www.TestsTestsTests.com
Formatting Paragraphs MS Word Tutorial
Free Online Microsoft Word Tutorials
MS Word 2010 – Formatting
* Paragraph Alignment
*
Line and Paragraph Spacing
*
Keep Together Function
*
Line and Page Break
Sometimes, you need to format individual paragraphs or the whole document. This includes changing the alignment between left, right, center or justified. You can also change the line spacing and control the page break.
Test your MS Word skills with the corresponding FREE Online Multiple Choice
Formatting Paragraphs Test
* Paragraph Alignment
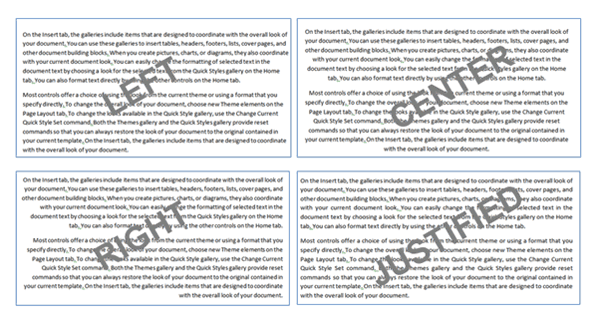
Paragraph alignment or justification is a paragraph setting which provides options to have paragraphs centered, justified to the left margin, justified to the right margin or lined up to both left and right margins. Oftentimes the alignment you choose for your text depends on the context of the document or personal preference.
Below is a diagram identifying the different paragraph alignment types. Take note of how the text aligns to the left or right margin of the page:

1. To apply alignment to your document, first select all the paragraphs you wish to apply this to.
2. In the Paragraph group, under the Home tab on the Ribbon, select the relevant alignment option by pressing the Left, Center, Right or Justify buttons (all circled in yellow in the screenshot below). You can identify the alignment buttons by hovering your mouse over each of them and studying the Quick Tip label or by looking at the alignment of the lines on the buttons themselves.

Experiment with the alignment options by selecting each in turn choosing the one which best fits in with the context and content of your document.
You can also use shortcut keys to set paragraph alignment. After selecting relevant text, press:
- Ctrl+l – to align text left;
- Ctrl+r – to align text right;
- Ctrl+e – to align text center; or
- Ctrl+j – to justify text.
* Line and Paragraph Spacing
Depending on the type of document you are creating in Word, line and paragraph spacing can do anything from add consistency and making your document appear more professional, to stretching that school essay out over the required number of pages.
Line spacing is the space that is automatically added between individual lines of text in a document. To set line spacing you do the following:
1. Position your cursor in the paragraph or select the paragraphs of text or even the whole document you wish to change the line spacing for.
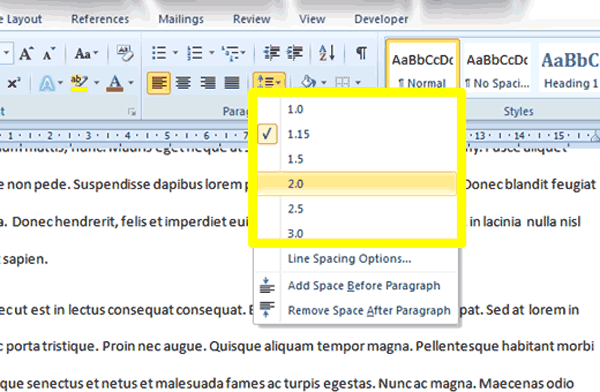
2. In the Paragraph group use the Line and Paragraph Spacing button to select one of the pre-set line spacing options (circled in yellow in the screenshot below):

3. When you hover your mouse over the various line spacing options, Live Preview will show you what that line spacing option will look like when applied to your document.
4. If none of the pre-set line spacing measurements suit your requirements, you can find further line spacing settings by selecting Line Spacing Options from the list. This will launch the Paragraph dialogue box. You can also launch the Paragraph dialogue box by clicking on the dialogue box launcher at the bottom right-hand corner of the Paragraph group.
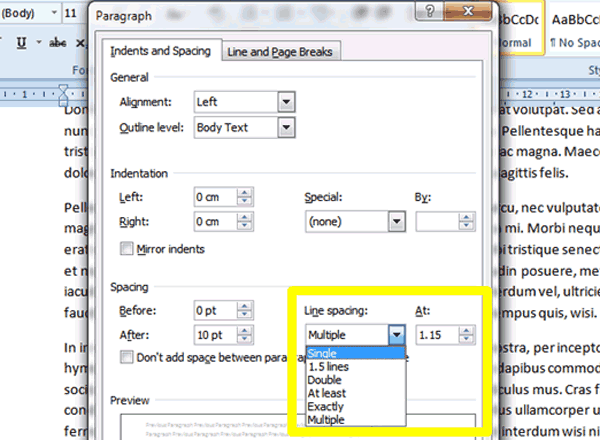
5. In the Paragraph dialogue box, in the Spacing Group, under Line Spacing, experiment with the available line spacing options and measurements (circled in yellow in the screenshot below) to see what they will look like when applied to your document:

The important options are:
- Single – sets lines of text together with no space between them.
- 1.5 lines – sets one and a half lines of blank space between lines of text.
- Double – sets two lines of blank space between lines of text.
You can also use shortcut keys to set line spacing:
- Ctrl+1 – single line spacing
- Ctrl+5 – 1.5 line spacing
- Ctrl+2 – double line spacing
Paragraph Spacing
Paragraph Spacing refers to the space that is automatically inserted between paragraphs in a document. Many people still insert spaces between paragraphs manually by inserting an extra paragraph break (enter) between paragraphs. The problem with doing this is that Word counts these breaks as paragraphs even though they contain no text. Inserting paragraph breaks manually can lead to formatting issues later on in a document or to inconsistent spacing when, for example, a paragraph breaks over two pages as more text is inserted into the document. Paragraph Spacing ensures that you have one less thing to think about when drafting your document. It will insert a paragraph space automatically when you press the enter key.
To set paragraph spacing size:
1. Select the text or entire document you wish to apply the setting to.
2. In the Paragraph group click on the Line and Paragraph Spacing button.
3. Use the Add Space Before Paragraph or Add Space After Paragraph options to quickly set standard paragraph spacing.
4. For more paragraph options, click on the Line Spacing Options button or launch the Paragraph dialogue box by clicking on the dialogue box launcher in the bottom right-hand corner of the Paragraph group.
5. In the Paragraph dialogue box, in the Spacing group, you can enter an exact value or select a value from the Before and After options. Before means that Word will automatically insert the space before the paragraph you have selected or at the top of every paragraph in the document if you selected the entire document. After means Word will automatically insert the space following the last line of the selected paragraph or after every paragraph in a document if you selected all.
In standard legal documents, for example, paragraph spacing is set to 6 before and 6 after to space paragraphs out equally throughout the document.
* Keep Together Function
This function performs exactly as advertised by keeping paragraphs or lines of text together and not allowing them to separate over pages. Imagine you have a heading that you don’t want to separate from subsequent lines of text or if you have specific lines of text that should always appear on the same page. Most people press enter until all the content moves to the next page, but this manual option could cause difficulties when text is added or deleted from the document.
To apply an automatic setting that will keep text together, you need to:
1. First select all the paragraphs or the headings and paragraphs you wish to apply this to.
2. Launch the Paragraph dialogue box by clicking on the dialogue box launcher at the bottom right-hand corner of the Paragraph group.
3. In the Paragraph dialogue box click on the Line and Page Breaks tab at the top of the dialogue box.
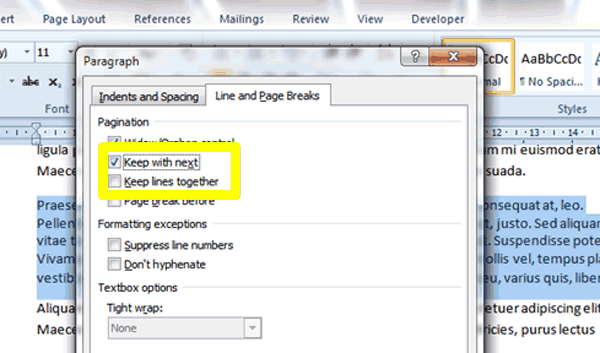
4. Tick the Keep With Next box to keep headings with subsequent paragraphs or the Keep Lines Together box to ensure selected lines of text do not separate over two pages.
Study the screenshot below to identify Keep With Next and Keep Lines Together (circled in yellow):

* Line and Page Breaks
The final frontier in paragraph spacing is to use manual line and page breaks to separate lines and sections.
You use a line break when you wish to insert a new line within the same paragraph without breaking up the paragraph or inserting a new paragraph.
1. To insert a line break, position your cursor before the text you wish to move to a new line.
2. Press Shift+Enter on your keyboard to insert the line break.
Page breaks allow you to insert a new page when required. People often press the Enter key on their keyboard repeatedly until they get to a new page, but this can cause numerous problems similar to those of using manual enters to separate paragraphs.
1. To insert a manual page break, ensure your cursor is positioned where you wish to insert the new page in your document.
2. Press Ctrl+Enter on your keyboard to insert the new page.
You can also apply an automatic setting whereby Word will always insert content on a new page regardless of changes made to the document.
1. To insert an automatic page break, select the text you wish to always be preceded by a page break.
2. Launch the Paragraph Dialogue box and click on the Line and Page Breaks tab.
3. Tick the box for Page Breaks Before.
Go ahead and experiment with inserting manual line and page breaks and setting automatic page breaks.
Test your MS Word skills with the corresponding FREE Online Multiple Choice
Formatting Paragraphs Test
TRY THE NEXT TUTORIAL: Microsoft Word Indents and Tabs Tutorial
TRY THE NEXT TEST: Microsoft Word Indents and Tabs Test


