
www.TestsTestsTests.com

Formatting Text in Word Tutorial
MS Word 2010 Tutorial
Microsoft Word Formatting
Free Online Microsoft Word Tutorials
* Change Font in Word
* Change Font
Color in Word
* Change Font
Size in Word
*
Change Case in Word – change Lowercase to Uppercase in Word
*
Font Effects in Word – Underline, Bold, Strikethrough &
Italics in Word
*
Superscript in Word – Superscript shortcut Word
*
Subscript in Word – Subscript shortcut Word
*
Word Copy Formatting
*
How to Clear Formatting in Word
How to change the way the text looks using a different font, font color, bold, italics, underline, strike through and spacing. Learn how to make your font superscript or subscript and change the case. Copy the formatting by using the Format Painter.
Test your MS Word skills with the corresponding FREE Online Multiple Choice
Formatting Text Test
* Change Font Type, Color And Size
Since the dawn of the age when man started using images and then text to document his experiences, man has also sought to make the characters (and later letters) decorative, beautiful and appropriate to the context of the message it is conveying. In everything from primitive cave paintings to medieval biblical texts, our forefathers demonstrated a desire to not only tell a story or pass on a message, but to make it look awesome. Thankfully in our age you no longer have to spend months painting the serifs on letters as it is all done automatically in a word processing program such as Microsoft Word. Knowing where to find options to make your documents look professional and/or decorative and understanding how to use them, is an extremely valuable skill to acquire.
At a basic level, you can change the font type (the typeface of the text in your document), the font color and size.
* Change Font in Word
Firstly, to experiment with changing the font type:
1. Select all the text you wish to apply the font to.
2. In the Font group on the Home tab, press the down pointing arrow on the right-hand side of the Font box (circled in yellow in the screenshot below) to expand the list of fonts available to choose from:
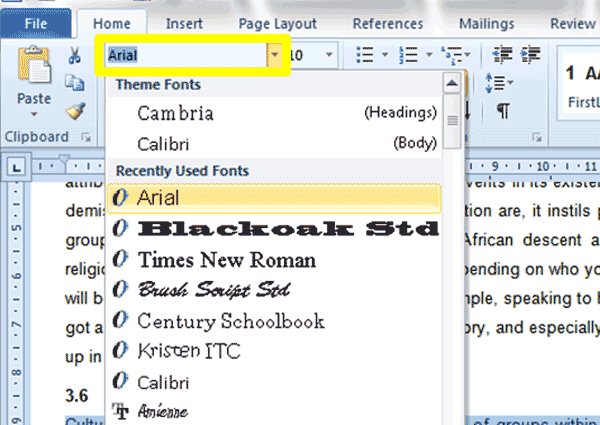
3. Scroll through the list of available fonts. When you hover your mouse over a font, Live Preview will show you what that font will look like when applied to your text.
4. When you find a font that you like, simply click on it to apply it to the text.
* Change Font Color in Word
To change the color of the font, you need to:
1. Select all the text you wish to apply a different color to.
2. In the Font group, click the dropdown arrow on the right-hand side of the Font Color box (circled in yellow in the screenshot below). You can identify the Font Color box by looking for an A with a colored line below it:
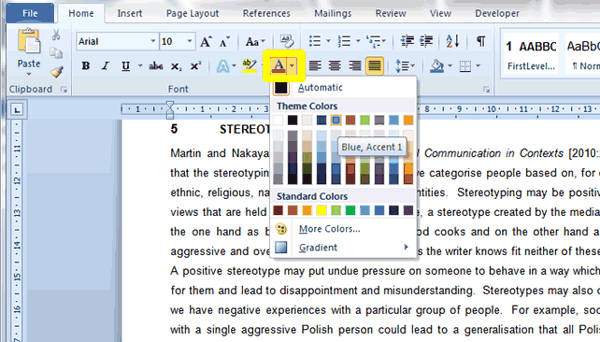
3. From the Font Color box select the color you wish to apply to your selected text.
4. For colors not available in the standard Font Color box, click on the More Colors option which you will find below the colors in the box.
* Change Font Size in Word
To change the size of text:
1. First select the text you wish to change the size of.
2. If you want to make the font bigger, you can either select an exact value from the Font Size box or use the Grow Font button (both circled in yellow in the screenshot below):
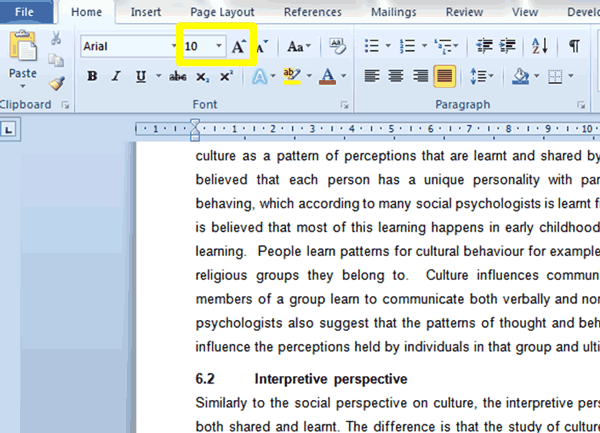
3. You will note the font size in the above screenshot is 10 pts. The pts means points and is a measurement of letter size. The larger the point value, the larger the font. Click on the dropdown arrow next to this value and select a higher value from the list to increase font size. Alternatively, you can also type a value into this box if you know the exact size the font must be.
4. You can also use the Grow Font button which is located next to the Font Size box and can be identified as a large uppercase letter A with an upwards pointing arrow in its top right-hand corner.
5. Each time you push the Grow Font button, your font size will grow by 2 pts.
To decrease the font size:
1. Select the text you wish to decrease in size.
2. You can use the Font Size box to select a smaller point value for the font size or type an exact value into the box.
3. You can also use the Shrink Font button which is located to the right of the Grow Font button. It can be identified as a smaller capital letter A with a downwards pointing arrow in its top right-hand corner.
4. Each time you push the Shrink Font button, your font size will decrease by 2 pts.
* Change Case in Word
* Change Lowercase to Uppercase in Word
*
Change Uppercase to Lowercase in Word
Imagine you are reviewing a document where there are multiple words that should have had an initial capital letter, or worst case scenario, someone typed sections of a document all in capital letters. Going through a document manually changing words to upper or lowercase would not be a problem if there are only one or two instances, but for multiple case changes, you may wish to use the ‘automatic’ Change Case function built into Word.
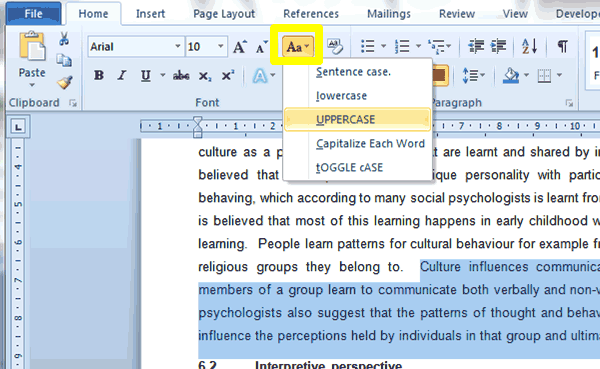
There are five options:
- Sentence Case: The first word in every sentence is capitalized.
- Lowercase: all the letters appear in lowercase letters.
- Uppercase: ALL LETTERS APPEAR IN CAPITAL LETTERS.
- Capitalize Each Word: Every Word In Every Sentence Will Start With A Capital Letter.
- Toggle Case: iS tHE oPPOSITE oF cAPITALIZE eACH wORD.
To change the case of text to any of the above options, you must:
1. Select all the text you wish to apply the case change to.
2. In the Font group, click on the Change Case button (circled in yellow in the screenshot below) and select the relevant option (see above for description of each option).
A shortcut for changing case is to hold down Shift whilst pressing the F3 key (Shift+F3) after selecting the relevant text. Press F3 repeatedly to cycle through available options.
* Font Effects in Word – Underline, Bold, Strikethrough & Italics in Word
If you have been working through this tutorial practically applying font types, color and size to text, you should be able to create a pretty good looking document by this point. We now move to the next level which consists of adding elements to text that will emphasize and/or make your work seem that more professional and aesthetically pleasing.
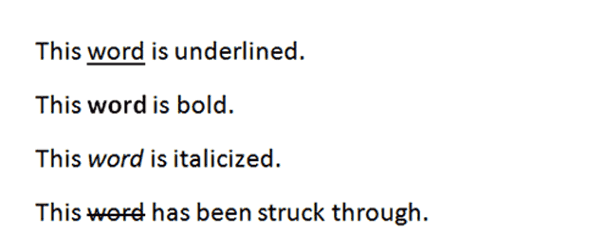
Font Effects is the collective name for various extra elements that can be applied to text. Font effects include bold, italics, underline and strikethrough.
Here are some examples of these effects to give you an idea as to what they look like:
1. To apply font effects to your text, firstly select the text you wish to apply the formatting to.
2. In the Font group under the Home tab on the Ribbon, click the button for the relevant Font Effect you wish to apply. These buttons have been circled in yellow in the screenshot below and are (from left to right): bold, italic, underline and strikethrough. You can apply one effect only or multiple effects at the same time.
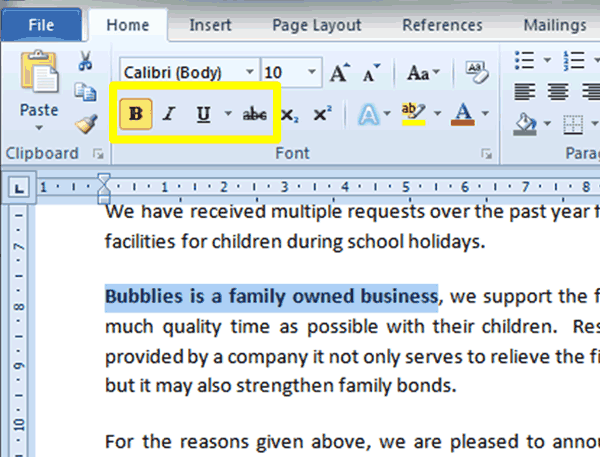
4. When you select text to which certain effects have been applied, those effect buttons will show as highlighted in orange on the Ribbon. For example, in the screenshot above the selected text has the Bold effect applied to it and the Bold button (the B) is highlighted.
3. To remove bold, italic, underline and strikethrough effects applied to text, simply select the text and click the button for the effect that has been applied to toggle it off
Shortcuts for Bold, Italic and Underline are:
- Ctrl+b (Bold)
- Ctrl+i (italic)
- Ctrl+u (underline)
You can use the same shortcut to both add and remove an effect to selected text.
* Superscript in Word – Subscript in Word
Superscript and subscript are not used as often these days as they used to be and most Word programs are set to create these by default for ordinals in dates, for example 1st January 2015, or for fractions, for example 1/2. It is still, however, good to know where to find and how to apply superscript and subscript formatting – they will come in handy if you are doing a chemistry assignment!
1. Select the character(s) you wish to change to superscript or subscript.
2. In the Font group under the Home tab on the Ribbon, click on the superscript or subscript button. You may identify these as either the button marked with an x and a number 2 in its top or bottom right hand corner (circled in yellow in the screenshot below):

* Superscript shortcut Word
Windows Superscript shortcut:
Word for Office 365, Word 2019, Word 2016, Word 2013, Word 2010, Word 2007, Word Online Word Starter 2010
1. Highlight the text you want to format.
2. Press Ctrl, Shift, and the Plus sign (+) all at the same time.
Word for Office 365 for Mac, Word 2011 for Mac, Word 2016 for Mac, Word 2019 for Mac
1. Highlight the text you want to format.
2. Press Command, Shift, and the Plus sign (+) all at the same time.
* Subscript shortcut Word
Windows Subscript shortcut:
Word for Office 365, Word 2019, Word 2016, Word 2013, Word 2010, Word 2007, Word Online Word Starter 2010
1. Highlight the text you want to format.
2. Press Ctrl and the Equals sign (=) at the same time.
Word for Office 365 for Mac, Word 2011 for Mac, Word 2016 for Mac, Word 2019 for Mac
1. Highlight the text you want to format.
2. Press Command and the Equals sign (=) at the same time.
To undo all of the above highlight the text and use the same shortcut.
* Word Copy Formatting
The copy formatting function is a wonderful secret weapon in the world of document design and production. It allows you to quickly reproduce formatting painstakingly created and applied in one place in a document, to another and even across different documents. Using the Format Painter to apply copied formatting to single or multiple words, sentences and paragraphs may well become one of your guilty pleasures after completing this lesson!
1. To copy formatting, select the text that contains the formatting you wish to reproduce over other text.
2. In the Clipboard group under the Home tab on the Ribbon, click the Format Painter (circled in yellow in the screenshot below) once if you wish to reproduce the formatting once only, or twice, if you wish to reproduce the formatting an indefinite number of times.
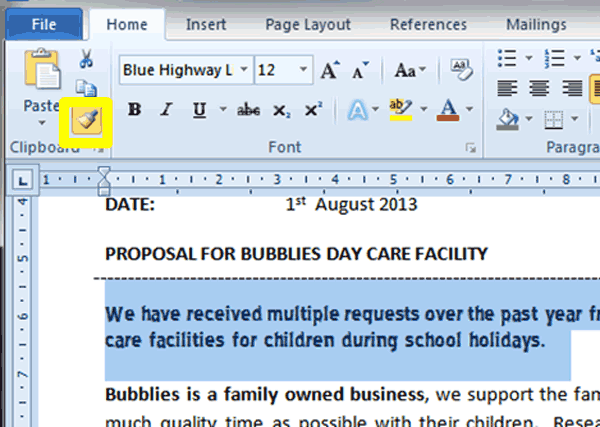
3. You have correctly activated the Format Painter if your cursor has changed to a paintbrush when you hover it over text in your document.
4. To apply the copied formatting, use the paintbrush to “paint” the sections of your document you wish to replicate the formatting over.
5. To switch the format painter off, press the Escape key on your keyboard or press the Format Painter button again.
A really handy shortcut to copy and paste formatting is:
- Ctrl+Shift+c – to copy formatting
- Ctrl+Shift+v – to paste formatting
The benefit of using the shortcut combinations above to copy and paste formatting as opposed to using the format painter, is that you can continue working in your document and just paste the formatting whenever necessary.
* How to Clear Formatting in Word
To quickly remove all formatting from a document and return the font type, size, color, etc to the default normal for the document, you can use the Clear Formatting function.
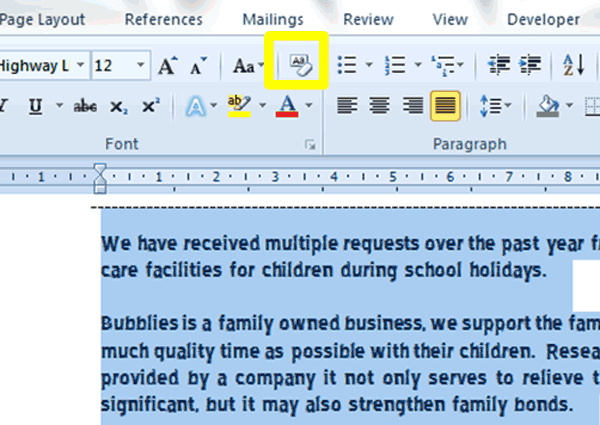
1. Select the text from which you wish to clear the formatting.
2. Press the Clear Formatting button (circled in yellow in the screenshot below) to immediately remove all formatting and return text to ‘Normal’.
A shortcut for removing formatting from text and returning it to the ‘normal’ default text is: Ctrl+Shift+n.
Test your MS Word skills with the corresponding FREE Online Multiple Choice
Formatting Text Test
TRY THE NEXT TUTORIAL:
Formatting Paragraphs in MS Word Tutorial
TRY THE NEXT TEST: Formatting Paragraphs in MS Word Test