
www.TestsTestsTests.com

Copying and Pasting in Excel Tutorial
Free Online Microsoft Excel Tutorial
Excel 2010 – Entering Data
* Copying and Pasting in Excel
* How to Copy and Paste Multiple Cells in Excel
*
Using the Fill Handle to Copy
*
Drag and Drop in Excel
*
Undo and Redo
* Undo Shortcut in Excel – Redo Shortcut in Excel
* How to Copy and Paste Multiple Cells in Excel
* Using the Fill Handle to Copy
* Drag and Drop in Excel
* Undo and Redo
* Undo Shortcut in Excel – Redo Shortcut in Excel
In Excel you will frequently copy and paste text and numbers using keyboard shortcuts, the right mouse button, the fill handle and the drag and drop functions. Using the copying and pasting functions in Excel will not only save you time from having to re-enter data repeatedly, it may also ensure more accurate data entry and less frustration.
Test your Excel skills with the corresponding FREE Online Multiple Choice
Excel Copying and Pasting Test
* Copying and Pasting in Excel
Copying and pasting in Excel is no different from copying and pasting in most other software programmes. There are four actions involved in copying and pasting. You have to select the content you wish to copy, you perform the copy action, you move to the location you wish to insert the copied content and perform the paste action.1. Open a spreadsheet that either contains information or a blank spreadsheet on which you have entered some information.
2. Select a cell that contains data. Then go to the Home tab on the ribbon and press the copy button located in the Clipboard group (circled in blue in the image below).

3. Note that the appearance of the copied cell (A2 in the image below) will change to include a dashed border around it:

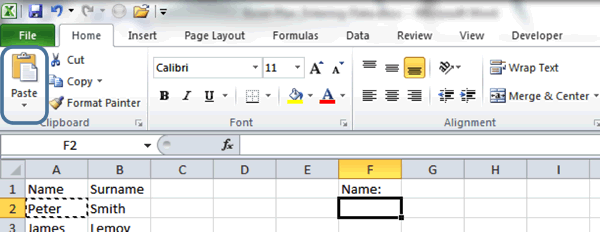
4. Now move your cursor and click once in the cell where you wish to paste the content. Then click the Paste button located to the left of the copy button on the Home tab in the Clipboard group (circled in blue in the image below) to paste the copied cell’s contents:
5. After you have pasted the contents once or as many times as needed, press the Escape button on your keyboard to deselect the copied cell(s).
6. You may have noticed that shortly after you pushed the Paste button that a small image appeared at the bottom right hand corner of the content you pasted. It is an icon of a clipboard, a piece of paper, the letters CTRL and a little down pointing arrow (circled in blue in the image below):

7. If you click the down pointing arrow, this opens a whole smorgasbord of pasting options(circled in blue above). These options allow you to paste text using the formatting of the copied cell or of the pasted section. It gives you the option to paste links to your cells so that pasted cells will automatically update if the linked cell is changed. It also offers many other useful pasting options. If you are the adventurous-type, you may want to experiment with some of these options and see what happens! .
Should you have unexpected or disastrous results – do scroll down to our lesson on the UNDO and REDO functions!
* How to Copy and Paste Multiple Cells in Excel
You can copy and paste multiple cells by selecting all the cells you wish to copy and pressing the Copy button. To paste, select the cell that is positioned in the top left corner of the area where you wish to paste and press the Paste button. Excel will automatically spread your data across the same number of cells that you originally copied.TIP: They say there are no shortcuts in life, but that wisdom must have been penned before the advent of Microsoft Office! There are plenty of shortcuts!
To copy, select the cell you wish to copy. Then hold down the control button on your keyboard and push the letter C. Let go of the letter C and let go of the control button. Then move your cursor to where you wish to paste the content. To paste, hold down the control button and press the letter V on your keyboard. Now go ahead and practice it!
* Using the Fill Handle to Copy
The fill handle allows you to quickly copy the contents of a cell to the cell(s) below, above or to the left or right of it. All you need is some empty cells to fill and the hand and eye coordination of a shopaholic swiping their credit card through a sale at their favourite store.1. The first step is to enter some data in a cell. Create a spreadsheet that looks similar to the one pictured below:

2. In this example, we want to quickly copy the word “Item:” to be inserted next to each of the fruits listed in column B. Select the cell containing the word “Item:” (A1 in the example above). The selected cell will have a dark black border around it showing that it is selected.
3. If you look carefully at the box, you will note the border is “broken” at the bottom right-hand corner. Hover your mouse cursor over this corner (circled in blue in the image below) until it changes to a crosshair:

4. Holding your left mouse button down, drag the crosshair down through the two cells below it (A2 and A3 in the image above). This is a quick way to copy information without having to use the copy and paste function and works for all adjacent cells.
Experiment with using the fill handle to copy the contents of a cell to the cells above, below, left or right of it.
* Drag and Drop
This function may bring to mind an eagle picking up an unfortunate turtle from where it was grazing and then dropping it in an area with no grazing, sharp rocks and a sudden end. Excel is not quite so brutal and the content that we drag from one area to another lives on happily ever after.1. To drag content, first select the cell or cells you wish to move to a different location.
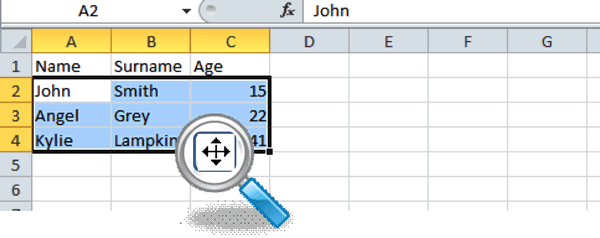
2. Hover your cursor over the border of the selected cells until your cursor changes to a four headed arrow (magnified and circled in blue in image below):
3. Hold down your left mouse button and drag the cell(s) to their new position.
This is a really useful function if you quickly need to move data around on your spreadsheet.
TIP: You can also use cut and paste to achieve the same results. You use cut and paste in exactly the same way as you would copy and paste the only difference is when you cut instead of copy, you will remove the original content of a cell instead of simply copying it. You will find the Cut button on the Home tab, in the Clipboard group. Follow the same procedure as you did for copy and paste in the COPYING AND PASTING tutorial.
The shortcut for cutting and pasting is: control + X to cut and control = V to paste.
* Undo and Redo
Undo performs exactly as advertised and will undo your last actions (up to a set number). Redo does the opposite of undo. So if you undo something and then want to undo, um, your undo, you would use redo. Undo and redo may just be your best friends in any MS Office application. Let’s see why… Imagine the scene: You have spent the last hour carefully putting together your budget. You painstakingly insert all the numbers and then realise, the last three amounts you added was last month’s budget. Now you could go through the whole spreadsheet trying to locate the last three numbers or you could simply use undo.
1. Open a spreadsheet and recreate the contents as pictured in the image below:

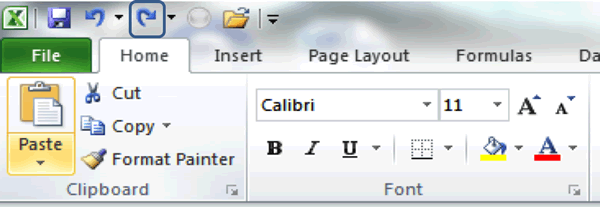
2. Now press the undo button on the top left-hand corner of the screen – located on the Quick Access toolbar (circled in blue in the image below):

3. Experiment with pressing the Undo button a few times and observe how the last actions on your spreadsheet are removed.
4. Now imagine you pressed Undo once too many times and you want to redo your last undo(s)? You use the Redo button, which is located next to the Undo button (circled in blue in the image below) to achieve this.
5. Experiment with pressing the Redo button a number of times and observe what happens to the data on your spreadsheet.
* Undo Shortcut in Excel – Redo Shortcut in Excel
The shortcut key combinations for Undo and Redo is:Control + Z to undo and
Control + Y to redo.
Woohoo! Now that you have done the tutorial:
Test your Excel skills with the corresponding FREE Online Multiple Choice
Excel Copying and Pasting Test
TRY THE NEXT TUTORIAL: Using Autofill in Excel Tutorial
TRY THE NEXT TEST: Using Autofill in Excel Test