www.TestsTestsTests.com
Numbering Different Parts of a Document
Intermediate Tutorial
MS Word 2010 – Formatting
Free Online Microsoft Word Tutorials
* Using Section Breaks
*
Working with Link to Previous
*
Numbering Different Sections
The functionality to number sets of pages differently is essential for many types of documents. You may need to number the main part of a document using numerals (1, 2, 3 etc) and appendices using Roman numerals (i, ii, iii, etc). These numbers need to be correctly inserted and formatted to reflect accurately in the document’s automatically generated table of contents. A good understanding of how to use Section Breaks and Page Numbering settings is essential.
* Using Section Breaks
Section Breaks are often used for all the wrong reasons. They structurally change the architecture of a document and therefore using them incorrectly can have disastrous consequences. The correct use of Section Breaks is to consider using them whenever there is a need to apply radically different formatting to different parts of the same document. A careful analysis of a document may reveal that pages 1-10 require Roman numerals for page numbering, pages 11 – 20 require no page numbering and the pages containing the appendices should be numbered using letters of the alphabet. Using Section Breaks, you would divide the document in the aforementioned example into three sections.
To divide a document into sections:
1. It is useful to switch the Show/Hide function to ‘on’ as this will show you where your Section Breaks are positioned. You switch Show/Hide on by clicking on the Show/Hide button in the Paragraph group under the Home tab or by using the shortcut combination: Ctrl+Shift+*
2. Position your cursor where you wish to end the first section of the document and start the second section.
3. Under the Page Layout tab on the Ribbon, in the Page Set-up group, click on the Breaks button and select ‘Next Page’ under Section Breaks (circled in yellow in the screenshot below). A Next Page Section Break inserts a new page.
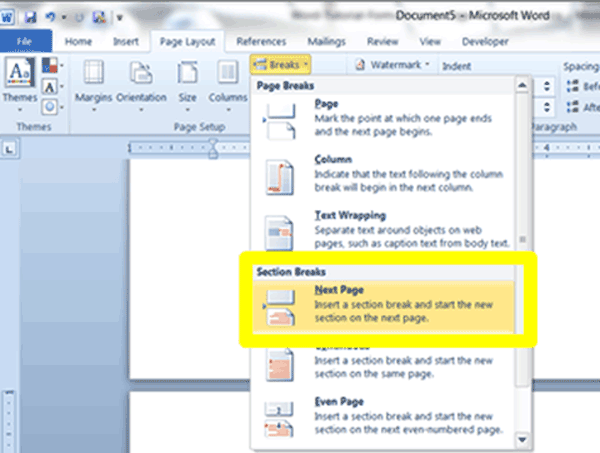
4. After inserting the Next Page Section Break, ensure you remove any Page Breaks in your documents that interfere with the Section Breaks (if applicable). To delete a Page Break, position your cursor ahead of the page break and press Delete on your keyboard. You can also select the Page Break and press Delete.
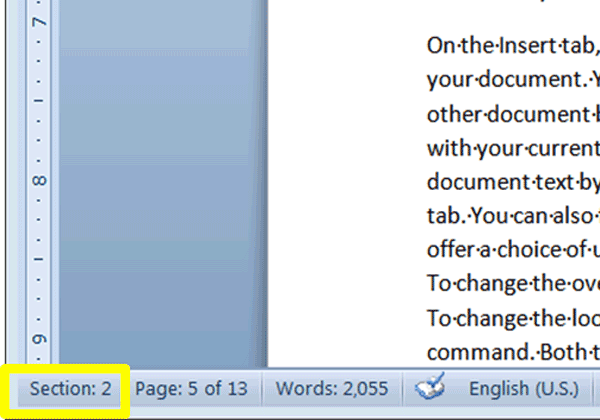
To test your Section Break(s), position your cursor on the pages before you inserted the section break and examine the Status Bar. It should read: ‘Section 1’. Now move your cursor to a page after the page where you inserted the Section Break. The Status Bar (see area circled in yellow in the screenshot below) should state ‘Section 2’.
5. Continue inserting Section Breaks to divide the document into as many sections as needed. Do not insert extra Section Breaks. Position your cursor on the last page of the document to check how many sections there are and remove any unnecessary section breaks.
Tip: To navigate between section breaks in a document, press Ctrl+g on your keyboard to launch the Go To dialogue box. Select ‘Section’ in the ‘Go to What’ list and use the Previous and Next buttons at the bottom of the screen to navigate between sections. You can also insert an exact section number to navigate directly to a specific Section Break.
Use two Section Breaks to create a separate section for any pages you wish to insert that are in Landscape orientation. For example, you may wish to insert a map into a document that is not in Portrait orientation. The section breaks will allow you to insert a page that is formatted differently.
* Working with Link to Previous
The rather obscurely named ‘Link to Previous’ function makes it possible to insert different footers (or headers) in a document. Headers and/or Footers may contain document names, chapter names or page numbers that need to be alternated or formatted differently. For example, you may wish to number the first section of a document using letters of the alphabet and have no numbering in the latter part of the document.
The Link to Previous function is married to Section Breaks and it is important not to separate them when you wish to use more than one type of page numbering in a document.
To test how Link to Previous functions, follow these steps:
1. Open a new blank document.
2. Insert a couple of pages and divide the document into at least three sections by using the Next Page Section Break and normal Page Break (Ctrl+Enter) functions. (For information on how to work with Section Breaks, see the Using Section Breaks tutorialabove).
3. Position your cursor in the Footer (or Header) of one of the pages in Section 2 of your document by double clicking the Footer (or Header) area. An alternative method for entering the Footer (or Header) area is to click on the Insert tab on the Ribbon and select ‘Edit Footer’ or ‘Edit Header’ (whichever is relevant) located in the Header & Footer group under the Footer (or Header) button.
4. To verify you are in the correct section, look out for the Footer-Section 2 label (circled in yellow in the screenshot of a blank document below) and/or Header-Section 2 label. You will note in the right-hand corner of the Footer (or Header) area there is a label for ‘Same as Previous’ (also circled in yellow in the screenshot of below):
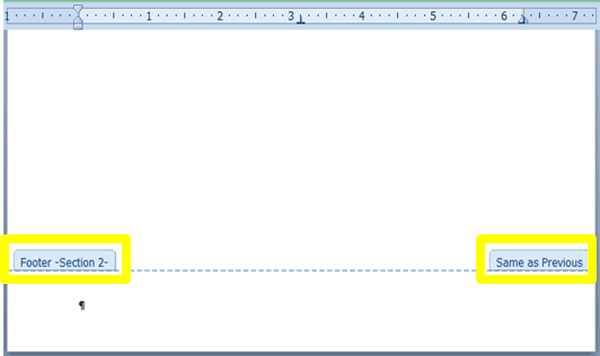
5. ‘Same as Previous’ means the Footer (or Header) of the selected section is linked to the previous section’s Header and Footer. This means if you insert content for the Header or Footer of Section 1, Section 2 will automatically have the same Header or Footer content. To insert a Header or Footer that is different from the Header or Footer in Section 1, you need to unlink the Header or Footer in Section 2 from the one(s) in Section 1. You are basically telling MS Word that you wish to divorce Section 2 from what is happening in Section 1.
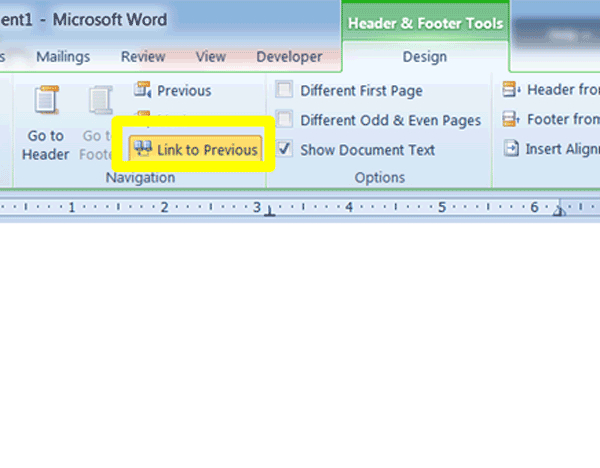
De-select the Link to Previous button (circled in yellow in the screenshot below) located in the Navigation group under the Header & Footer Tools contextual tab. It is possible to tell whether a Footer (or Header) is linked to a previous section by noting whether the Link to Previous button is highlighted in yellow (active) or not. The ‘Same as Previous’ label will disappear from the right-hand corner of the Footer (or Header) when it is no longer linked.
6. Experiment by adding content to the Header or Footer areas of Section 1, 2 and 3 of your document with the Link to Previous button deactivated for sections 2 and 3.
It is worth practicing adding different sections, unlinking them and adding different Footers (or Headers) to the relevant areas and becoming comfortable with how this function works.
* Numbering Different Sections
Armed with the skills to insert Section Breaks together with using Link to Previous, you are about 99.9% of the way to be able to number different sections of your document using different numbering formats or types. Scenarios which require the numbering of appendices, addendums or schedules contained in the same document using a different numbering convention, are common.Using a combination of Section Breaks, Link to Previous and the Page Number Format dialogue box, numbering different sections in a document can become second nature to you.
To practice numbering different sections of a document differently:
1. Open a blank document, insert a couple of pages (6 or more) and divide the document into two or more sections.
2. Move your selection to the first section you wish to number differently (whether this is on page 5 or 25 of your document) and deactivate the Link to Previous function so that the section will no longer be the ‘Same as Previous’.
3. Go back to the first section of your document and position your cursor in the Footer region. In the Header & Footer Group click on the Page Number button and select a page number type from the Current Position list. This will insert a standard page number for all the pages in Section 1 of your document.
4. Next move your cursor to the Footer in Section 2 of your document and insert a page number using the same method as described above.
5. After inserting a number into Section 2, click on the Page Number button in the Header & Footer group again and select Format Page Numbers. This will launch the Page Number Format dialogue box. Use the Number format box (circled in yellow in the screenshot below) to select a numbering type for your second section pages.
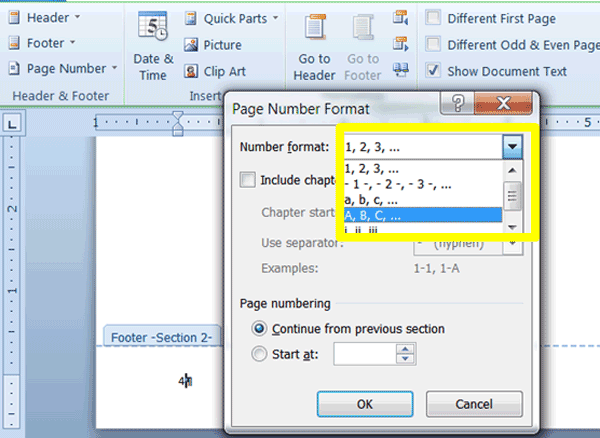
6. In the Page Numbering section at the bottom of the Page Number Format dialogue box, tick the radio button next to the ‘Start At’ label and set the value you wish your numbering to start at. If you do not set a value for the start value, Word will continue the numbering from the previous section despite the numbering formats being different.
You should now have two different page numbering types in your document. You can continue adding further numbering types to further sections of the document. The above instructions refer to the Footer of the document, but you can insert these into the Header of the document using the same instructions.
If at any point you wish to change numbering to be the same throughout the document, remove the Section Breaks or activate the Link to Previous function for each section of the document.
QUICK TIP: to quickly insert a page number in the Header, Footer or body of a document, follow these steps:
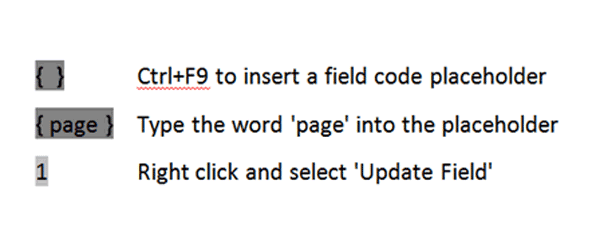
After inserting a page number using the above method, you can continue to format or change the page numbering as usual.
Test your MS Word skills with the corresponding FREE Online Multiple Choice
Numbering Different Parts of a Document – Intermediate Test
TRY THE NEXT TUTORIAL: Creating & Applying Styles in MS Word Tutorial
TRY THE NEXT TEST: Creating & Applying Styles in MS Word Test


