
www.TestsTestsTests.com

Spelling & Grammar Check MS Word Tutorial
Free Online Microsoft Word Tutorials
MS Word 2010 – Formatting
* Set Language
*
Running a Spell Check
*
Running a Grammar Check
Word can check both your spelling and grammar. Caution: You still need to proofread your document!
Test your MS Word skills with the corresponding FREE Online Multiple Choice
Spelling and Grammar Check Test
* Set Language
You are forgiven for thinking the language option in Microsoft Word only applies to people who speak more than one language and need to type in a language other than English. Within English itself there are multiple dialects and Wikipedia lists more than 45 dialects across as many countries. Each of these dialects has different spelling conventions, for example: centre (UK spelling) versus center (US spelling).
With the world truly becoming a global village increasing the likelihood of us needing to interact with people all around the world, it is important to know how to adjust the Microsoft Word language setting to accommodate different dialects of English and even other languages when needed.
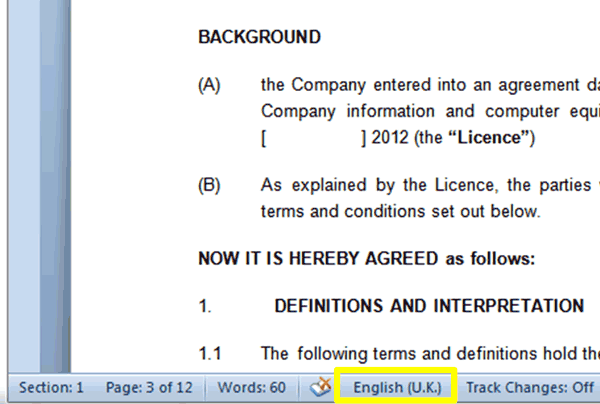
To check which language a document is set to:
1. Select the whole document by pressing Ctrl+a on your keyboard.
2. On the Status bar at the bottom of your Word screen, click on the Language button (circled in yellow in the screenshot below). You will note that this document is set to English (UK).
To change the language setting of a document:
1. First select the whole document by pressing Ctrl+a on your keyboard.
2. Click on the Language button on the Status Bar (circled in yellow in the screenshot above).
3. This will launch the Language dialogue box pictured below:
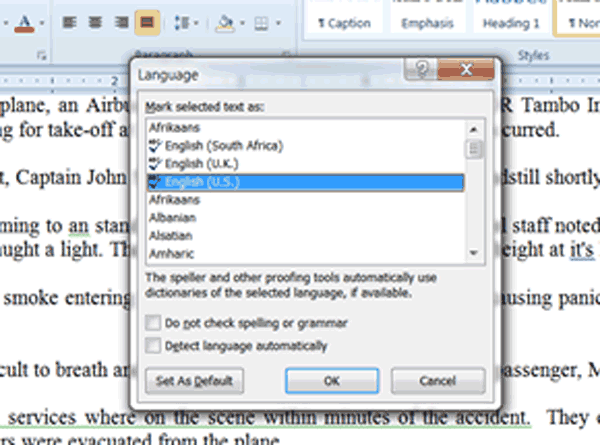
4. Scroll through the list of languages in the Language dialogue box and select the language or dialect that you require by clicking on it once in the list. Press the OK button to effect the change.
5. The languages and dialects you use most often will appear at the top of the list. The list is sorted alphabetically and you can find all dialects of English (for example) by finding English in the list of languages and then looking out for the dialect in brackets (for example US for United States English).
6. Use the ‘Set as Default’ button in the bottom left-hand corner of the dialogue box to set your selected language as the default language used in your document.
NOTE OF CAUTION: do not tick the box labelled ‘Do not check spelling or grammar’ unless you are absolutely sure you do not wish spelling and language errors to show up. The ‘Detect language automatically’ box can also result in unexpected errors in your document as Word will change the language of your document to what it ‘thinks’ the language should be. These boxes are a good starting point when your document is not checking spelling and language correctly. Select the whole document (Ctrl+a), launch the language dialogue box and ensure these boxes are not ticked.
* Running a Spellcheck
The spellcheck function may make you wonder about all the years you spent preparing for spelling bees and learning to refine your spelling abilities. You can use the spell checker in Word while typing, to correct misspelt words, or after completing a document and before proofreading it.
To check spelling while you type:
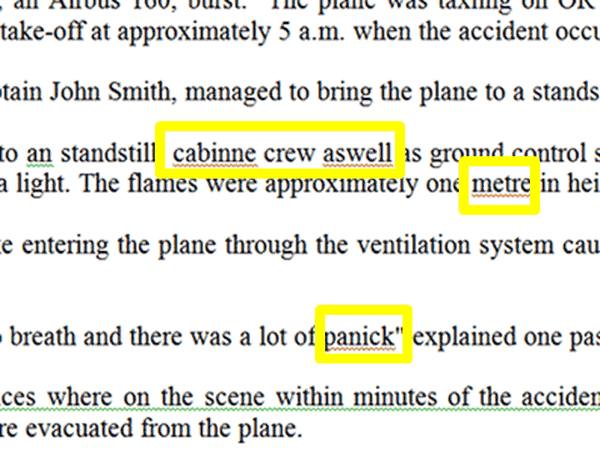
1. When you type a word and spell it incorrectly, Word will insert a wavy redline underneath the misspelt word. Examples are circled in yellow in the screenshot below:
2. Right-click on the misspelt word and review the spelling options provided by Word (circled in yellow in the screenshot below). Depending on the misspelt word, you will have different spelling suggestions offered to you:
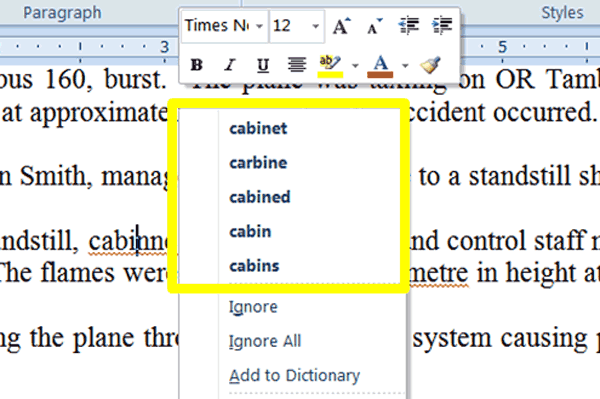
3. Pick the correctly spelt word from the list to replace the misspelt word by clicking on the correctly spelt word in the list. The misspelt word in your document will automatically be replaced by the word you select.
If a word is spelt correctly but MS Word picks it up as a spelling error, you can tell Word to ignore it (i.e. to stop marking it as an error) or to ignore all instances of the word throughout your document. You can also add the word to your dictionary. The latter option will ensure Word picks up any misspelling on the new word when you use it in future.
To ignore a word that is picked up as a spelling error:
1. Right-click the word and select Ignore from the list.
2. The red wavy line underneath the word will disappear to indicate it is being ignored as a spelling error.
To ignore all instances of a word:
1. Right-click the word and select Ignore All from the list.
2. The red wavy line underneath the word will disappear to indicate it is being ignored as a spelling error. Future uses of the same word in the document will not be picked up as an error.
To add a word to the dictionary:
1. Right-click the word and select Add to Dictionary from the list.
2. The red wavy line underneath the word will disappear to indicate it is no longer viewed as a spelling error. When you type the word again in future it will not be picked up as a typing error and if you misspell the word, you will have the correct spelling as a correction suggestion.
To run a spellcheck on a completed document:
1. Click on the Review tab on the Ribbon (no need to select the document first).
2. Click on the Spelling & Grammar button located in the Proofing group. This will launch the Spelling & Grammar dialogue box (pictured in the screenshot below):
3. Errors will show up as red words in the Not in Dictionary box.
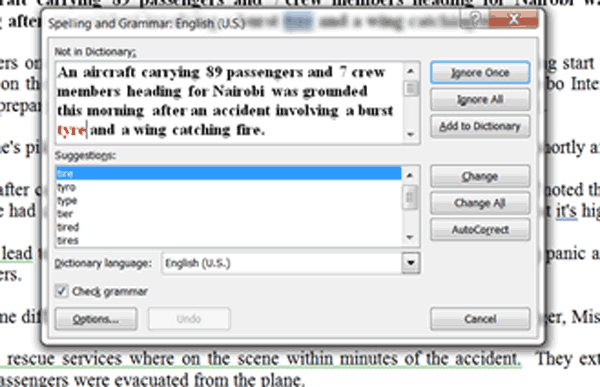
4. Use the Ignore Once and Ignore All buttons to skip a word which you do not wish to correct to move on to the next error.
5. Use the Add to Dictionary button to add a word to your Word dictionary to ensure it is not picked up as an error in future.
6. To correct a misspelt word, select the correctly spelt version of the word in the Suggestions box and then click on the Change button. Use the Change All button to correct the spelling of a word throughout the document.
To end a spell check, close the dialogue box by clicking the Cancel button or continue checking through the document until Word prompts you that spellcheck has completed.
Quick Tip: a shortcut for launching the Spelling (and Language) dialogue box is to press F7 on your keyboard.
* Running a Grammar Check
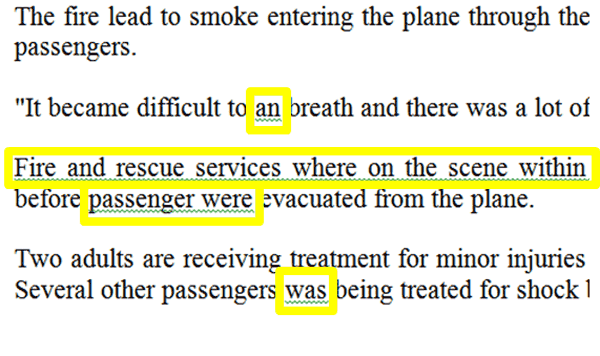
Grammar Check works parallel to the spell checker. Grammar errors are underlined with a green wavy line and words that are used incorrectly are underlined with a blue wavy line. You can correct grammar errors as you type or correct them after completing a document and before proofreading the document.
To correct grammar errors as you type:
1. When you make a possible grammar error, Word will insert a wavy green or blue line underneath the error. Examples are circled in yellow in the screenshot below:
2. Right-click on the word or phrase that is marked as having a grammar error and review the suggestions provided by Word (circled in yellow in the screenshot below):
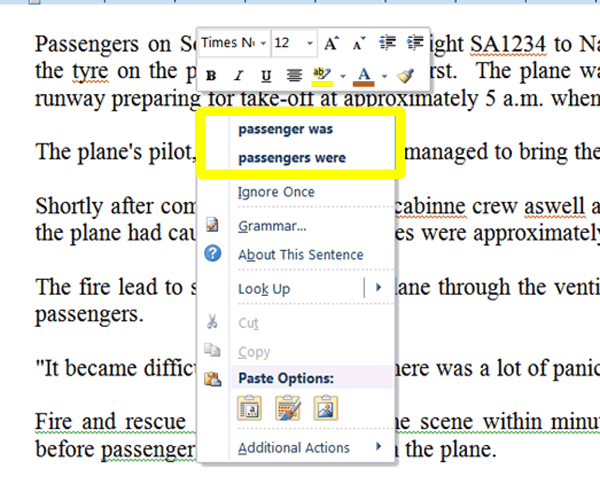
3. Correct the grammar error by clicking on the correct option in the list. The word, phrase or sentence in your document will automatically be replaced with the option you select from the list.
If Word picks up a word, phrase or sentence as containing grammar errors which is not really an error, you can tell Word to ignore it (i.e. to stop marking it as an error) or to ignore a rule (to ignore similar faux grammatical errors throughout the rest of the document).
To ignore a grammatical error:
1. Right-click the word and select Ignore from the list.
2. The green or blue wavy line underneath the word, phrase or sentence will disappear to indicate it is being ignored as an error.
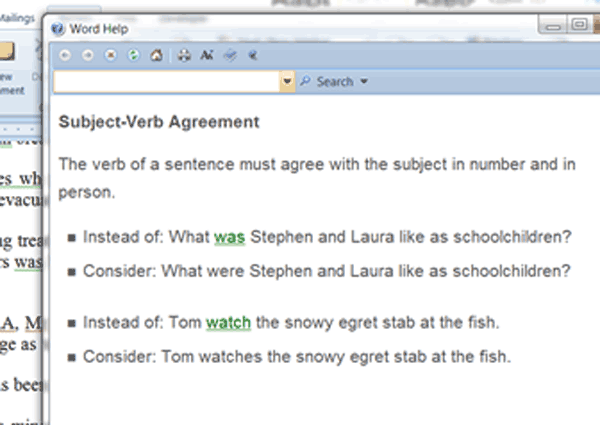
To get more information on a grammatical error:
1. Right click the word, phrase or sentence that is marked as a grammar error with a green or blue wavy line underneath.
2. Pick ‘About this Sentence’ from the list. This will launch a dialogue box that explains the error and provides you with examples and suggestions of how to fix your sentence:
To run a language check on a completed document:
1. Right-click on a grammar error in your document.
2. Select Grammar from the list to launch the Grammar dialogue box.
OR
1. Click on the Review tab on the Ribbon (no need to select the whole document first).
2. Click on the Spelling & Grammar button located in the Proofing group. This will launch the Spelling & Grammar dialogue box (pictured in the screenshot below). You can review the grammar error by looking in the top part of the dialogue box where the error will be in green font.
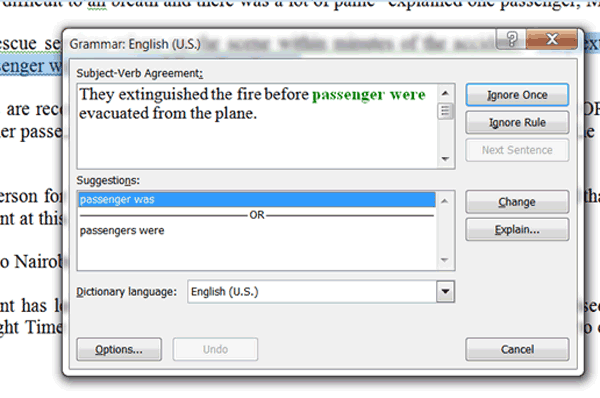
3. Use the Ignore Once and Ignore Rule buttons to skip a word, phrase or sentence which you do not wish to correct and to move on to the next error.
4. To correct a grammar error, select the correct option from the Suggestions box by clicking on it and then click on the Change button.
5. To get an explanation about the error and examples and suggestions of how to fix your sentence, click on the Explain button.
To end a grammar check, close the dialogue box by clicking the Cancel button or continue checking through the document until Word prompts you that the Spelling and Grammar check has been completed.
Remember, spelling and grammar checkers are useful tools, but do not replace proofreading a document. It is important to still review the content of your document as there are many proofing errors that Word is not equipped to pick up.
PROOFING TIP: if you want to impress readers of your document with your vocabulary or if you just simply do not wish to use the same word multiple times, use the Synonyms option to find alternatives for words. Simply right click the word you wish to find a different version for and click on Synonyms. You can then select a replacement word from the available options listed.
TRY THE NEXT TUTORIAL: Word Page Numbering Basics Tutorial
TRY THE NEXT TEST: Word Page Numbering Basics Test