www.TestsTestsTests.com
Indents and Tabs MS Word Tutorial
Free Online Microsoft Word Tutorials
MS Word 2010 – Formatting
* Working With Indents
*
Special Indents
*
Setting, Editing and Deleting Tabs
Use the ruler or paragraph dialog box to create, edit or delete indents, block quotes, hanging indents and tab stops to easily format your document.
Test your MS Word skills with the corresponding FREE Online Multiple Choice
Indents and Tabs Test
* Working With Indents
Employers, college professors and other professionals often judge the quality of a document’s style by how its author set about creating indents and tabs (which are discussed later in this tutorial). Unprofessional and amateur formatting, where indents are either not used correctly or substituted with other formatting, may cost you a job or could be the difference between achieving an A for a college paper or a B.
Indents, in the context of MS Word, constitute the distance between a paragraph and the left and/or right margin of the document. Word users are often unaware of the Indent function and may use ‘workarounds’ such as tabs or even the spacebar to create a text indent.
The first and possibly simplest way of inserting indents in a document, is to use the Increase and Decrease Indent buttons on the Ribbon:
1. To insert a left indent to an entire paragraph, select the paragraph or position your cursor anywhere within the paragraph text. You can also select multiple paragraphs to indent at the same time.
2. In the Paragraph group under the Home tab on the Ribbon, click the Increase Indent button (circled in yellow in the screenshot below) once to indent the paragraph.
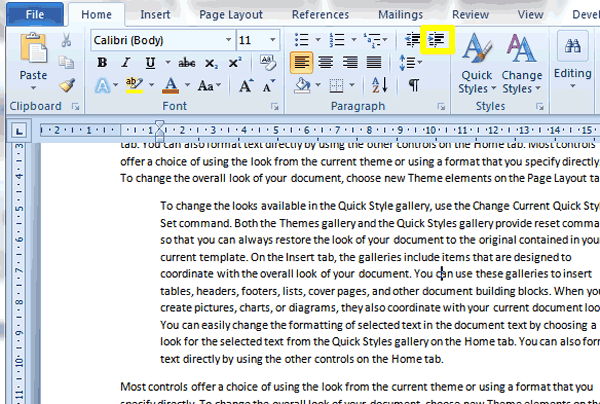
3. Click the Increase Indent button more than once to create a larger indent.
4. To decrease an existing indent, press the Decrease Indent button located to the left of the Increase Indent button.
Use the following shortcut combinations to increase or decrease indents:
- Ctrl+m – increase indent; and
- Ctrl+Shift+m – decrease indent.
A second, albeit slightly more complex way of adding indents, is to use the Indent Markers on the Ruler:
1. Select the paragraph(s) you wish to apply the indent to.
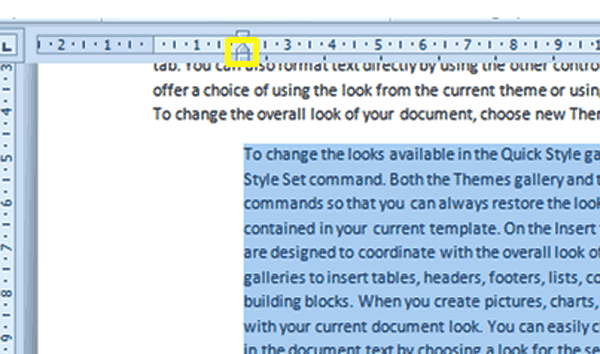
2. On the Ruler, left click and slide the Left Indent Marker (circled in yellow in the screenshot below) to the right on the Ruler to indent the paragraph. Be careful to click the bottom half of the marker as attempting to slide the top half of the Indent Marker will result in only the first line of the paragraph being indented.
3. To reduce an indent, select the paragraph(s) to which you wish to apply a reduced indent.
4. On the Ruler, left click and slide the Left Indent Marker (circled in yellow in the screenshot above) to the left on the Ruler to reduce the indent on the selected paragraph.
* To create an indent in the margin
1. Select the paragraph(s) you wish to apply the right indent to.
2. Click and slide the Right Indent Marker (circled in yellow in the screenshot below) the desired distance to the left on the ruler.
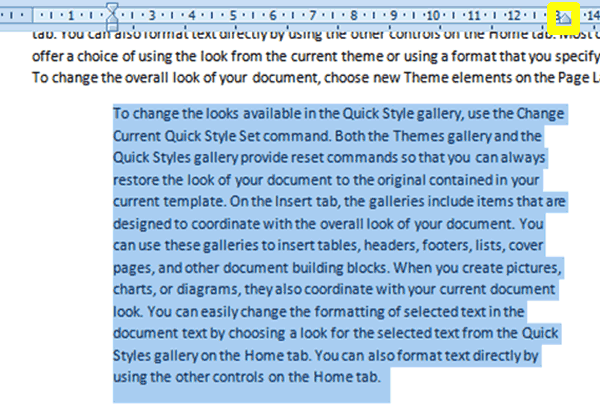
As in the screenshot above, you can use the right and left indents in conjunction with each other to create a block quote. Block quotes are frequently used in research papers, reports and school essays to indicate a direct quotation from a different source. You can also use the right indent function described above to create a margin on the right-hand side of pages to leave room for lecturers’ comments.
A note of caution though for using the left and right indent markers on the ruler: using these haphazardly can create an inconsistently formatted document. If you are formatting a long document it is difficult and time-consuming to drag the Indent Markers into position every time the formatting is required. Problems may also creep in where they are not all in exactly the same position.
To avoid inconsistency, you may wish to use the third method for setting left and right indents namely using the Paragraph dialogue box.
1. Select the paragraph(s) you wish to apply the indent to.
2. Launch the Paragraph dialogue box by clicking on the dialogue box launcher located in the bottom right-hand corner of the Paragraph group under the Home tab on the Ribbon.
3. Under the Indents and Spacing tab, use the up and down pointing arrows next to the Left and Right indent boxes (circled in yellow in the screenshot below) to increase or decrease the right and left indentation of your selected paragraphs.
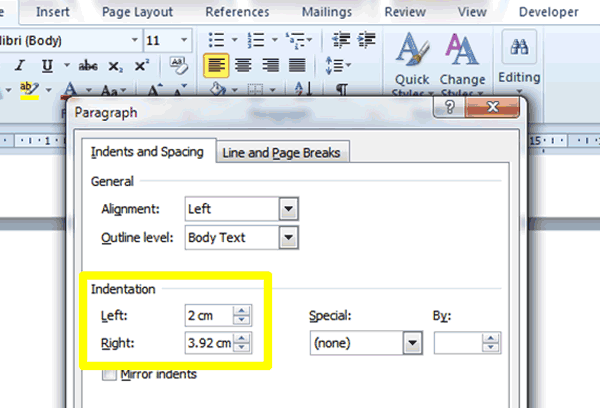
4. Press the OK button located at the bottom of the dialogue box to accept and apply the changes you have made or press Cancel to exit the Paragraph dialogue box.
*
Special Indents
Many types of legal documents, literary text and school essays require the use of special indents such as First Line and Hanging Indents. Below is a labelled screenshot for you to visually discern the difference and utility of these two special indent types:
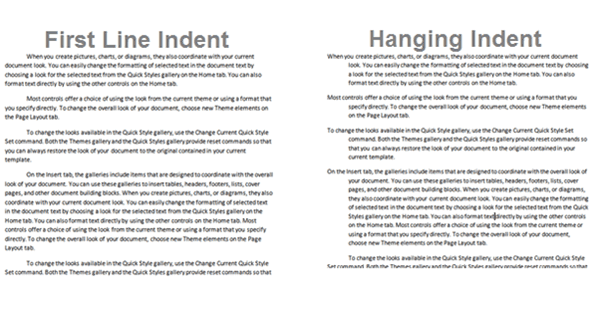
To insert a First Line or Hanging Indent:
1. Select the paragraph(s) you wish to apply this indent type to.
2. Launch the Paragraph dialogue box by clicking on the dialogue box launcher located in the bottom right-hand corner of the Paragraph group.
3. In the Paragraph dialogue box under the Indents and Indents and Spacing tab, select First Line Indent or Hanging Indent from the dropdown list under Special in the Indents group.
4. You are able to set an exact value for the size of the First Line or Hanging Indent by entering a value into the box labelled ‘By’.
To remove First Line or Hanging indents:
1. Select the paragraph(s) the indents have been applied to.
2. In the Paragraph dialogue box look for the Indents group and select ‘None’ in the dropdown box under Special.
3. A really quick way of removing indents from paragraphs or an entire document is to select the affected paragraphs and press Ctrl+q to remove the formatting.
* Setting, Editing and Deleting Tabs
Tabs are similar to Indents in that they allow you to align paragraphs at different points on the Ruler. Using tabs you can set multiple stops in a single line. Imagine you wish to create a list where names, surnames, telephone numbers and job roles are all lined up – you can set a tab stop for each item in the list.Below is a screenshot of an example of a tabbed list:
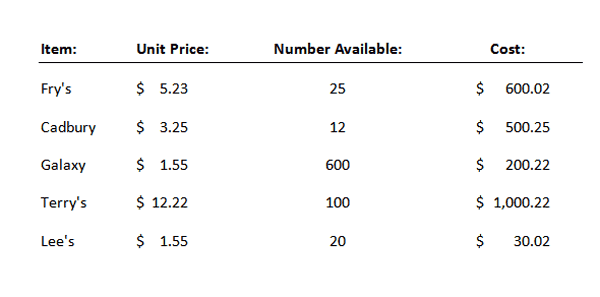
Using tab stops to create lists such as the one above ensures items are neatly lined up and stay lined up. It also makes adding further lines of data easy and streamlines formatting.
Many people use the space bar or press tab multiple times to line items up to look like the list in the screenshot above. This is time consuming, can be frustrating and the resultant list items may be slightly misaligned. When new items are added, it may even cause the whole list to lose its alignment.
To create a tabbed list, such as in the screenshot above, do the following:
1. Select ALL the items that will form part of the list, or if you have no items yet, position your cursor in the line you wish to add the first line of items of your list to.
2. Find the Tab Selector (circled in yellow in the screenshot below) which is positioned in the top left-hand corner, to the left of the Horizontal Ruler and above the Vertical Ruler:
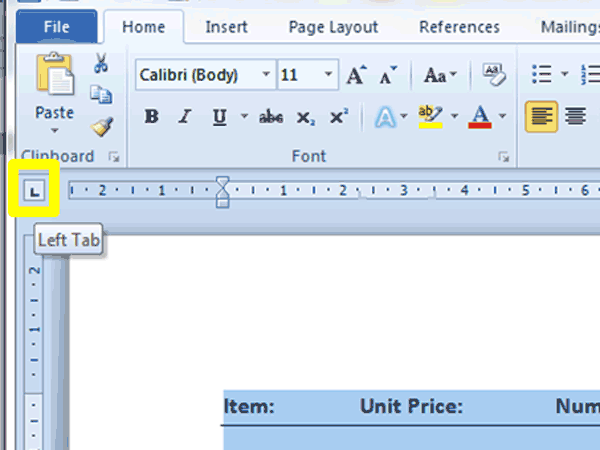
3. Hover your mouse cursor over the Tab Selector and a screen tip will appear telling you which tab is currently available to insert into your document. The default tab is the Left tab.
4. To select a different tab, for example a right or center tab, click the Tab Selector to change the available tab.
There are five tab types, namely:
- Left Tab – text will be aligned to the right of this tab stop;
- Centre Tab – text will be centered around this tab stop;
- Right Tab – text will be aligned to the left of this tab stop;
- Decimal Tab – decimal points in numbers are aligned to this tab stop; and
- Bar Tab – inserts a vertical line at the positon of the tab stop.
5. Once you have selected the desired tab type, click once on your Horizontal Ruler where you wish the tab to be positioned. You can place multiple tabs by clicking different positions on the Ruler. Our example at the beginning of this tutorial contains five tab stops in total.
6. Depending on which tabs you use and where you place them, your Ruler may look something like the ruler circled in yellow in the screenshot below:
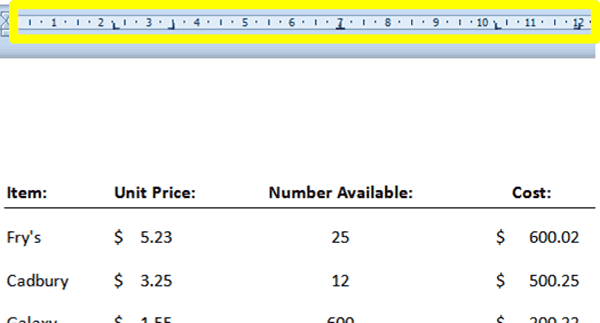
7. Each of the little black marks on the Ruler represents a tab stop to which you wish to align text.
Type the first word you wish to add to your list. Use the Tab key on your keyboard to move to the next tab you have created to type the second item. Continue doing this for all the tabs you have set.
8. Pressing the Enter key to take you to the next line, you can continue typing items into your list and use the Tab key to move across the page.
Once you have completed your list of items, you may wish to edit where tab stops appear and items are lined up. To edit tabs that have been set, do the following:
1. Select ALL the lines in your list you wish to apply the change to. If you move the tabs without first selecting all the relevant text, the change will be applied to the line of text your cursor is positioned in only.
2. On the Ruler click and drag the tab stops into their new position.
Deleting a Tab is easy:
1. Firstly, and very importantly, select ALL the text you wish to remove the tab stop from.
2. Click the tab you wish to delete and drag it down and off of the Ruler.
A second method for working with tabs is to use the Tab dialogue box. This allows you to set exact measurements for your tabs, select tab types, set tab leaders and clear specific tab stops.
1. To set a tab stop using the Tab dialogue box, first select all the items in an existing list you wish to set tabs for or position your cursor on the first line where you wish to start typing your list.
2. You can launch the Tab dialogue box (see screenshot below) by:
- a. Double clicking any tab on the Ruler; or
- b. Launching the Paragraph dialogue box and selecting the Tabs button on the bottom left hand corner of the dialogue box.
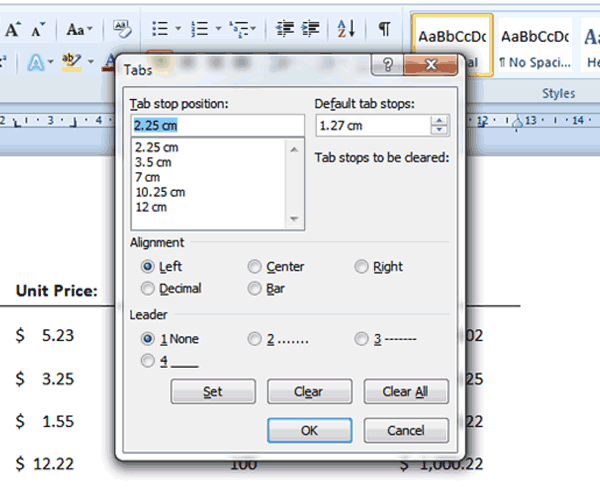
3. Enter a value into the Tab Stop Position Box to set where your tab will be positioned.
4. Under Alignment click the radio button next to the tab type you wish to use.
5. A leader is a line of dots or a line that leads to a selected tab. To add a leader, select one of the options in the Leader group or leave the value at the default which is ‘None’.
6. Finally, click the Set button to finalize your tab stop(s) and click OK to exit the dialogue box.
A great use for tabs and leaders is to create forms where you need alignment of dots or lines without having to manually type these in. Below is an example of a form you can quickly create using tab stops and leaders:
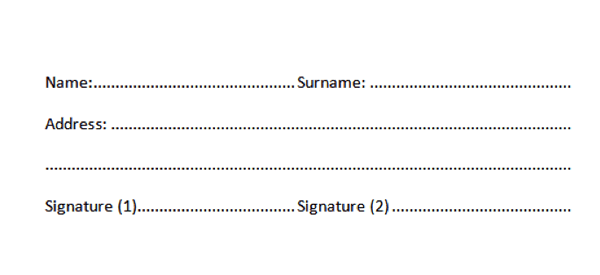
Go ahead and experiment with setting different tab types and tab leaders. You may be pleasantly surprised at how many of your current formatting issues may be resolved by the correct use of tabs.
Test your MS Word skills with the corresponding FREE Online Multiple Choice
Indents and Tabs Test
TRY THE NEXT TUTORIAL: Page Layout in Microsoft Word Tutorial
TRY THE NEXT TEST: Page Layout in Microsoft Word Test


