www.TestsTestsTests.com
Word Basics Tutorial
Free Online Microsoft Word Tutorials
MS Word 2010 – Getting Started
* The Ribbon
* The Quick Access Toolbar – QAT
* Vertical and Horizontal Ruler
* Vertical and Horizontal Scroll Bars
* The Status Bar
Starting out in Word it’s important to identify and understand all the things you see on the screen. This includes the Ribbon, Tabs, the Quick Access Toolbar, the ruler and the Status Bar.
Test your MS Word skills with the corresponding FREE Online Multiple Choice
Word Basics Test
When you open Microsoft Word 2010 for the first time it may be a little overwhelming seeing all the different names, icons, rulers, and other areas of the screen. Trying to complete tasks in Word without knowing the basic anatomy of the program screen and how things are organized, is a little like a surgeon trying to perform surgery without knowing exactly where to find the organs. He/she may eventually find the right organ, but their patient and nerves will be in shreds.
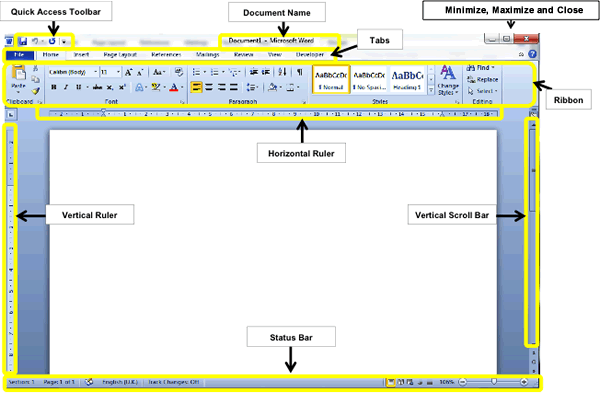
Below is an image of a typical Word screen with different areas to take note of circled and labelled:

Study the labels above and try to identify these areas on your own Word screen.
* The Ribbon
In Word, as in all Office programs, the Ribbon is the control center of everything you will want to do in the program. The Ribbon is divided into Tabs and Groups each containing function buttons that pertain to that Tab or Group. The Ribbon is located at the top of the screen underneath the document name.1. Open the Word program and identify the Ribbon and Tab area (circled in yellow in the image below):

2. Use your mouse to click on the Tabs located at the top of the Ribbon labelled: Home, Insert, Page Layout, References, Mailings, Review and View.
3. Note what happens to the Ribbon when you select the different tabs. You will use the Ribbon to find functions and elements to make your document look professional, fun and everything in-between. In later tutorials when you are asked to, for example, look under the Home Tab to find a function in the Font Group, you will click on the Tab labelled ‘Home’ on the Ribbon to find this group and function.
Did you know: the Ribbon is called the Ribbon because of its flowing nature with all functions contained on one long continuous ‘ribbon’. To see this in action, click with your mouse anywhere in the Ribbon and use the scrolling wheel (on your mouse) to move backwards and forwards through the Ribbon.
* The Quick Access Toolbar – QAT
The Quick Access Toolbar (QAT for short) is the powerful mini-me of the Ribbon. You can add functions to the QAT that you frequently use and need quick access to. By default the QAT contains functions such as save, undo and redo, but you are able to modify it to contain just about any function available in Word.1. In an open Word screen, see if you are able to identify the QAT (circled in yellow in the image below):

2. The QAT in the image above contain a Save, Undo and Redo shortcut.
3. If you click on the down pointing arrow located to the right of the icons on the QAT, you will have a list of suggestions for function shortcuts to add (or remove) from your QAT.
The QAT can also be moved to be located above or below the Ribbon.
* The Vertical and Horizontal Rulers
If you look carefully at the top and left-hand side of a Word screen, you will notice a line containing measurements that resemble a ruler. The Horizontal Ruler, located at the top of the screen, is used to set tabs, indents and page size. The vertical ruler, located on the left-hand side of the screen, is used to increase the top and bottom margins of a page. Together the rulers function very much like rulers in real life and help you to create tidy documents where content is perfectly lined up.
1. Open a blank document and identify the Horizontal Ruler (circled in yellow in the image below):

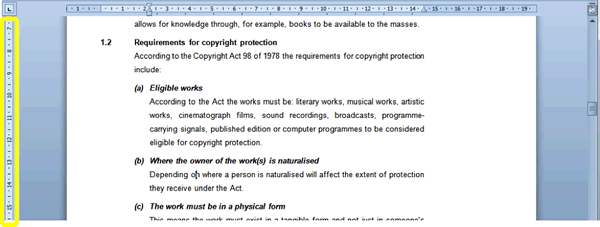
2. Next, identify the Vertical Ruler (circled in yellow in the image below):

3. To hide and re-display the Horizontal Ruler and the Vertical Ruler, click on the View Ruler button located below the Ribbon on the right-hand side of the screen (circled in yellow in the image below):

Without these rulers, there would be no way of telling how things are aligned on the screen and you may have to revert to using a real ruler and holding it to your screen to see if objects and text are lining up!
* The Vertical and Horizontal Scroll Bar
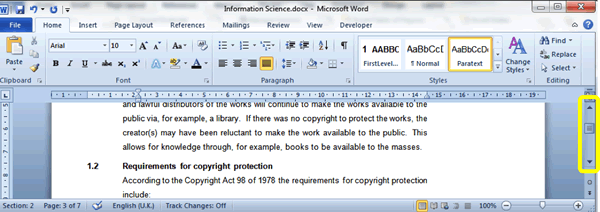
The Vertical Scroll Bar located on the right-hand side of screen is a quick way of moving through a document or to move the view of your screen upwards or downwards.1. Identify the Vertical Scroll Bar in an open Word document (highlighted in yellow in the image below):

2. Clicking on the arrows located at the top or bottom of this scroll bar will move the view of your document upwards or downwards in increments.
3. Live dangerously by dragging the slider located in the middle of the two arrows upwards or downwards.
If you’re document fills the screen horizontally and not all parts of the document are visible, a horizontal scroll bar will appear at the bottom of your screen (circled in yellow in the image below):

This scrollbar will allow you to move the view of your document to the left or the right by pressing the arrows located on either side of the scroll bar. You can also move the slider in the middle of the two arrows by dragging it to the left or right.
* The Status Bar
The Status Bar in Word functions very similarly to a status update on Facebook. If each document in Word had its own Facebook page, the status would read something like: ‘Language is now set to English (U.S.)’ and ‘LOL, Track Changes are off’. Similar to a status on Facebook, the Status Bar in Word’s function is to give you information about the status of your document.It tells you how many pages your document contains and on which page you are, what the default language of the document is, how many words in your documents and a collection of other status updates.
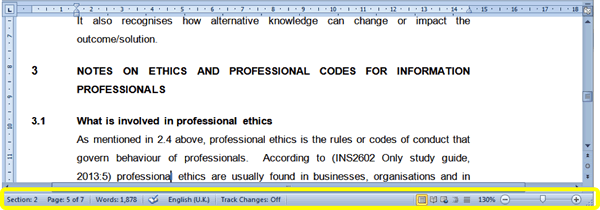
1. Locate the status bar in an open Word document (circled in yellow in the image below):

2. Study the example above and take note of what it tells us about the open document.
3. It tells us, for example, that the cursor in the document is currently located in the second section on page five. It also tells us that there are seven pages in total in the document and 1,878 words. The language is set to English with UK spelling and track changes are switched off.
4. The status information is not just useful details; some also double-up as shortcut buttons to take you to the related function. For example, clicking on the page number in the Status Bar will take you to the Go To function dialogue box and clicking on the Words status update, will take you to a detailed Word Count dialogue box.
5. You can modify the status bar by right clicking anywhere on it and selecting or deselecting a function to add or remove from it by clicking in the list (circled in yellow in the image below):

The items with ticks next to them on this list (above) are items that are currently on the Status Bar and those without are available to be placed on the Status
The Status Bar is an invaluable tool when you are, for example, writing an essay for school and need to achieve a certain number of words or if your boss asks you to prepare a five page report. It can also alert you to important problems in a document, for example, if you are using the incorrect language which could cause you to make spelling errors.
The icons located to the right on the Status Bar are zoom functions that control, for example, how big or small your document is displayed on your screen. There are also icons that change the view of your documents. These view and zoom functions will be examined in a separate tutorial.
Test your MS Word skills with the corresponding FREE Online Multiple Choice
Word Basics Test
TRY THE NEXT TUTORIAL: Understanding and Using the Ribbon in Word
TRY THE NEXT TEST: Understanding and Using the Ribbon in Word


