
www.TestsTestsTests.com

Track Changes in Word 2016 –
Comments in Word
Tutorial
Word 2016 Tutorial – Reviewing Documents
Free Online Microsoft Word Tutorial
* What are track changes in Word – Comments in Word?* How to insert comments in Word – Delete comments in Word
* How to add track changes in Word 2016 documents
* How to accept track changes in Word – reject track changes
Documents go through various revisions and edits. Make your comments or document changes stand out by inserting comments and using track changes.
* What are track changes in Word – Comments in Word?
Comments and track changes are two of Microsoft Word’s review functions. They allow for organised and traceable comments and edits to be made to a document. People are often afraid of or confused by comments and track changes that are added to a document.
Study the section of a document in the screenshot below taking notes of the revisions in the body of the document and comments on the right-hand side:
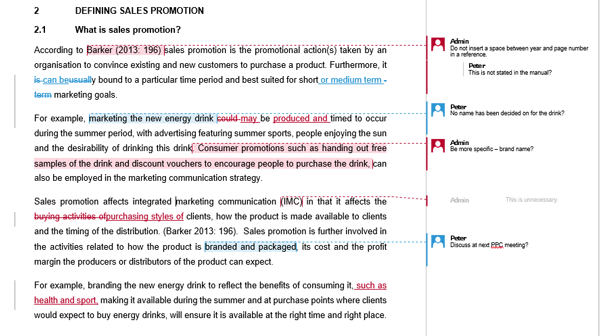
You will note edits made to the text in colored font and highlighted text which are linked to a note (comment) in the right-hand margin by two separate users, Admin and Peter.
These are track changes and comments applied to a document. Track changes are also known as redline changes due to their color.
You can use track changes and comments to share a document with colleagues asking them for feedback and to make their own track changes. You can also use it as a review and proof reading tool. With Word 2016 multiple different users can make changes to a document and the track changes and comments will correspond with each user’s profile. Additionally, you can also lock track changes so that any changes users make to a document, will be visible edits.
* How to insert comments in Word – Delete comments in Word
Gone are the days where you had to print out a document and add your feedback or comments using a pen and highlighter. The comments function in Word 2016 provides you with a quick way to not only add comments to a document, but also to reply to other commentators’ comments.To insert a comment into a document:
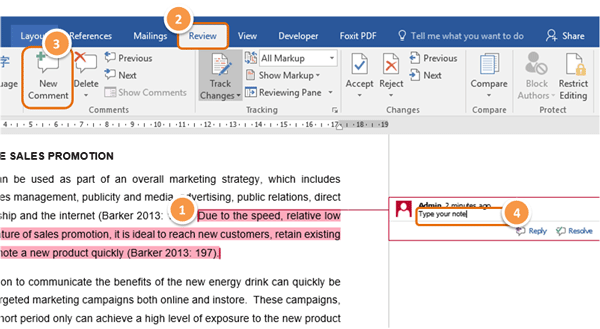
1. Select the text you wish to comment on or position your cursor in the document section that applies.
2. Click on the Review tab on the Ribbon.
3. In the Comments group, select New Comment.
4. In the comment box that appears, type the note you wish to add.
Click back in the body of the document to continue reviewing the text.
You can also edit an existing comment, reply on a comment made by a different reviewer or resolve a comment.
1. Click in the comment you wish to change and edit the text in the box.
2. To respond to a comment another reviewer made, click on the Reply button on the relevant comment.
3. To mark a comment as having been dealt with, click on the Resolve button on the relevant comment.
NAVIGATION TIP: To quickly move between comments in a document, use the Previous and Next buttons in the Comments group under the Review tab on the Ribbon.
To delete a single comment or all comments in a document:
1. Select the comment to delete by clicking on it.
2. In the Comments group click the Delete button.
3. To delete all the comments in a document, click on the arrow below the Delete button in the Comments group and select Delete All Comments (see areas circled in orange in the screenshot below):
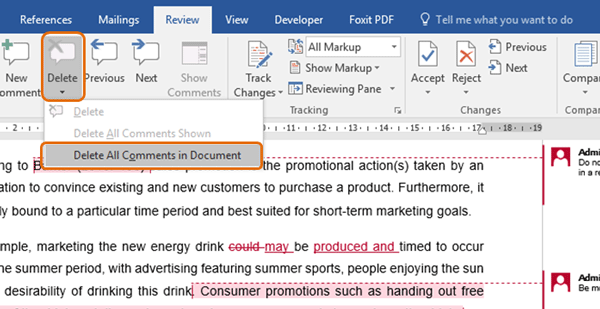
Remember, you can always press Undo to restore all the comments.
* How to add track changes in Word 2016 documents
Although track changes may look intimidating to use, they are actually quite simple if you know a few small tricks to using them!To activate track changes in a document:
1. You must have the document open you wish to apply track changes to. Track changes are activated only for the selected document.
2. Click on the Review tab on the Ribbon.
3. Click on the Track Changes box in the Tracking group. The box will become greyed out to show it is activated.
Track changes will be activated and you can make tracked edits to the document.
How track changes are displayed in a document is an important factor. Some people like a pane at the bottom or side of the document listing all changes made, whilst others prefer to see the changes on the text in the document. Additionally, if you are editing a document and the track changes are making it difficult to read the document, you can change to a view type that applies track changes, but hide them from view.
Study the area circled in orange in the screenshot below:
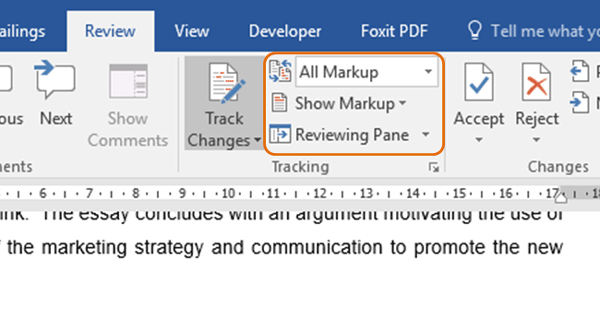
1. To display track changes in a separate pane: select Reviewing Pane in the Tracking group and then choose either Reviewing Pane Vertical or Reviewing Pane Horizontal from the options. Remove the pane by clicking on the Reviewing Pane button.
2. To display track changes in the actual body of the document: click on Show Markup in the Tracking group. Go to Balloons in the list and select Show only comments and formatting in balloons. This will ensure all changes made to the document are visible in the body of the document.
3. To hide or display track changes: click on the Display for Review box (this box usually defaults to the All Markup option) and select Simple Markup or All Markup to view track changes. Select the No Markup option to continue making track changes but to hide them from view.
To stop tracking changes, click on the Track Changes button to deselect it.
* How to accept track changes in Word – reject track changes
Track change documents are often sent for review where some of the changes are accepted, whilst others are rejected. This can be effected directly in a document where the track changes function was used.Study the functions circled in orange in the screenshot below:
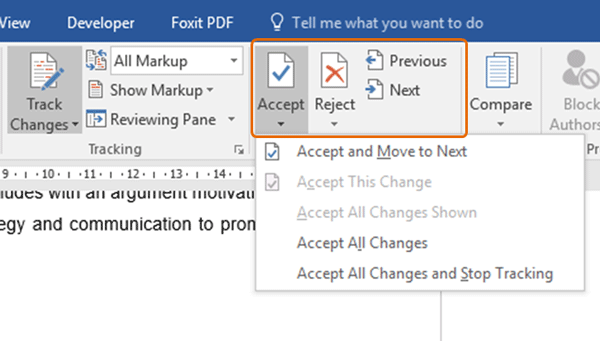
To accept or reject track changes:
1. Under the Review tab on the Ribbon, in the Changes group, use the Previous and Next buttons to navigate between track changes.
2. When you encounter a track change you wish to incorporate into the document permanently, click on the Accept button in the Changes group.
3. When you encounter a track change you do not wish to incorporate into the document, click on the Reject button in the Changes group.
Using the Accept and Reject buttons will automatically move you from one track change to the next.
To accept all the changes made to a document, click the dropdown arrow below the Accept button and select Accept all changes.
To reject all the changes made to a document, click the drop down arrow below the Reject button and select Reject all changes.