www.TestsTestsTests.com
Headers and Footers in Word 2016 Tutorial
Microsoft Word 2016 Tutorial
Free Online Microsoft Word Tutorial
* How to insert headers and footers in Word* How to edit headers and footers in Word 2016
* Adding dynamic content to headers and footers in Word
* Adding images or logos to headers & footers in Microsoft Word
* How to have different headers or footers in the same document
Headers and footers make a document look professional and also automates functions such as adding page numbers, document names and document properties that automatically update.
* How to insert a header or footer
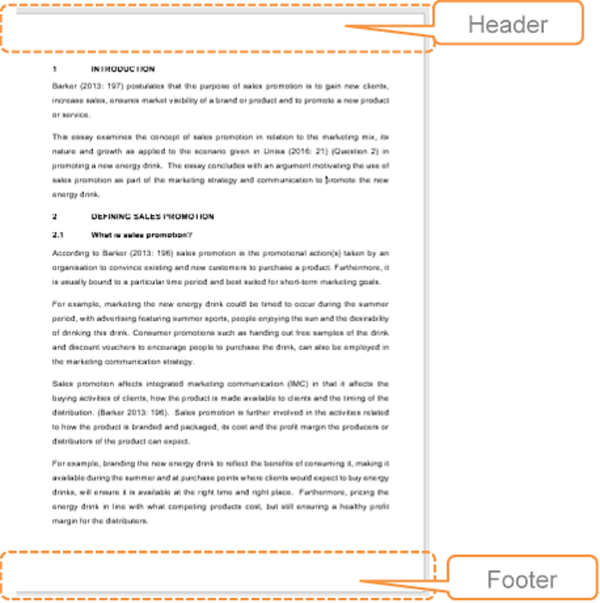
Headers and footers are sections of a document that repeat on every page without interfering with the body of the document. Headers and footers can contain just about any content, including tables, images, page numbers, document names, document authors, shapes and more.
To insert a header or footer into a document:
1. Identify the header and footer sections of the document (circled in orange and labelled in the screenshot below):
2. Double-click the header or footer region (whichever one you wish to insert) using your left-mouse button. You can also go to the Insert tab on the Ribbon, and in the Header & Footer group, select either a header or footer to insert.
3. Select one of the pre-designed headers or footers from the Header & Footer gallery that is visible under the Header & Footer Tools, Design tab. Remember, this is a contextual tab and will only be visible when your cursor is positioned within the header or footer region of a document.
You don’t have to select one of the pre-designed headers or footers, you can just type directly into the header or footer region of a document.
4. Once you have added the desired header or footer, double-click back in the body of the document to exit the header and footer region. You can also click on the Close Header & Footer button on the right-hand side of the Header & Footer Tools Ribbon.
You will notice that when you add more pages to your document (Ctrl + Enter), the header and footer region (depending on which you added content to) will repeat at the top of every page. The header and footer will be slightly greyed out to draw attention to the body of the document and make editing of the main content easier. The headers and footers will print normally and if you wish to see what they will look like on your final document, go to the Print Preview page (Ctrl + P).
* How to edit a header or footer
Editing a header or footer, or deleting them altogether, comprises similar steps to that of adding a header or footer to a document, which is discussed in the section above.To edit a header or footer:
1. Double-click the header or footer region (whichever one you wish to edit) using your left-mouse button. You can also go to the Insert tab on the Ribbon, and in the Header & Footer group, select Edit Header or Edit Footer.
2. In the header or footer region, edit the content you have added by changing the format, inserting new content or editing the text or images in this region.
3. Double-click back in the body of the document to exit the header or footer region.
A tip for creating a well-organized header or footer, is to use alignment tabs:
1. Go to the header or footer section by double-clicking the region or accessing it via the Header & Footer group under the Insert tab on the Ribbon.
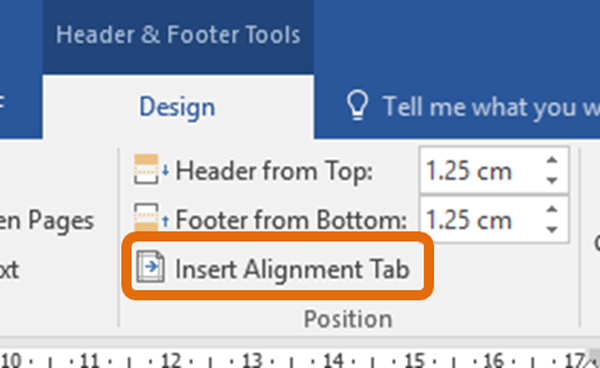
2. Under the Header & Footer Tools, Design tab (remember, this is a contextual tab that will only be visible if your cursor is positioned in the header or footer region of the document) go to the Position group and select Insert Alignment Tab (circled in orange in the screenshot below):
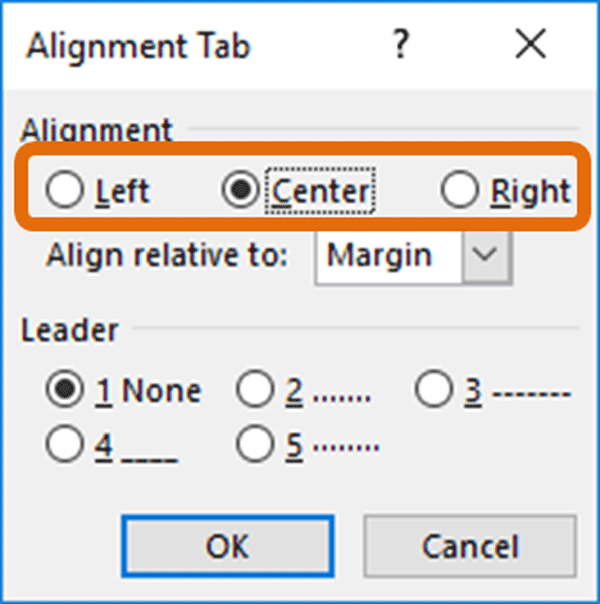
3. In the Alignment Tab dialog box, select and set a Left, Centre or Right tab stop (see screenshot below) depending on where you wish to position the header or footer content.
4. Use the Tab key on your keyboard to move between the different tab stops that you have added, to insert text or dynamic content such as fields, for example:
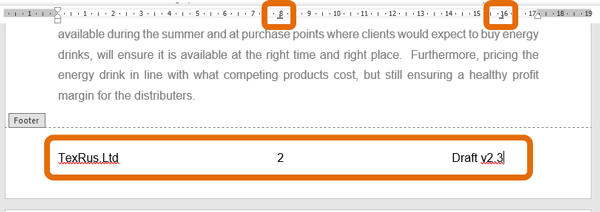
In the screenshot above, the two tab stops, a center tab and a right tab, are circled on the Ruler. The text circled in the footer is an indication of how it will display with the tab stops set to those positions.
You can manually move the tab stops, by clicking and dragging the tab stop on the Ruler to a new position.
* Adding dynamic content to a header or footer
Part of the attraction to adding headers or footers to a document is that it separates the content from the main body of the document and therefore makes it easier to insert dynamic content that updates with subsequent pages you add.
Dynamic content includes page numbers, the date and time the document was saved, the document name, the author and a whole host of other automated fields.
To add dynamic content to a header or footer:
1. Go to the header or footer section by double-clicking the region or accessing it via the Header & Footer group under the Insert tab on the Ribbon.
2. Select a Page Number, Date & Time or Document Info field from the pre-set galleries (circled in orange in the screenshot below) to insert into either the header or footer region:
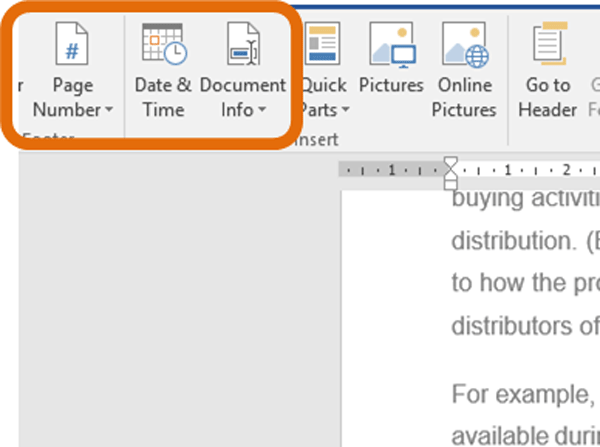
3. Depending on the field(s) you choose, your footer (or header) region could look something like this:

In the screenshot above, there is a date field, which automatically updates to the current date, a page number, which will update with each consecutive page which is added to the document and the document title, which is the title inserted on the cover page.
It is worth experimenting with other document info, date and time formats and page number set-ups to see which would be most applicable to your needs.
Headers and footers which contain dynamic formats (as in fields) usually update automatically, but should you wish to ensure it has updated, select the content and press the F9 key on your keyboard.
*Adding images or logos to a header or footer
Headers and footers are also great for creating letterheads and templates that require branded content such as company logos or addresses at the top (header) or bottom (footer) of a page.
To create a company letterhead using headers or footers:
1. Go to the header or footer section by double-clicking the region or accessing it via the Header & Footer group under the Insert tab on the Ribbon.
2. Under the Header & Footer Tools, Design tab, go to the Insert group and select Pictures.
3. Navigate to where the image or logo you wish to insert is saved and select Insert.
4. Word will insert the logo at the center of the header (or footer) region by default, depending on the size of your image.
5. Resize the image or logo, if necessary, by dragging the corner handles around the image inwards or outwards to decrease or increase the image size as required.
6. To move the image to a different position, you will need to edit the layout options. The Layout Option button is visible in the right-hand corner of the selected image (circled in orange in the screenshot below):
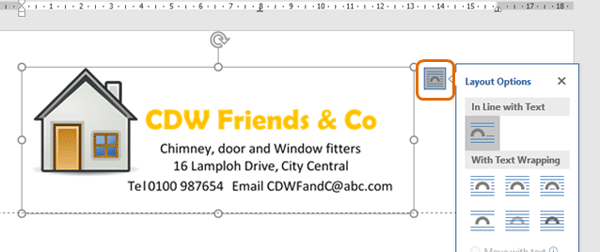
7. Hover your mouse cursor over the different With Text Wrapping options in the Layout Options box. Using the Through or Behind Text options will give you greater flexibility in moving the logo or image position.
8. Once in position, the final step is to ensure you increase the header (or footer) area so that your logo or image does not obscure the body text of your document.
Increase (or decrease) the header (or footer) size by editing the value in the Header from Top (or Footer from Bottom) box (circled in orange in the screenshot below). You will find this option in the Position group under the Header & Footer Tools, Design tab.
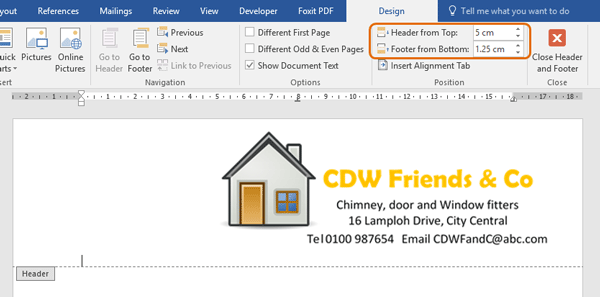
This will increase the Header (or footer) area and ensure these areas do not encroach on the body of the document.
* How to have different headers or footers in the same document
A problem which is often experienced with the use of headers and footers, is how to exclude headers or footers from the cover page of a document or how to have different headers and footers in the same document. In the example we used in the previous section, creating a letterhead, the design may require a different look for the second page of a letter. It may be a smaller logo or simply a page number.To have a different front or cover page header or footer:
1. Insert the header or footer for the second page (see sections above on how to insert a header or footer).
2. With your cursor positioned in the header or footer region, tick the Different First Page box (circled in orange in the screenshot below) located in the Options group under the Header & Footer Tools, Design tab.
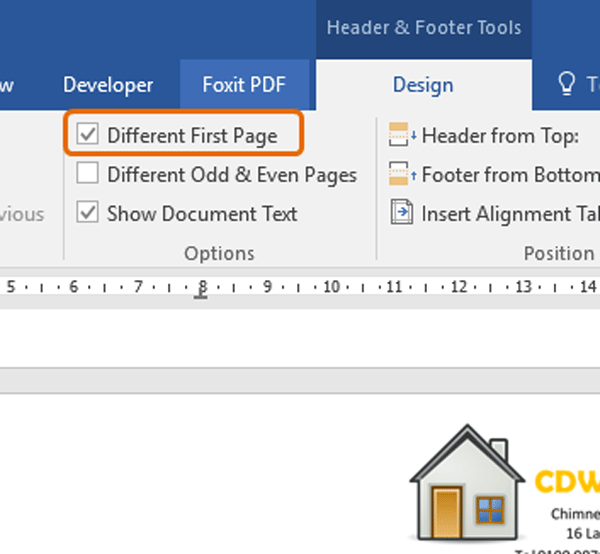
This will separate the second and subsequent pages’ header or footer from the first page of the document.
3. Insert the desired header or footer for the first page to complete the separation.
This function may require some experimentation to ensure the headers and footers are completely separated and it is usually easiest to start with a new document when you are still learning the program.
Another issue that people using Word frequently experience, is how to have different headers or footers for different sections of a document. For example, you may wish to not number the cover page and table of contents for a guide or essay, and only start the numbering on the page containing the introduction to your work.
The key to achieving different headers and footers for different parts of a document lies in section breaks. Section breaks act as separators for different sections or parts of a document and enable you to insert different headers and footers to different sections.
To use section breaks to add different headers and footers:
1. First, decide where in the document you wish to add different sections. For example, if page 1 and 2 of the document contain the cover page and table of contents to which you do not wish to add page numbers, and page 3 onwards require page numbers, starting the numbering as page 1, your section break will be at the end of page 2. This sounds far more complicated than it really is, and the screenshot below with captions illustrate this example:
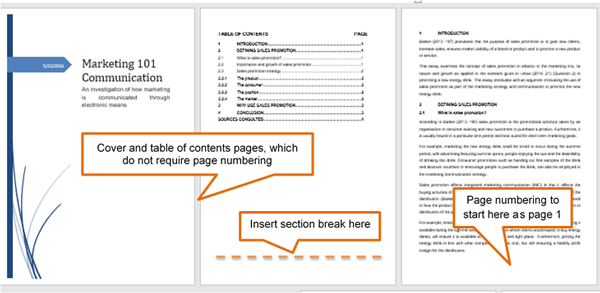
2. Position your cursor at the end of the second page (see example above) and insert the section break by going to the Layout tab and selecting Breaks in the Page Setup group. Select the Next Page option from the Section Breaks in the list of break types.
3. Ensure you delete any page breaks. A tip to see where section breaks or page breaks are in a document is to switch on the Show/Hide function. Go to the Home tab and in the Paragraph group select the Show/Hide button. A shortcut to Show/Hide is Ctrl + *.
4. Go to the first page that needs to have a page number (as per the example above) and select the header or footer region.
5. In the Navigation group under the Header & Footer Tools, Design tab, tick the box for Link to previous.
You will note that the Same as Previous label disappears from the right-hand corner of the header or footer (whichever is selected) region, which now should only contain the section number, which in the example above, is Footer Section 2. Anything you add to the footer region, which is labelled Footer Section 2, will repeat in the rest of the document which is part of Section 2.
Add content to the footer, for example, a page number and change the formatting and value properties for the content as usual.
You can add as many sections to a document as is needed with different headers and footers for each section.
Woohoo! Now that you have done the tutorial:
TEST your MS Word skills with the corresponding FREE Online Multiple Choice
Headers and Footers in Word 2016 TEST
* TRY THE NEXT TUTORIAL: Comments and Track Changes in Word Tutorial 2016
* TRY THE NEXT TEST: Comments and Track Changes in Word Test 2016


