
www.TestsTestsTests.com

Using the Slide Sorter View PowerPoint Tutorial
MS Office 2010 Training – Working with Slides
Free Online
PowerPoint Tutorial
* What is the Slide Sorter View
*
Change the Order of Slides
*
Delete Slides
*
Hide and Unhide Slides
*
Insert and Remove Sections
The Slide Sorter view lets you see multiple slides in thumbnail view. This makes it easy to see the sequence of slides, change the order, hide or unhide, or delete them.
* What is the Slide Sorter View
The Slide Sorter view is one of the four main view types available in PowerPoint. It allows you to view thumbnails of each slide in your presentation and the order the slides appear in. Each slide thumbnail is numbered and you can zoom in or out to see smaller or bigger thumbnail images of slides.
To access the Slide Sorter view:
1. Open a PowerPoint presentation that contains a couple of slides.
2. Click on the View tab on the Ribbon.
3. In the Presentation Views group, click on Slide Sorter. This will open a screen with thumbnail images of all the slides in your presentation.
To exit the Slide Sorter View:
1. Click on the View tab on the Ribbon.
2. In the Presentation Views group, click on Normal. This will take you back to the regular slide view where you can edit your slides.
The Slide Sorter view also provides a quick overview of all the slides in your presentation enabling you to spot any inconsistencies in slide layout and design.
* Change the Order of Slides
Being able to change the order of slides in a slide stack is essential for multiple reasons. Many people are not aware of the Slide Sorter view and rely on labor-intensive methods such as cutting and pasting slides or even recreating a presentation to organize the sequence of slides. With the Slide Sorter view, reorganizing the sequence of slides in a slide stack, is as easy as if they were physical pages or cards you are moving around.
To change the order of slides:
1. Open the PowerPoint presentation containing the slides you wish to organize.
2. On the View tab in the Presentations Views group, click on Slide Sorter to open the Slide Sorter view.
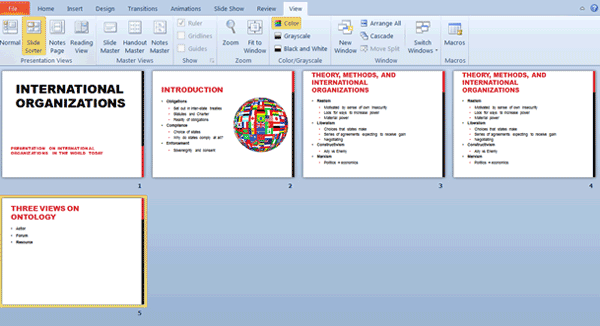
3. In the Slide Sorter view, click on the slide you wish to move. A yellow border (see thumbnail 5 in screenshot below) indicates which slide is selected:
4. Click and hold down your left mouse button whilst dragging the slide to its new position.
To move multiple slides to a new position, hold down the Ctrl key on your keyboard while clicking to select the slides you wish to move. Drag the selected slides to their new position.
Use the Undo button in the Quick Access Toolbar or Ctrl+z, to restore any slides that have been moved in error to their original position.
* Delete Slides
The helicopter view of your slide stack provided by the Slide Sorter view, allows you to quickly see any problems in the sequence and layout of your presentation. You may observe missing information, duplicate or obsolete slides that you would not have noticed in the regular slide view (Normal view).
To delete slides using the Slide Sorter view:
1. Click on the View tab on the Ribbon and select Slide Sorter in the Presentation Views group.
2. Click on the thumbnail of the slide you wish to delete and press the Delete button on your keyboard. You can also right-click the thumbnail and select Delete Slide from the menu list.
If you delete a slide in error, use the Undo function located on the Quick Access Toolbar to restore the deleted slide(s). You can also press Ctrl+z on your keyboard to undo the deletion.
* Hide and Unhide Slides
Imagine you have a presentation that contains multiple slides which you use to present a subject to many different audience-types. It may be a business talk which you present both to senior management and junior employees, for example. Now imagine some of those slides were not really interesting or applicable to one of your audiences. What do you do?
Well, you could recreate different versions of your presentation that include or exclude specific slides, but this can be messy. If you make changes to the core information on one version, you will have to manually change it for the second or third version(s) as well.
By using the Hide Slide function, you can intentionally exclude slides from your presentation. This will not delete the slides, but simply move them to the background and give you the option of displaying them or skipping them during a presentation.
To hide a slide:
1. Open the Slide Sorter view by selecting it from the Presentations View group under the View tab.
2. Right-click on the slide you wish to hide and select Hide Slide from the menu list.
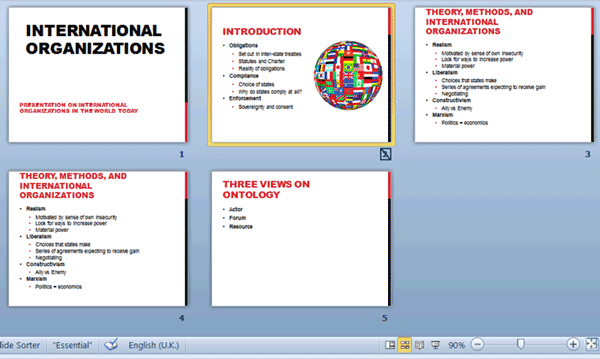
3. The slide thumbnail will not disappear, but you will note a box crossing out the thumbnail number (see slide 2 in the screenshot below) will appear.
When you preview your presentation either in Presenter View or in the Normal slide show view, these slides will appear either crossed-out or faded.
To unhide a slide:
1. Open the Slide Sorter view by selecting Slide Sorter in the Presentations Views group under the View tab.
2. Right-click the thumbnails of the slides you wish to unhide and select Hide Slide from the menu list. This is a toggle button (a function that can be switched on and off) and will not change to unhide.
3. The box crossing out the slide number will disappear and the slide will no longer be crossed-out or faded in the Presenter and Normal views.
Select multiple slides to hide or unhide by holding down the Ctrl button on your keyboard whilst selecting slide thumbnails in the Slide Sorter view.
* Insert and Remove Sections
Sections enable you to subdivide a slide stack in a presentation into categories or subject areas, making it easier to manage for the presenter, and follow, for the audience.
After reorganizing your slides in the Slide Sorter view, review the content of the slides and evaluate whether your presentation would benefit from grouping slides into groups, categories or sections.
To add a section:
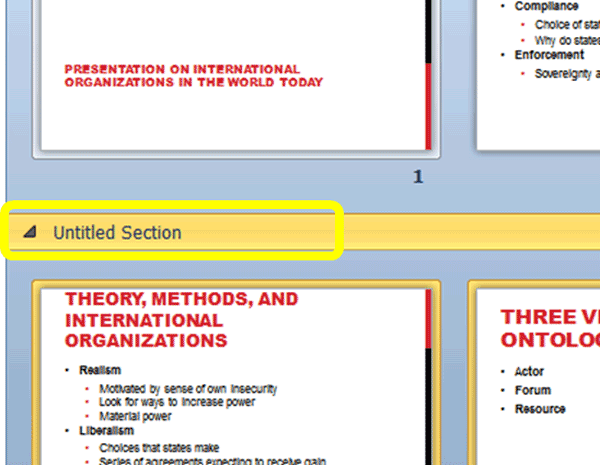
1. In the Slide Sorter view, select the slide you wish to be the first slide in the new section.
2. A visible unnamed section break will appear dividing the slides.
3. Continue adding sections where necessary until you are happy with the groupings.
To name sections:
1. Right-click on the section line (circled in yellow in the screenshot below):
2. Select Rename Section from the menu list.
3. In the Rename Section dialogue box, type a suitable name for your section.
To remove a Section division:
1. Right-click the section line.
2. Select Remove Section to delete the current section division, or select Remove All Sections to delete all section breaks in the presentation.
Removing Sections will not delete the slides contained within the section, it will remove the section division line or category.
Woohoo! Now that you have done the tutorial:
Test your PowerPoint skills with the corresponding FREE Online Multiple Choice
PowerPoint Using the Slide Sorter View Test
TRY THE FIRST TUTORIAL: Planning Your PowerPoint Presentation Tutorial
TRY THE FIRST TEST: Planning Your PowerPoint Presentation Test