
www.TestsTestsTests.com

Working with Text PowerPoint Tutorial
Microsoft Office 2010 – Working with Slides
Free PowerPoint Online Tutorial
* Inserting Text in PowerPoint
*
Selecting and Formatting Text in PowerPoint
*
Cut, Copy & Paste Text in PowerPoint
*
Rotating Text in PowerPoint
It takes some finesse to select, copy, move, format, delete and rotate text. Let us teach you how! It will saves you heaps of time and make you feel like an expert.
Test your PowerPoint skills with the corresponding FREE Online Multiple Choice
Working with Text Boxes & Placeholders in PowerPoint Test
* Inserting Text in PowerPoint
PowerPoint is all about boxes and content holders. Unlike a word processor such as Microsoft Word, you cannot click and type directly onto a slide in PowerPoint. Instead, depending on the type of content you wish to insert, you would select a placeholder or content holder. Text is usually contained in a Text Box, although it can also be added to shapes, images and tables.
To insert text into a slide you need to start with a Text Box:
1. Select the slide to which you wish to add the text.
2. Click on the Insert tab on the Ribbon and in the Text group, click on the Text Box button. The button will be highlighted in orange to show it is in use.
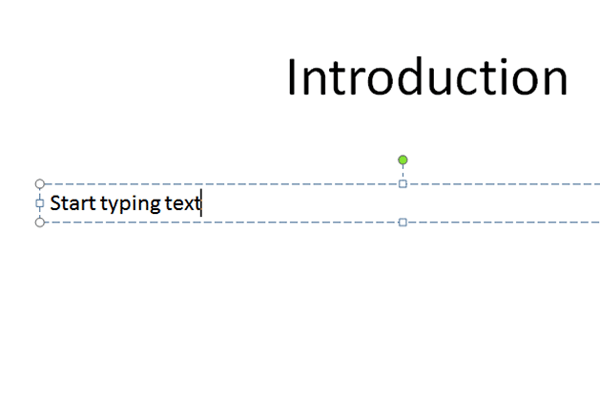
3. Click on the slide to insert the box and start typing your text. The Text Box will automatically resize as you type to fit the contents. The Text Box is surrounded by a non-printing dashed-outline (see screenshot below):
Warning: if you insert a Text Box and do not immediately add text, the Text Box will disappear and you will have to reinsert it.
To add text to existing Text boxes:
1. Click on the Text Box you wish to add text to.
2. Move your cursor to the position in the text you wish to add more text to and simply type to add additional text.
Shapes are frequently used in PowerPoint slides. You can add text to any shape by doing the following:
1. Select the slide you wish to add the shape to.
2. Click on the Insert tab on the Ribbon and in the Illustrations group, click on the Shapes button.
3. Select the desired shape from the Shapes gallery by clicking on it.
4. Use your mouse cursor to create the shape on your selected slide, by holding down the left-mouse button and dragging the shape to the desired size.
5. To add text to a specific shape, select the shape by clicking on it and then just start typing to add text. If you have difficulty to select the shape and add text, right-click the shape and select Edit Text from the menu list.
The selected shape will have a single-line boxed outline around it as in the circle containing the word Place in the screenshot below:

Should you need to add a lot of text, for example multiple slides containing four or five bullet points, an easy way to add text is by using the Outline Panel to quickly type the content for slides:
1. Click on the Outline tab located to the right of the Slides tab located on the left-hand side of the PowerPoint screen.
2. Click in the Outline panel and type the heading for your slide.
3. Press Enter to add a new slide or press Enter and Tab to start a bullet list. Press Enter to add more bullets:

4. To exit a bullet list and insert a new slide, press Ctrl+Enter.
The Outline Panel is great for quickly typing up the outlines of PowerPoint slides and saves you time from having to manually insert Text boxes every time you wish to add more text. When you are finished adding text to the Outline view, click on the Slides tab to return to a normal view of your slides.
* Selecting and Formatting Text in PowerPoint
To format the appearance of text in PowerPoint, you must first be comfortable with selecting the text. Depending on whether you wish to format all the text contained in a Text Box or specific lines of text only, will dictate how you make your selection for formatting.
To format all the text contained in a Text Box or Shape:
1. Click on the Text Box or shape to select it.
2. If the outline around the Text Box appear as dashes, click on this outline again so that it displays as a solid line. If it is a shape or the Text Box has a border around it and you do not see the dashed outline, still click on the solid outline of the Text Box or Shape to ensure it is selected.
3. On the Home tab on the Ribbon, in the Font group select formatting such as fonts, font size and color, bold and underline to apply to the text in the Text Box or Shape.
4. To change the formatting for line and paragraph spacing, click on the Paragraph dialogue box launcher (circled in yellow in the screenshot below) and in the Paragraph dialogue box (see below) select line and paragraph spacing values.

To format only specific lines of text contained in a Text Box or shape, you need to select only those letters, words, sentences or lines of text you wish to format.
1. Click on the Text Box or Shape containing the text you wish to format.
2. Use your mouse to select the text to format and use the Formatting tools under the Home tab in the Font and Paragraph groups to format the text.
If you used the Outline Panel to add text, you can format the text directly in the Outline Panel or use the methods described above.
To format text in the Outline Panel:
1. Open the Outline Panel by clicking on the Outline tab located on the left-hand side of the PowerPoint screen next to the Slides tab.
2. Select text in the Outline Panel using your mouse and apply formatting from the Home tab on the Ribbon using the formatting options in the Font and Paragraph groups.
The formatting will be displayed in the main PowerPoint screen view of your slides. Formatting will not display directly in the Outline Panel.
* Cut, Copy & Paste Text in PowerPoint
It is a fact of life that the project you start out with is rarely the one you end with. You may start with the headings, subheadings, bullet points and paragraph text in your presentation in a specific order, only to realize on review of your slides, some content fits better in a different location. Being able to move content around in a presentation is as essential as being able to create the presentation itself.
There are a few different methods of moving content around in PowerPoint including dragging and dropping using the mouse and cut, copy and paste.
To move content using drag and drop:
1. Select the line of text to move.
2. Left-click on the selected line and hold down the left mouse button whilst dragging the text to a different location.
You can drag a line of text from within a Text Box to a new location within the same Text Box or into a separate existing Text Box. If you want to insert the content into its own, new Text Box, simply drag it away from any existing text boxes to automatically create a new Text Box.
Quick Tip: To move bullet points up or down in a list hold down the Shift and Alt keys then use the up and down arrows on your keyboard to move the bullet points up or down in the list. (Shift+Alt+Up or Down Arrow).
Using the Clipboard group functions to cut or copy, and paste text:
1. Select the text you wish to Cut.
2. Click on the Home tab on the Ribbon and in the Clipboard group click the Cut icon that looks like a pair of scissors, to cut the content. You can also right-click the selected text and select Cut from the quick menu or press Ctrl+X on your keyboard to cut. (Remember Cut removes text from its current location and if you do not Paste the cut text, Cut essentially equals deleting the text).
3. Move your cursor selection to the location you wish to insert the cut text in directly after cutting the text.
4. Click on the Paste button located in the Clipboard group under the Home tab. Alternatively, press Ctrl+V to paste the cut content.
The Copy function works in exactly the same way as the Cut function EXCEPT when you use Copy, as its name suggests, you are simply making a copy of the content and not cutting (essentially deleting) it from its current location.
Two useful tools to be aware of when using Cut, Copy and Paste are Paste Options and the Clipboard.
After copying text, you can access different Paste Options by clicking on the dropdown arrow below the Paste button in the Clipboard group, right-clicking and viewing Paste Options on the quick menu, or viewing the Paste Options box that appears directly after pasting content.
To use Paste Options from the Paste function in the Clipboard group:
1. After cutting or copying content, move your cursor to the location you wish to paste the content in.
2. Click on the dropdown arrow below the Paste button (highlighted in yellow in the screenshot below):

3. Hover your mouse cursor over the available Paste Options to view the ScreenTip with a description of each button in this group:
- * Use Destination Theme – pastes text and automatically formats text the same way as surrounding text in paste destination.
- * Keep Source Formatting – pastes text with cut or copied formatting into new destination.
- * Picture – pastes text as an image into a selected location.
- * Keep Text Only – pastes text as text only. The pasted text will have the paste destination formatting.
The safest Paste Option is usually the Keep Text Only option.
An extension of Cut, Copy and Paste, the Clipboard, is a powerful hidden tool in all Office Programs. It allows you to copy up to 24 items that you can then paste as and when necessary. This is especially useful for reorganizing content on slides. You can cut or copy multiple sections, even entire slides, to the Clipboard to Paste at a later stage.
To use the Clipboard:
1. Cut or copy the text you wish to add to the Clipboard using any of the cut and copy methods described above.
2. Under the Home tab in the Clipboard group, click on the Clipboard dialogue box launcher (circled in yellow in the screenshot below) to launch the Clipboard panel.

3. All items you copy will appear in the Clipboard panel. To paste an item, move your cursor to the position on your slide you wish to paste the content and click on the item in the Clipboard Panel to paste it.
You can paste the same item as many times as you need from the Clipboard Panel. It is a great tool for keeping track of items you cut to ensure you don’t cut something and forget to paste it in. Once the Clipboard contains 24 items, it will replace the oldest cut or copied item(s) with any new item(s) you cut or copy.
* Rotating Text in PowerPoint
PowerPoint is all about being creative and bringing your thoughts and ideas to life whilst presenting a talk. This may sometimes mean you don’t want text to appear horizontally on a page, but may need it to be vertical, diagonal or something in-between the two.
To rotate text in PowerPoint you can use the Text Direction function to change the direction of text in a Text Box or the Rotation handle to rotate the entire Text Box.
To use the Text Direction function:
1. Click on the Text Box containing the text you wish to change direction of.
2. Under the Home tab, in the Paragraph group, click on the Text Direction button (circled in yellow in the screenshot below):

3. Select the text direction from the available options in the list: Horizontal, Rotate All Text 90 degrees, Rotate All Text 270 degrees or stacked. Hovering your mouse over each of the options in the list will show you a live preview of what your text will look like with the selected rotation option is applied.
If none of the pre-set options in the Text Direction list matches your requirements, for example, you may need to rotate the Text Box only slightly, using the Rotation handle on the Text Box may yield better results.
To use the Rotation handle:
1. Select the Text box you wish to rotate by clicking on it.
2. You will notice a green dot attached to the Text Box (circled in yellow in the screenshot below). When you move your mouse cursor over the green dot, your cursor will change into a circular arrow to indicate it is the Rotation handle.

3. Click on the Rotation handle and drag it to the left or the right to rotate the Text Box to the desired direction and position.
It is important to remember that rotating text in slideshows that are intended for viewing on an overhead screen may make it difficult to read.
Woohoo! Now that you have done the tutorial:
Test your PowerPoint skills with the corresponding FREE Online Multiple Choice
Working with Text in PowerPoint Test
TRY THE NEXT TUTORIAL: Text Boxes & Placeholders PowerPoint Tutorial
TRY THE NEXT TEST: Text Boxes & Placeholders PowerPoint Test