www.TestsTestsTests.com
Using Data Validation Tools Excel Tutorial
Excel 2010 Training –
Working with Data
Free Online Microsoft Excel Tutorial
* What is Data Validation?
*
Numbers, Dates & Time Validation Criteria
*
Data Validation Lists
*
Input Messages
* Removing a Filter
* Removing Data Validation
To analyze data in Excel, the data must be entered consistently. If you type “yes” for one instance but “Y” in another instance, you will not be able to analyze the data easily. Data analysis tools ensure that values are entered in the same format where specified throughout your worksheet.
Test your Excel skills with the corresponding FREE Online Multiple Choice
Using Data Validation Tools Test
* What is Data Validation?
Data validation in Excel may sound intimidating, or like a function only the very advanced Excel user would utilize, but in reality it is so simple, anyone could use it. Furthermore, when you first get a taste for data validation and the time-saving, sanity-preserving awesomeness that it brings, you may never create a worksheet in Excel again without it.
So what exactly is data validation? In simple terms, it is a tool that limits the type of content that can be entered into a cell based on predetermined criterial. For example, you could set a column in Excel to only accept values that are numbers, text limited to a set number of characters and you can even specify which words are allowed by creating a data validation list containing these options.
Other data validation tools allow you to create input messages that prompts the person entering the data as to what values are expected, and error alert messages that explain why a data entry is incorrect when it doesn’t meet the data validation criteria that has been set.
Study the worksheet in the screenshot below:
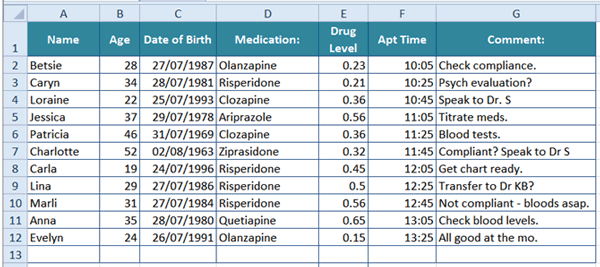
How many different data types can you see? If you noted that there are text types, numbers, decimals, dates and times, you would be absolutely right.
In the worksheet above, data validation could be applied to the Age column to ensure that only a number is entered. The Date of Birth column could have a restriction that allows only dates to be entered. For the Medication column, we could create a list containing the items (in this instance medication names) from which you can pick when entering the relevant data. The Drug Level column could contain data validation that only allows for decimal numbers between specific ranges only, to be entered. Finally, the Apt Time column could limit the data being entered to times that fall between, for example, the opening and closing times of the clinic (as pertaining to the example above).
Not using data validation is fine if it is a small worksheet with only a couple of entries, but imagine it contains hundreds of rows and multiple columns. If you wanted to analyze how many people, for example, take a drug called Risperidone, but someone misspelled the name of the drug when they entered it, your analytical formula or function will not pick up or count the misspelled instance. Data validation ensures that incorrect information is not inadvertently entered, as the cell will not accept data which is not in the data validation criteria format that has been selected for the cell range.
* Validation Criteria
As mentioned already, data validation criteria includes numbers, decimals, dates, times, text length and lists. Within each of these validation criteria types there are further options that allow you to place limitations on the type of data that can be entered.
To limit a cell range to only allow numbers to be entered:
1. Select the cell range to apply the data validation to.
2. On the Ribbon, click on the Data tab.
3. In the Data Tools group, click on the Data Validation button.
4. In the Data Validation dialogue box, ensure the Settings tab is active (the dialogue box opens on the Settings tab by default).
5. Below the heading: Validation Criteria – Allow – click on the dropdown arrow and select Whole Number or Decimal (depending on your data needs) from the list:
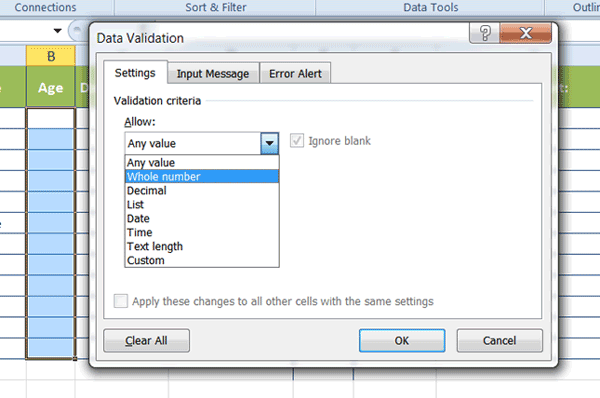
6. Below the Data heading, select an option for the number range you wish to allow entry for in the cells you have selected. For example, should the numbers allowed fall between certain values, be greater than or less than. For example, in the Age column in the screenshot above, we could set that the age value should be a Whole Number only and greater than or equal to 18.
7. Press OK to accept your selection.
8. Test whether the data validation is working by attempting to, for example, type a value that is included and a value that is excluded by your Validation Criteria. In our example, we could try to first insert 18 and then 17 into the Age column.
A default error message will alert you to the fact that the value you have tried to enter is not valid thus preventing incorrect data from being entered in the selected cells.
To limit a cell range to only allow dates or times:
1. Select the cell range to apply the data validation to.
2. On the Ribbon, click on the Data tab.
3. In the Data Tools group, click on the Data Validation button.
4. In the Data Validation dialogue box, ensure the Settings tab is active (the dialogue box opens on the Settings tab by default).
5. Below the heading: Validation Criteria – Allow – click on the dropdown arrow and select Date or Time (whichever is appropriate) from the dropdown list.
6. Below the Data heading, select an option for the date or time range you wish to allow entry for in the cells you have selected. For example, should the dates or times be allowed fall between certain periods, be greater than or less than a set date or time.
7. Press OK to accept your selection.
8. Test whether the data validation is working by attempting to, for example, type a value that is included and a value that is excluded by your Validation Criteria.
The Text Length Validation Criteria allows you to set a limit on the number of text characters a cell can contain.
* Data Validation Lists
Data validation lists do not only look awesome, they make data entry quicker, easier and more consistent. They act as reminders of what data needs to be selected and entered into a cell. For example, a list of classes, medications, products or departments, are only a few types of items you can use to create a data validation list category for.
The easiest method for creating a data validation list is to:
1. Open a blank worksheet and type the items for your list into this sheet. You can also use an existing list of items on a worksheet. Ensure that the list items are typed into separate cells.
2. Select the cell range in which you want the data validation list to appear.
3. Click on the Data tab on the Ribbon.
4. In the Data Tools group, click on the Data Validation button.
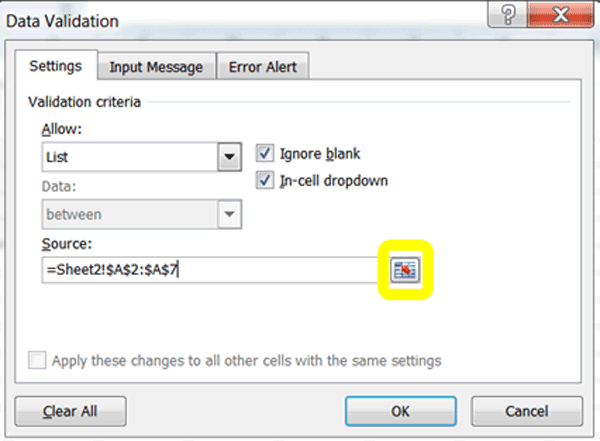
5. Below the: Validation Criteria – Allow – heading, select List from the dropdown list.
6. Click on the selection block (circled in yellow in the screenshot below and select the list you typed in instruction 1 above. Press Enter to accept the selection. The Source box should now contain the cell references for the location of where you typed the list as demonstrated in the screenshot example below:
7. Press OK to accept the data validation setting.
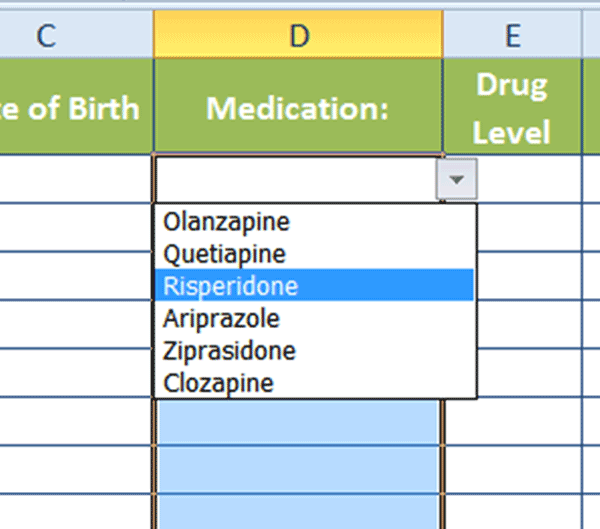
Test the data validation list you created by clicking in a cell within the selected range and picking an item from the list:
Practice by creating different data lists and experiment with using existing lists of data as a data validation list.
* Input Messages
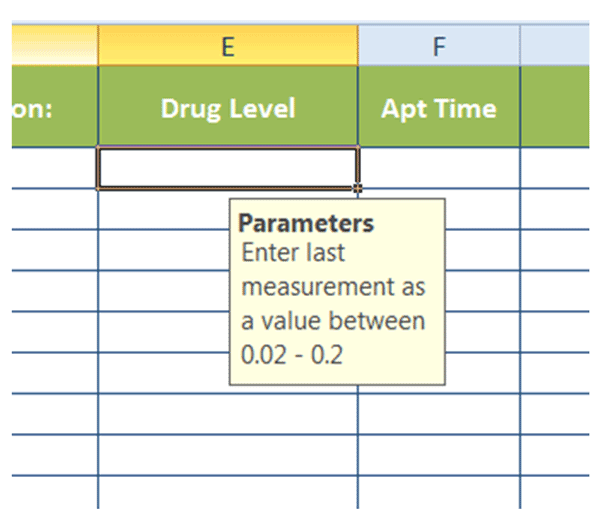
Input messages are reminder notes that pop up when a cell is selected. They can act as a guide for others using the worksheet or a reminder for yourself as to what kind of information should be entered into a cell.
In the screenshot example below, when a cell in the Drug Levelcolumn is selected, the input message explaining what values are expected to be entered into the cell appear:
To create an Input Message:
1. Select the cell, range of cells, row or column you wish the message to appear in when a cell within the range is selected.
2. Click on the Data tab on the Ribbon.
3. In the Data Tools group, click on the Data Validation button.
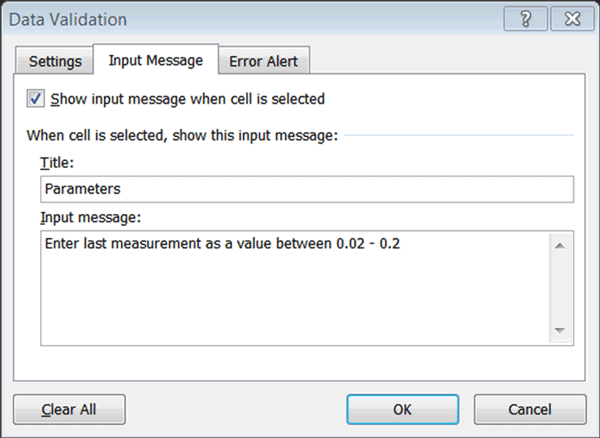
4. In the Data Validation dialogue box, click on the Input Message tab.
5. Ensure the box: Show input message when cell is selected is ticked.
6. Type a Title for your message or leave this box blank.
7. Type the body of your message in the Input Message box.
8. Press OK to accept the Input Message you created. You can always come back to the Data Validation dialogue box and change the message by selecting the cells or data range the message is applied to, clicking on Data Validation in the Data Tools group and changing the message details under Input Message.
In the screenshot below, an input message has been created:
Experiment with creating input messages for cells and cell ranges and editing the message.
* Error Alert Messages
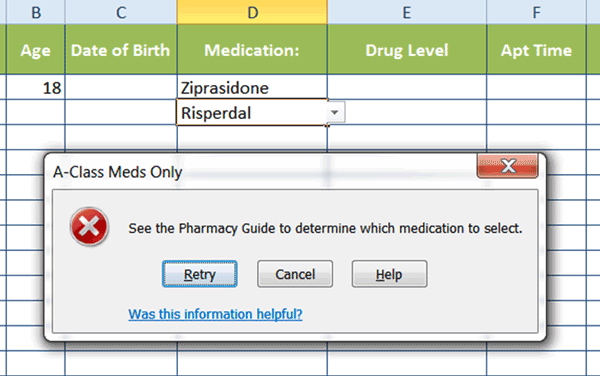
Where input messages are gentle nudges in the right direction, error alert messages represent an army of angry traffic police officers guarding a no entry road. When you apply data validation to cells to limit the type of data that can be entered, a default error message will appear if data that do not meet your validation criteria, is entered. This default message may not explain exactly why the data that was entered is incorrect and may need to be customized to explain the error.
In the screenshot below, a customized error alert message was created to notify nursing staff entering data onto the sheet that the drug they entered is incorrect and where to find correct information:
To add a customized error alert message:
1. Select the range of cells to which Data Validation criteria (see the section on Validation Criteria in this tutorial) has been applied.
2. Click on the Data tab and then on Data Validation in the Data Tools group.
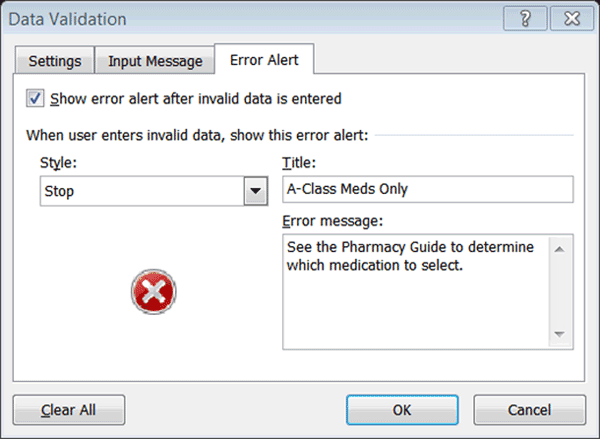
3. In the Data Validation dialogue box, click on the Error Alert tab.
4. Ensure the: Show error alert after invalid data is entered box is ticked.
5. Select a Style for the error alert message. You can select from Stop, Warning and Information styles.
6. Enter a title for your message in the Title box.
7. The body of the error message goes below the Error Message heading.
In the screenshot below, an error message has been created:
Experiment with creating error messages for different data sections.
* Removing Data Validation
At times you may want to delete the validation criteria applied to a range of cells or even delete all the criteria on a sheet.
To delete data validation criteria, including lists, input and error messages:
1. Select the cell(s) or entire worksheet to remove the validation from.
2. On the Ribbon, click on the Data tab.
3. In the Data Tools group click on Data Validation.
4. In the Data Validation dialogue box, click on Clear All in the bottom left-hand corner.
5. Press OK to confirm your selection.
All the data validation criteria applied to your selected cells will be removed. You can always press Undo if this was an error.
Now you have done the tutorial…
* TRY THE NEXT TUTORIAL: Using Formulas VLOOKUP and INDEX-MATCH
* TRY THE NEXT TEST: Using Formulas VLOOKUP and INDEX-MATCH


