www.TestsTestsTests.com
What-If Analysis Excel Tutorial
Excel 2010 Training –
Working with Data
Free Online Microsoft Excel Tutorial
* Using Goal Seek
*
Activating Solver
* Using Solver
* Working with Data Tables
Ever wonder what would happen if you changed a number in a formula? A What-if analysis lets you see how those changes will affect the outcome of the formula. Use Solver, data tables, and Goal Seek to test multiple values and see how the results change.
Test your Excel skills with the corresponding FREE Online Multiple Choice
What-If Analysis Excel Test
* Using Goal Seek
Goal Seek is a target-orientated personality’s dream-function. It allows you to tell a financial sheet what you want and it changes numbers to ensure your goal is reached. This may sound like cheating the books (and indeed this is a great function should you be criminally minded), but Goal Seek does have many legit uses. For example, if you wish to solve a formula based on a result that you already have to see what variables the formula needs in order to return this result, you could use Goal Seek.
Study the screenshot below:
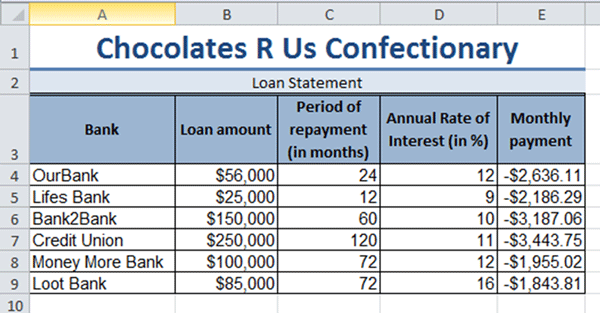
In this example, column E, Monthly payment is calculated by using the PMT function. This function calculates a monthly loan payment based on the loan amount, the number of repayments and interest rate. For example, Chocolates R Us Confectionary wishes to loan an amount of $56,000 from OurBank, pay it back over 24 months at an annual interest rate of 12%. This gives a monthly payment of $2,636.11.
We can use Goal Seek to change the Monthly payment to a different amount by having Excel automatically recalculate one of the other variables that we choose (Loan amount, Period of repayment or annual rate of interest).
To use Goal Seek:
1. Click on the Data tab on the Ribbon.
2. In the Data Tools group, click on What-If Analysis.
3. Choose Goal Seek from the menu list to launch the Goal Seek dialog box.
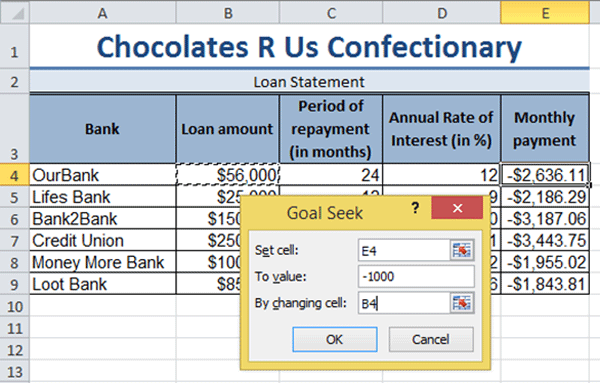
4. Click in the Set Cell box and select the cell reference for the value you wish to change. In our screenshot example above, if we wanted to change the Monthly payment amount in cell E4, this would be the cell reference to insert in this box.
5. Next, in the To Value box, enter the result you wish to obtain. For example, if we want to change our Monthly payment to OurBank (see screenshot above) to -$1,000, this is the value to enter in this box.
6. In the By Changing Cell box, select the cell reference for the cell which contains the value you want to adjust in order to calculate the new result. In our example above, we can select the Loan amount, Period of repayment or Interest rate variables specified for OurBank.
The completed Goal Seek box for the above example may look something like this:
7. Click OK to complete the Goal Seek.
8. The Goal Seek Status dialog box will appear detailing the changes made. You can press OK or Cancel at this point to accept or reject the changes.
You can use Goal Seek as many times as you like to experiment with changing different variables that form part of a calculation in order to achieve desired results.
* Activating Solver
The Solver utility is the big brother (or sister) of Goal Seek. It is essentially Goal Seek on steroids and allows you to calculate optimal values for a cell by changing multiple cells used in a formula instead of only one. It also permits you to set checks and controls on one or more cells that are used in a formula.Solver is not automatically available in Excel and needs to be activated the first time you use it.
To activate Solver:
1. Click on the File tab to launch the Excel 2010 Backstage view.
2. Click on Options to launch the Excel Options dialog box.
3. On the left-hand panel of Excel, click on Add-Ins.
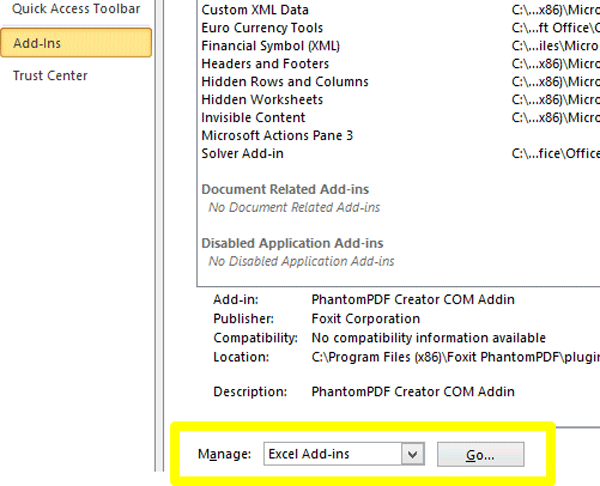
4. Next to Manage (see area circled in yellow in the screenshot below), select Excel Add=Ins and click on Go to launch the Add-Ins dialog box.
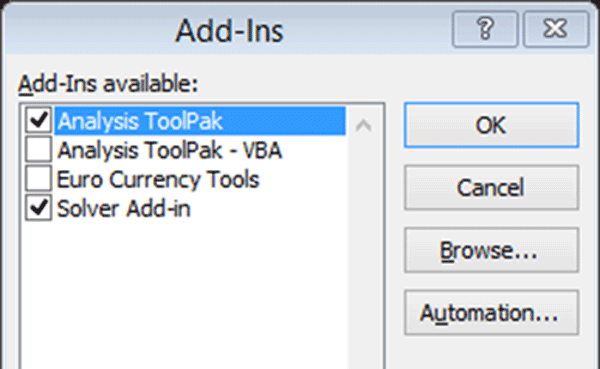
5. In the Add-Ins dialog box, check the boxes for Analysis ToolPak and Solver Add-In (see screenshot below). Press OK to accept the Add-Ins selection.
6. After pressing OK, you will note an Analysis group is added to the Ribbon under the Data tab with the two options selected, Data Analysis and Solver functions.
* Using Solver
Solver permits you to set multiple constraints and helps you calculate the optimal values for a formula by adjusting variables contained in the formula. In everyday English this means Solver allows you to tell an Excel formula what you want and how to get it.
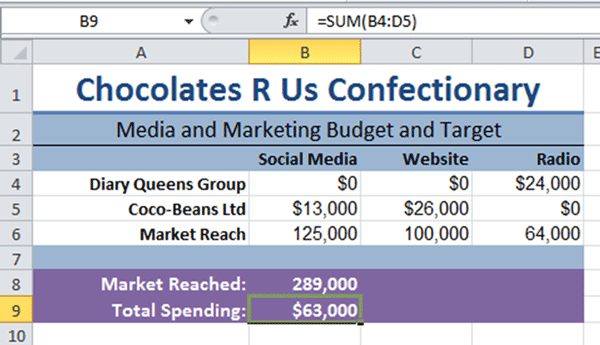
Study the screenshot below. We will be using this example to demonstrate Solver’s functionality.
1. Click on the Data tab on the Ribbon.
2. In the Analysis group, click on Solver to launch the Solver Parameters dialog box.
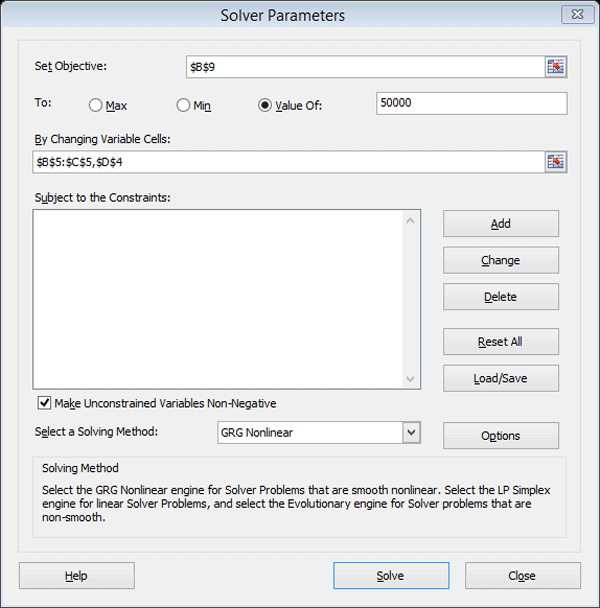
3. In the Set Objectives box, insert the cell reference which contains the formula you wish to apply the Solver to. In our example above, we wish to change the Total Spending contained in cell B9 to a value of $50,000.
4. Select the option you wish to apply to the result of the target cell, for example Max, Min or Value Of. We know the exact value for our example, so we will tick the Value Of box and insert 50000 in the box next to it.
5. In the By Changing Variable Cells box, select the cells which contain the values that need to be adjusted. In our example, this will be all the cells that form part of the Sum formula in B9 that contribute to the Total Spending. An easy way to insert all the relevant cells if they are non-continuous, is to hold down the control key on your keyboard whilst selecting the cells.
6. In the Subject to the Constraints box, insert any constraints you wish by clicking the Add button. This will launch the Add Constraint dialog box. Constraints are not always necessary, but are essential when you want to apply limitations on changes. You can use it to for example, set an amount that must or must not be exceeded or to use whole numbers only.
7. After adding constraints (if applicable), change the Select a Solving Method from the list if this is needed. Otherwise leave as is on GRG Non-Linear.
See screenshot below for the completed Solver Parameters for our example scenario:
8. Finally, click the Solve button to apply the Solver variables.
9. A Solver Results dialogue box will appear giving you the option to either cancel the Solver solution or to accept it:
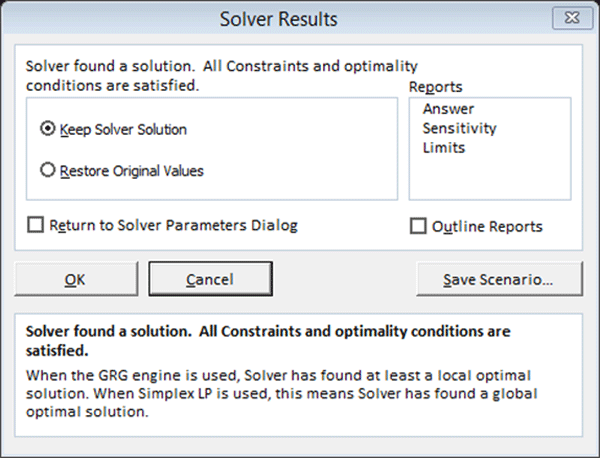
10. After pressing OK the selected cells will change keeping the revised values. You can go back to the Solver at any time to modify the results or to process more or different variables.
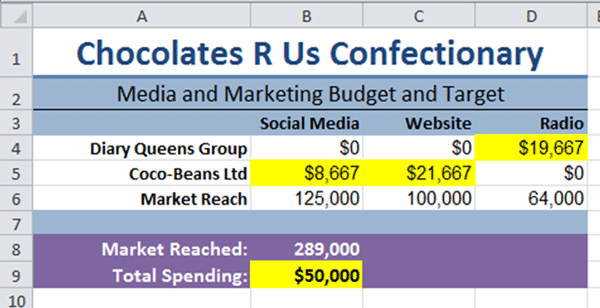
After carrying out the Solver on our Media and Marketing Budget to set the total spend to $50,000, the selected variables have been changed. Study the highlighted cells in the screenshot below and compare them to the worksheet at the beginning of this section (Using Solver):
Don’t be intimidated by all the different options and dialog boxes presented by Solver. It is an incredibly powerful function that can be used just as easily for simple variable modifications to complex ones. Create your own example, or replicate the one in this tutorial and practice using the Solver to change the variables.
* Working with Data Tables
A data table is a little like a Rubik’s Cube. It is a range that displays results which depends on changing specific values in one or more formulas. A Data Table also contains all the different values that make up the relevant formula calculation.
There are two types of Data Tables, one variable and two variable. For the purposes of this tutorial, we will be looking at one variable data tables.
Data tables are best understood when creating them for yourself. Study the screenshot below and recreate your own one in Excel.
In the example above, cells A3 to B15 forms the data table. The range A4 to A15 contains the input values that Excel will use when creating the data table.
To create the data table using the above data:
1. Begin by inserting the formula you wish to use. For our example this is the PMT function which calculates monthly payments based on variables which include the monthly interest rate, number of payments and the loan amount (see Variables table).
In the screenshot below, you will note the PMT function has been created using the values in cells E2, E3 and E4 in the Variables table:
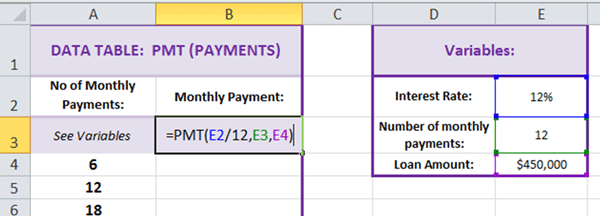
2. The Monthly Payment value in B3 based on the variables in E2:E4 is: -$39,982. To fill in the data table for the payment periods listed in A4 to A15, select the entire data table (A3:B15 in our example).
3. Click on the Data tab on the Ribbon and in the Data Tools group, click on What-If Analysis.
4. Select Data Table from the menu list to launch the Data Table dialogue box.
5. Click in the Column Input Cell box and insert the cell reference for the cell that contains the value you wish to substitute. In our example, we wish to substitute the number of monthly payments which is contained in cell E3. We would therefore insert E3 in the Column Input Cell box:
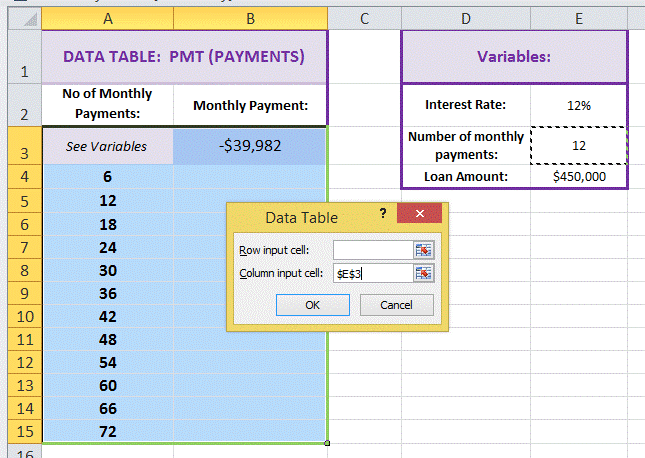
6. Press OK to accept the Data Table input cell.
The completed data table for the above example will look like this:
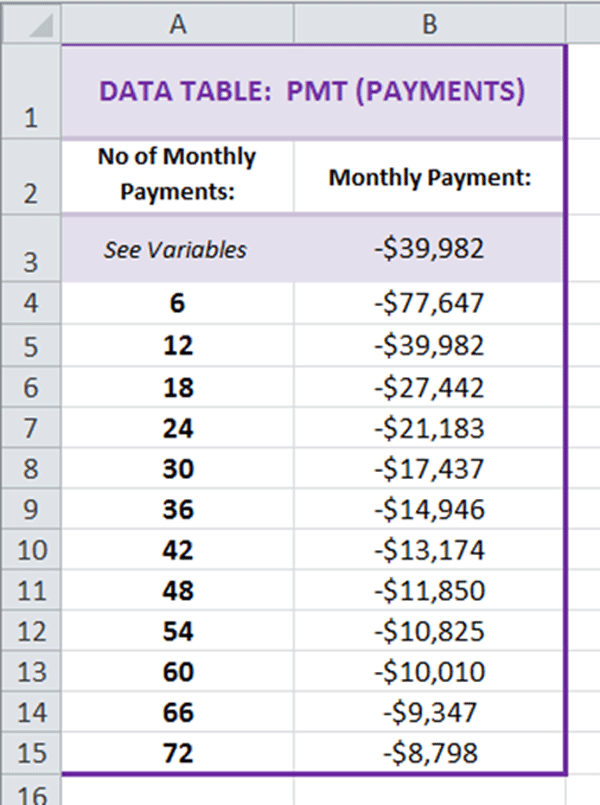
You can use a Data Table for any type of formula, from simple multiplication tables to complex financial and engineering functions. The key to data table success is to place all the variables in the correct cells in relation to one another with the formula always in the cell above where the first values appear.
Amaze your friends by quickly creating data tables that answer multiple questions and scenarios at the same time!Now you have done the tutorial…
Test your Excel skills with the corresponding FREE Online Multiple Choice
What-If Analysis Excel Test
* TRY THE NEXT TEST: Using Data Validation Tools in Excel


