
www.TestsTestsTests.com

Concatenate Function, Convert Text to Columns & Remove Duplicates Excel Tutorial
Excel 2010 Training –
Working with Data
Free Online Microsoft Excel Tutorial
* How to Use the Concatenate Function
*
Convert Text to Columns
* Remove Duplicate Values
Sometimes you need to combine the contents of different cells into one, sometimes you need to split the data in a cell into separate cells. Use the concatenate function to combine words and even numbers that are contained across different columns into one cell. The converse function of concatenate is the Text to Columns function which allows you to separate text across different columns. Excel even has a built-in function to remove duplicate values to ensure your data is free from repeat entries.
Test your Excel skills with the corresponding FREE Online Multiple Choice
Concatenate Function, Convert Text to Columns & Remove Duplicates Excel Test
* How to Use the Concatenate Function
According to the Oxford Dictionary the word concatenate means to link things together in a series. Although the word has possibly been in use since the late Middle Ages, its use in computer languages over the last decades has escalated its status and prevalence across different platforms. In Excel, the concatenate formula can literally save you days of work and frustration.
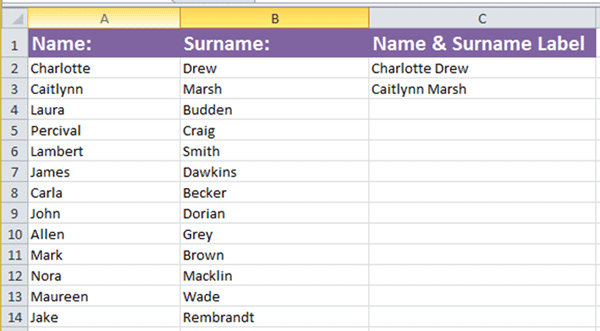
It is easiest to demonstrate the usefulness of this function by using an example. In the screenshot below, we have columns titled Name and Surname. Imagine you needed to have the current values entered into the Name and Surname columns in a single cell for each person as per the example below (see Name & Surname Label column C):
Of course you can manually type the name and surname into column C above or use copy and paste. This solution may work fine for you if you only have a handful of names and surnames (or other words or numbers) to join, but imagine it is a worksheet containing hundreds or even thousands of names and surnames or other values. Concatenation allows you to quickly join together the contents of two or more cells.
To use the concatenate function:
1. Position your cursor in the cell in which you wish the result of the concatenation to appear. In our screenshot example above, we would position the cursor in the Name & Surname Label column (column C).
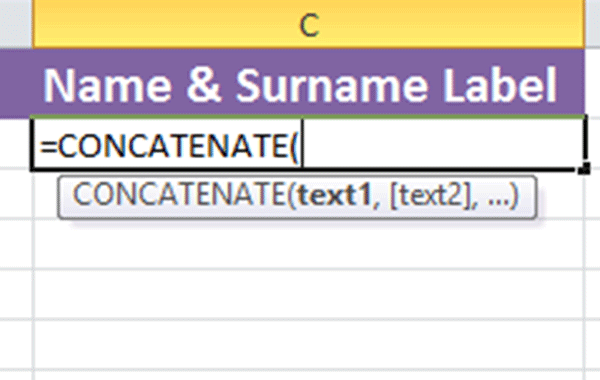
2. Next, type the equals sign (=) to start the formula, followed by the word Concatenate.
3. Excel will suggest the syntax for the formula for you as follows (see screenshot below):
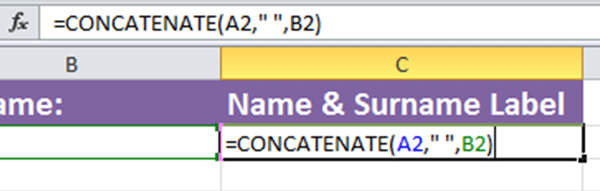
4. For the text1 argument in the formula, click on the cell containing the first value. In our example this will be a cell in Column A.
5. For the text2 argument in the formula, insert quotation marks followed by a space and then another quotation mark. This is essential to insert a space between, for example, the name and surname values. If the values you are joining do not need a space, you can omit this step.
6. For the text3 argument in the formula, click on the cell containing the second value. In our example this will be a cell in Column B.
7. Close the bracket and press the Enter key to finalize the formula.
8. The completed formula (as per our example above) will look like this (see screenshot below):
9. Finally, copy the formula down through the column by double clicking the right bottom corner of the cell or dragging the copy handle down through the rest of the cells in the column. You can also use the Copy and Paste function to duplicate the formula down the column. Ensure you paste the formula and not the values.
NB: Remember that the column where you enter the formula will still contain the formula although it is displaying the desired value. If you copy the values in this column over to another area on the worksheet, a separate worksheet or document, you will have to ensure you paste the values and not the formula.
* Convert Text to Columns
The convert text to column option allows for wide-ranging functionality to separate the contents of a single cell across multiple cells. Imagine you have a column where each cell contains an entire address that needs to be split across cells in several columns or, a simpler instance, when you have a name and surname in the same cell and wish to separate them across two columns. Having one cell which contains multiple pieces of data often happens when information has been copied over from a Microsoft Word document or other source and can even occur when someone inadvertently enters multiple strings of data into one cell instead of splitting it up logically.
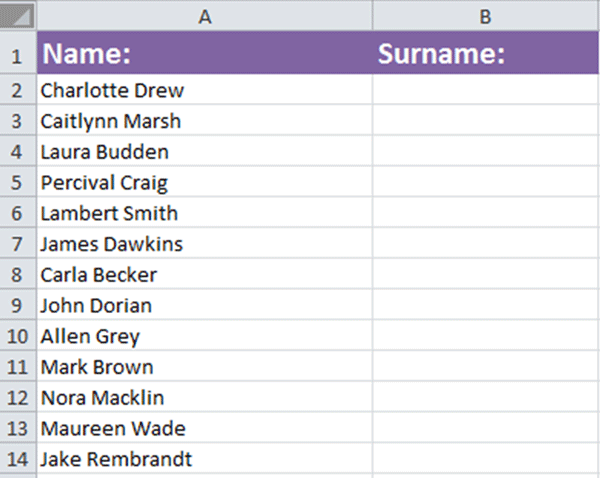
To demonstrate this logic better, the screenshot below contains a column that has both the name and surname of each person in the same cell, down the same column. We need to separate the name and surname into the Name and Surname columns respectively. Many people resort to cutting and pasting the required data over or even retyping it, which can be cumbersome.
To separate the contents of a cell across multiple cells in different columns:
1. Select the column or cells containing the values you wish to split. In our example above it will be the cells in the Name column (column A).
2. Click on the Data tab on the Ribbon and in the Data Tools group, click on Text to Columns.
3. In the Convert Text to Columns Wizard dialogue box, ensure the Delimited radio button (circled in yellow in the screenshot below) is selected. This will ensure that text in a cell that is separated by a space is split at the point of the space.
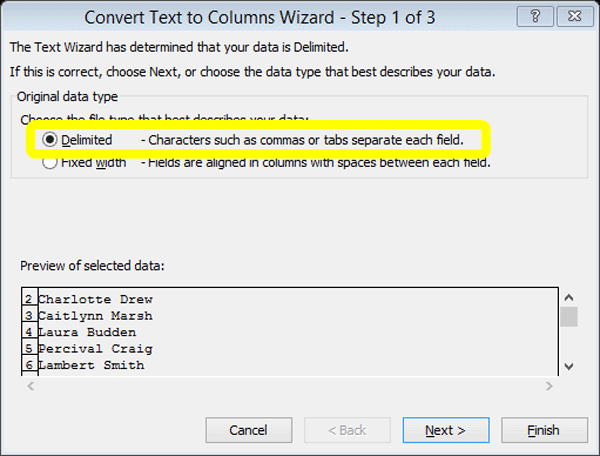
4. Click on the Next button to go to Step 2 of the Convert Text to Columns Wizard dialogue box.
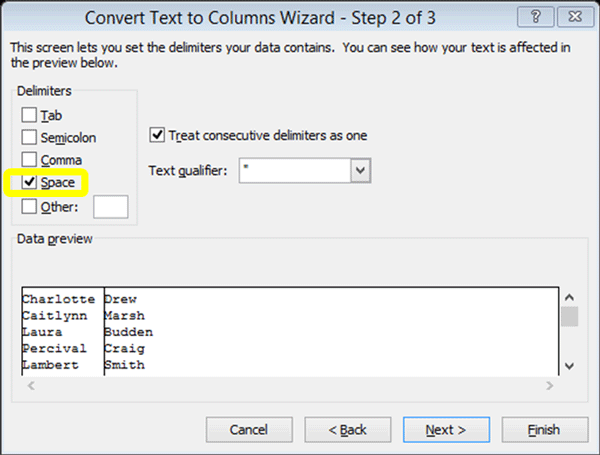
5. In the Convert Text to Columns Wizard – Step 2 of 3 dialogue box, tick the box for Space (circled in yellow in the screenshot above). Untick any other boxes under Delimiters. Should your text be separated by any of the other delimiters listed, you should select the relevant one(s).
6. Press the Next button to advance to the final step in the Convert Text to Columns Wizard. Select the format for your data. In our example, this will be the Text option. You can also leave it as General and change the format at a later point.
7. Press Finish to apply the conversion.
Whenever you are faced with data that is located in a single cell that needs to be split across cells in different columns, the Convert Text to Columns function should be your first stop. It is worth experimenting with the countless other options for delimiters and formats contained in this Wizard.
* Remove Duplicate Values
Duplicate names, items or other values can lead to data that returns incorrect values in formulas or have a knock-on effect in other productivity realms. Imagine in a mailing list, the same person gets contacted twice or a product that has been entered multiple times gets counted in the stock incorrectly. To avoid errors that arise from duplicate values, Excel has a built-in function to remove duplicate values.
To use the Remove Duplicates function:
1. Position your cursor anywhere within the data range containing the cells you wish to check for duplicates, or select the row(s) or column(s) to analyze.
2. Click on the Data tab on the Ribbon and in the Data Tools group, select Remove Duplicates to launch the Remove Duplicates dialogue box (see screenshot below):
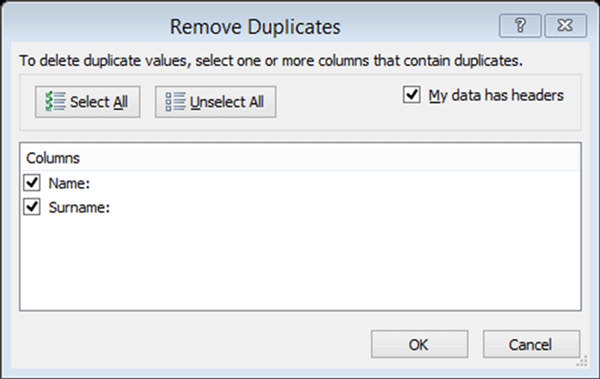
3. In the Remove Duplicates dialogue box (see screenshot above), tick the boxes for the columns you wish to include in the range and ensure the My data has headers box is ticked if you have included column headings in your selection.
4. Press OK to proceed to remove the duplicates. Excel will automatically remove the duplicate values in the selected range and an information box notifying you of how many duplicate values have been removed, will be displayed.
If you have removed duplicates in error, simply press the Undo button or Ctrl+Z to restore any deleted values
As a safety precaution, it may be worth first highlighting all duplicates before using the Remove Duplicate function.
To highlight duplicates:
1. Select the data range you wish to check for duplicates.
2. Click on the Home tab on the Ribbon and in the Styles group, click on Conditional Formatting.
3. Select Highlight Cells Rules from the menu list and then Duplicate Values from the submenu list.
4. Press OK in the Duplicate Values dialogue box. All the duplicate values will be highlighted and you can quickly review them before applying the Remove Duplicates option.
TIP: An important rule of thumb when using any of Excel’s function on a worksheet that contains reams of data that you cannot afford to lose or corrupt, make a duplicate of the worksheet before you experiment so that you have a backup to return to should anything go wrong.
Now you have done the tutorial…
Test your Excel skills with the corresponding FREE Online Multiple Choice
Concatenate Function, Convert Text to Columns & Remove Duplicates Excel Test