
www.TestsTestsTests.com

Protecting Worksheets Excel Tutorial
Excel 2010 Training –
Worksheets
Free Online Microsoft Excel Tutorial
* Password Protect a Workbook
*
Protect a Worksheet from Changes
*
Protect a Workbook Structure from Changes
*
Unlocking Selected Cells to Allow Edits
Data in an Excel worksheet can be highly confidential when it contains, for example, personal details, salaries or bonuses of staff at a company or even your personal budget. Another security issue is when other viewers or users of the worksheet inadvertently or intentionally change formulas or data without your knowledge and thus compromise the integrity of the data. Excel provides multiple functions to protect your worksheet and data so that other people can’t change some or all of it or access it without prior authorization.
Test your Excel skills with the corresponding FREE Online Multiple Choice
Excel Protecting Worksheets Test
* Password Protect a Workbook
By their very nature, worksheets in Excel can contain confidential information relating to personal budgets, company financials, salary or other personal details. This calls for a method of restricting access to workbooks that contain sensitive or private information.
Password protection enables you to add a password to a workbook that prevents anyone who does not have the password, to open the workbook or view its contents.
To add a password to an existing workbook:
1. Open the workbook.
2. Click on the File tab on the Ribbon and then click on the Info tab (circled in yellow in the screenshot below):
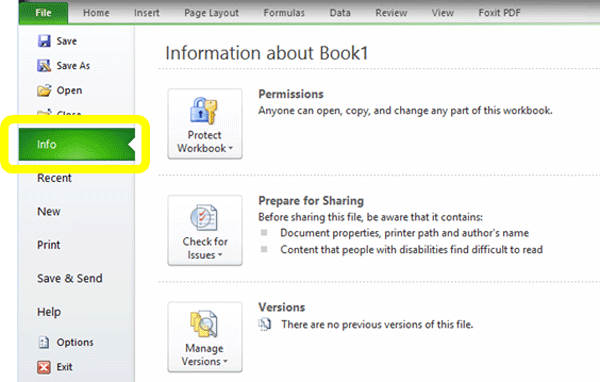
3. Next, click on the Protect Workbook button and select Encrypt with Password from the list.
4. In the Encrypt Document dialogue box, type a password for the workbook and press OK. You will be asked to confirm the password in a second dialogue box. Retype the password and press OK again.
5. Close the workbook. When you try to open it again, a dialogue box prompting you to enter the password will appear. To open the workbook, insert the correct password and press OK.
To delete a password:
1. Open the workbook by entering the password created.
2. Click on the File tab on the Ribbon and then click on the Info tab.
3. Next, click on the Protect Workbook button and select Encrypt with Password from the list.
4. Delete the password contained in the Encrypt Document dialogue box and press OK.
5. Save the document.
NB: Make a note of remembering the password. It is virtually impossible to access a workbook that has been password protected without using the correct password.
* Protect a Worksheet from Changes
If you are anything like me, you take great pride in how you put a worksheet together. You carefully pick the formulas to use and tweak the formatting and colors to suit your tastes. Then you sit back and press the share button to distribute your worksheet to all relevant parties or provide access to the original to people who need it. A few hours or days later, you open your worksheet and something is not quite right. The formulas are no longer calculating correctly or someone changed the font or color of the sheet. Many an office dispute or argument has been initiated by something as simple as someone changing the shade of a heading row on someone else’s worksheet!
To keep the peace, Excel has a neat feature that allows people to open your worksheet and use the data contained therein, but leave them powerless to make any changes to it. If you suspect they are IT savvy and may be on to your method of blocking changes, you can even password protect access to switching the worksheet protection on or off leaving them unable to edit it.
To protect a worksheet from changes:
1. Open the worksheet you wish to protect.
2. Click on the Review tab on the Ribbon.
3. In the Changes group, click on Protect Worksheet.
4. In the Protect Worksheet dialogue box (see screenshot below), you have a multitude of actions that you can select to allow for the worksheet after protection is applied. For example, you may wish users of the sheet to be able to select cells and use the Filter function. Tick the boxes for any of the functions you wish to permit:
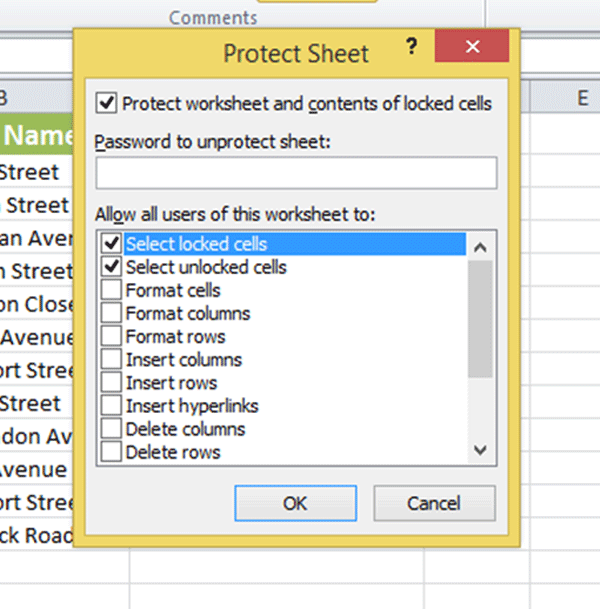
5. If you wish to password protect the protection function, enter a password in the box for Password to unprotect sheet. This will allow access to the worksheet, but block anyone from switching off the protection.
6. Press OK to accept the changes.
If you click back in your worksheet and try to make any changes that you have not permitted in the Protection Worksheet dialogue box, an error message informing you that you do not have permission to change the worksheet will pop up.
To remove worksheet protection:
1. Open the worksheet from which you wish to remove protection.
2. Click on the Review tab on the Ribbon.
3. In the Changes group, click on Unprotect Worksheet. If you set a password for worksheet changes, you will be prompted to enter the password before the protection will be switched off.
*Protect a Workbook Structure from Changes
If you have a workbook containing many worksheets, you can protect each individual sheet using the method described in the tutorial section above. You can also protect an entire workbook before sharing it by setting the protection for the workbook structure. This will prevent others who access your workbook from being able to move, delete or insert new worksheets into the workbook.
To protect a workbook:
1. Open the workbook you wish to protect.
2. Click on the Review tab on the Ribbon.
3. In the Changes group, select Protect Workbook.
4. In the Protect Structure and Windows dialogue box (see screenshot below), tick the box for:
- * Structure – to prevent worksheets from being moved, deleted or new ones inserted;
- * Windows – to prevent the workbook window from being minimized or resized.

5. You can insert an optional password to prevent someone from turning the workbook protection off. Enter the password in the Protect Structure and Windows dialogue box (see screenshot above).
6. Press OK to save changes.
Test the protection setting by trying to delete, insert or move a worksheet within your workbook. This is a great function to ensure control over the structural integrity of a workbook.
To remove workbook protection:
1. Open the workbook to remove the protection from.
2. Click on the Review tab on the Ribbon.
3. In the Changes group, click on the Protect Workbook button. If you set a password for workbook protection, you will be prompted at this point to enter the password in order to switch off the workbook protection.
* Unlocking Selected Cells to Allow Edits
Locking and unlocking cells in Excel is a somewhat paradoxical feature. It is both exceptionally powerful and useful and at the same time, extremely puzzling to use.
To demonstrate its usefulness, let’s start with an example. In the screenshot below, you will note columns containing names, surnames and addresses. The last column (highlighted in yellow) requires a Boolean value such as true or false to be entered to confirm that a letter had been sent to each person:
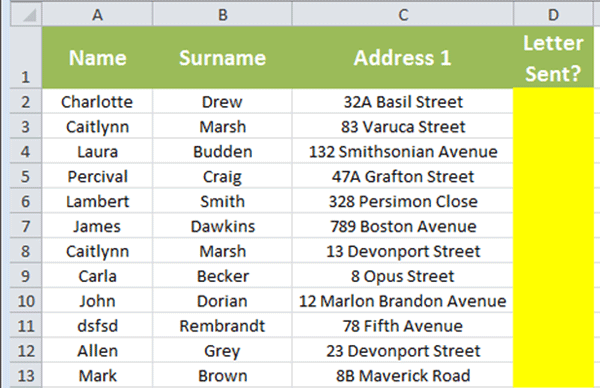
In the above example, we may wish to block a user from being able to edit the names, surnames or addresses on the worksheet or prevent them from making any formatting changes, but we want them to be able to enter TRUE or FALSE in the Letter Sent column. In essence, we are looking for the best of both worlds: wanting to protect the worksheet, but also wanting others to be able to change what we want them to change!
To achieve the above, we need to be able to lock some cells whilst leaving others unlocked. In the example above, we will want to lock all cells, except those in the column D (Letter Sent?).
Cells are automatically all locked in a worksheet until you unlock them. We therefore need to unlock the cells in the column D.
To unlock cells:
1. Select the cell(s) or cell ranges you wish to unlock.
2. Click on the Home tab on the Ribbon. In the Cells group, click on Format and then click on Lock Cells (see circled in yellow in the screenshot below):
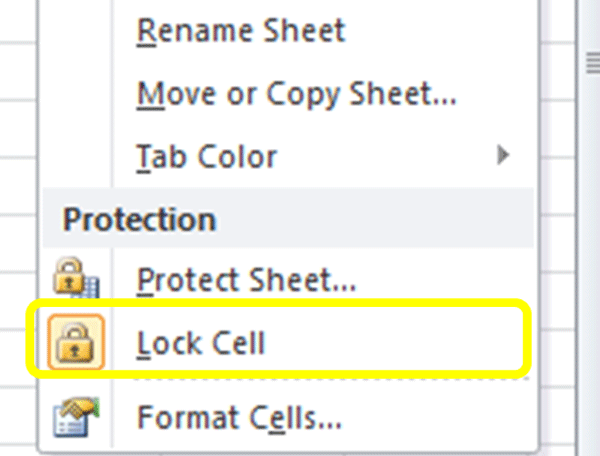
3. The only indication that you have successfully unlocked the cells is that the graphic of a lock next to the Lock Cell word in the Format menu, will be un-highlighted.
4. Unselect the unlocked cells and then click on the Review tab on the Ribbon.
5. In the Changes group, click on Protect Worksheet. Press OK to accept the changes.
You will now be able to edit, add contents and format the unlocked cells, whilst the rest of the worksheet remains locked and no one will be able to edit them without unprotecting the worksheet. You can add a password to ensure that no one can switch this function off.