
www.TestsTestsTests.com

Advanced Worksheet Formatting Tutorial
Free Online Microsoft Excel Tutorial
Excel 2010 –
Worksheets
* Freeze Window Panes
*
Split Screens
* Naming Cell Ranges
*
Transposing Rows and Columns
*
Inserting Comments
Use freeze panes to always see your column headings, no matter how far down you scroll. Split the worksheet to see two different parts at the same time using the Split Screen function. It can be helpful to name cells and cell ranges rather than referring to a cell by its address. Switching rows and columns gives you another view of your data. Like using a sticky note, inserting comments can help explain your data.
Test your Excel skills with the corresponding FREE Online Multiple Choice
Excel Advanced Worksheet Formatting Test
* Freeze Window Panes
When your data runs over multiple rows and/or columns, scrolling down or to the right through the data on your worksheet will move the column and/or row headings out of view. If you are anything like me, this inevitably means that once these headings are out of sight, you instantly forget what they were. Usually this means you have to scroll back to the top or the left of the worksheet to review the column or row headings, however, there is a simpler method. Freezing window panes allow you to make specific rows and/or columns of the worksheet immovable. The rest of the worksheet will be unaffected and will move behind the frozen rows and columns when you scroll through a worksheet.
You can insert the freeze pane in any part of a worksheet, but most commonly you will want to freeze title columns or rows.
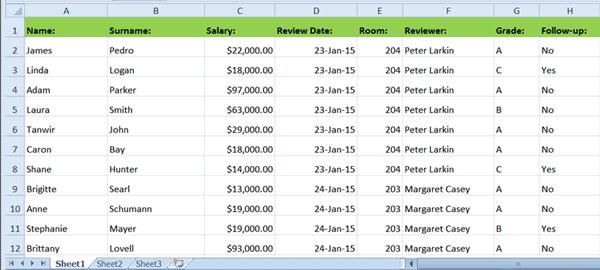
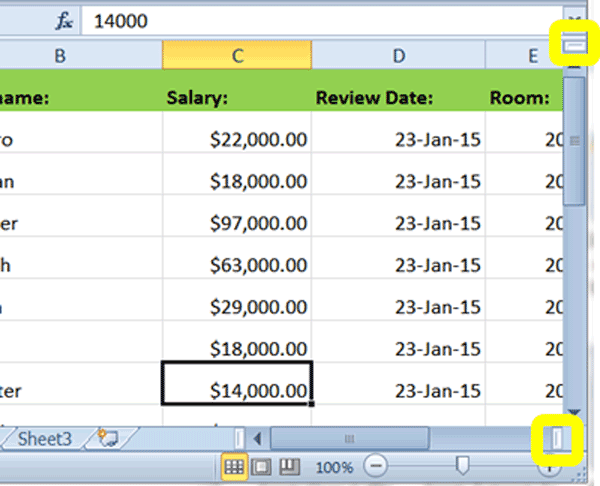
Study the screenshot below. You may agree that it would be useful to be able to freeze the heading row at the top of this worksheet so that it will remain visible when scrolling down to view the data or to add new data after the last row.
To freeze a selection such as a row or column in a worksheet:
1. Position your cursor anywhere in the worksheet.
2. Click on the View tab on the Ribbon and in the Window group, click on the Freeze Panes button (highlighted in yellow in the screenshot below).

3. From the Freeze Pane menu select Freeze Top Row or Freeze First Column, depending on where your headings are located. In our example worksheet above, it would make sense to freeze the first row containing the column headings: Name, Surname, Salary, Review Date, etc.
4. The section that has the Freeze Pane applied to it will have a line below it (in the case of a row) or a line to the right of it (in the case of a column) to indicate that it has been frozen.
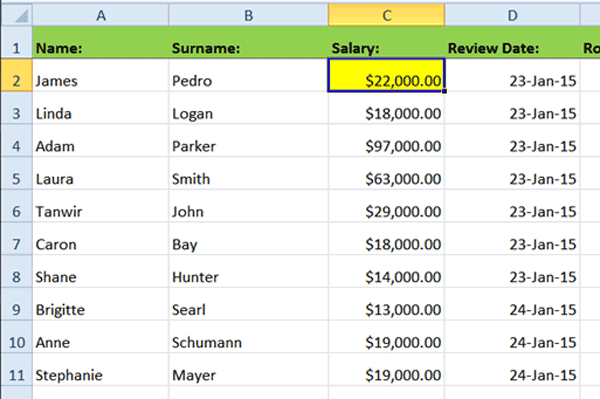
What happens if you want to freeze both a row and a column at the same time? For example, in our worksheet above we may want the column headings visible as well as the names and surnames of the employees on the list.
To apply a Freeze Pane to a row and column section simultaneously:
1. Position your cursor in the cell that falls at the junction of where the Freeze Pane will need to meet. For example, in the worksheet below, if we wish to freeze the heading row as well as the names and surnames of employees, we would position our cursor in the cell highlighted yellow:
2. After selecting the cell to the right of the last column and below the last row you wish to include in the Freeze Pane, click on the View tab on the Ribbon.
3. In the Window group click on the Freeze Panes button and select Freeze Panes from the Freeze Pane menu.
4. You will note a horizontal and vertical line indicating where the Freeze Pane is located.
Before applying a new Freeze Pane, you must remove the previous Freeze Pane selection.
To remove a Freeze Pane:
1. Position your cursor anywhere in the worksheet from which you wish to remove Freeze Panes.
2. Click on the View tab on the Ribbon.
3. In the Window group, click on the Freeze Panes button and select Unfreeze Panes from the Freeze Panes menu.
4. All Freeze Panes applied to the worksheet will immediately disappear.
Freeze Panes will not affect the printing of a worksheet, formatting or any formulas within the sheet. It is a view function only that makes viewing reams of data in Excel easier.
* Split Screens
At first glance, the Split Screen function may appear to serve no purpose whatsoever. This function has a reputation as a pranking tool where the screens of unsuspecting colleagues, parents or friends, who may not be as computer literate as the prankster, is split in two! So, even if you do not view this function as useful to you, you may want to take note of how it works should you wish to impart some frustration on someone else (or if someone applies this to your Excel screen!).
The Split Screens function does exactly what the name says: it allows you to split the Excel screen into two parts where you can view different sections of the same worksheet at the same time. This is a view only and does not affect the actual content or layout of your worksheet.
To apply a Split Screen to a worksheet:
1. Open the worksheet you wish to apply a Split Screen to and click on the View tab on the Ribbon.
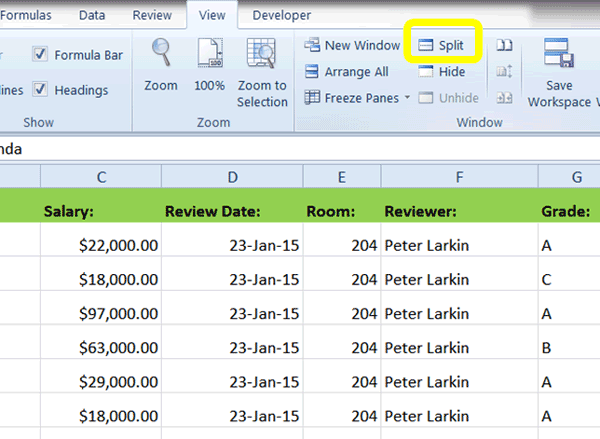
2. In the Window group click the Split button (circled in yellow in the screenshot below):
3. After you click the Split button, a vertical and horizontal split line will appear depending on where in the worksheet your cursor was located when you pressed the Split button.
4. To move the Split Screen lines, hover your mouse cursor over the Split line you wish to move until the mouse cursor icon changes into a double pointed arrow icon. Click and drag the Horizontal Split line up or down and/or the Vertical Split lines to the left or right, depending on how you wish to split the.
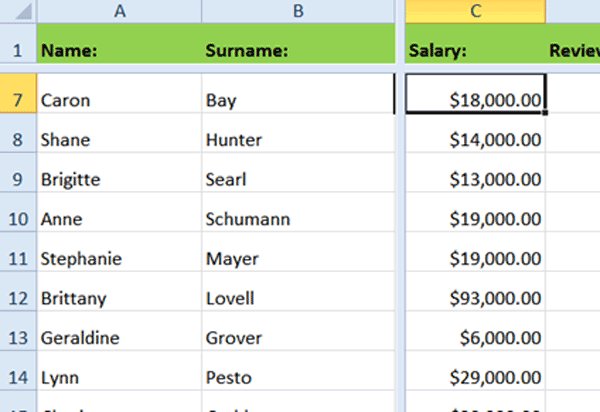
5. Position your cursor on either side of a split and use the horizontal or vertical scroll bars to move around on each side of the Split Screen. Both sides of a Split Screen contain the entire worksheet and the split does not affect the formatting or contents of your worksheet, as mentioned earlier.
This may be a useful function should you have an exceptionally large worksheet and need to compare data in one part of the worksheet to another part.
An alternative method to activate a Split Screen is to drag either the Vertical or Horizontal Split Line onto the screen. The Split icons are located above the horizontal and to the right of the vertical scrollbars respectively, (circled in the screenshot below):
Click and drag the Horizontal Split Screen line down from above the vertical scrollbar or drag the Vertical Split Screen line to the left from its position next to the Horizontal Scrollbar.
To remove a Split Screen:
1. Click the Split button in the Window group under the View tab to deactivate all Split lines.
2. Alternatively, double click a Split line to remove it.
* Naming Cell Ranges
Formulas in Excel can often be complex and difficult to understand. Now imagine you did not create the formulas, or they were created a long time ago, just how difficult it would be to understand the cell references and calculations. Luckily for us, Named Cell Ranges, take a lot of the work out of understanding how a formula was constructed.
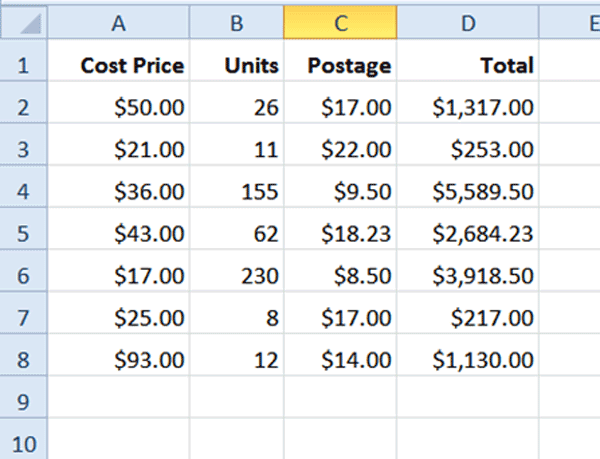
To demonstrate the benefit of using Named Cell Ranges, study the two formulas below:
Formula A: = =SUM((A2*B2),C2)
OR
Formula B: = SUM((COST_PRICE*UNITS),POSTAGE)
Which of the formula examples above do you think is easier to understand, Formula A or B?
I’m sure you would agree that Formula B is easier to understand. At a quick glance we can tell that the formula calculates the total cost price of units including postage. When faced with Formula A, you would have had to carefully study the data and data headers to ascertain what the formula is calculating and where the cell references are located.
Named ranges do not only make understanding data and formulas easier, it also aids in creating complex formulas, analyzing data and using data validation and analysis tools.
Named ranges can be a single cell, groups of cells, whole rows or columns of data.
To create a Named Range:
1. Select the cell or range of cells you wish to name. In the example below, we have selected a column (Cost Price) to create a name for.
2. Click in the Name Box (circled in yellow in the screenshot below) and type a name for the range:
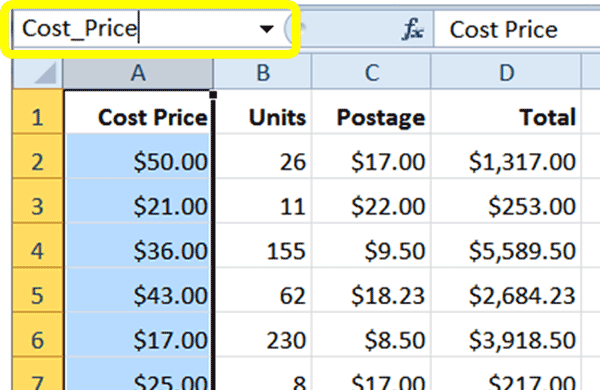
Connect two words in a named range by using the underscore as in the example above. Excel will not allow you to use two words, punctuation or numbers on their own in a named range.
3. Press the Enter key on your keyboard to complete the Named Range.
To view all Named Ranges in a worksheet, click the dropdown arrow next the Name Box:
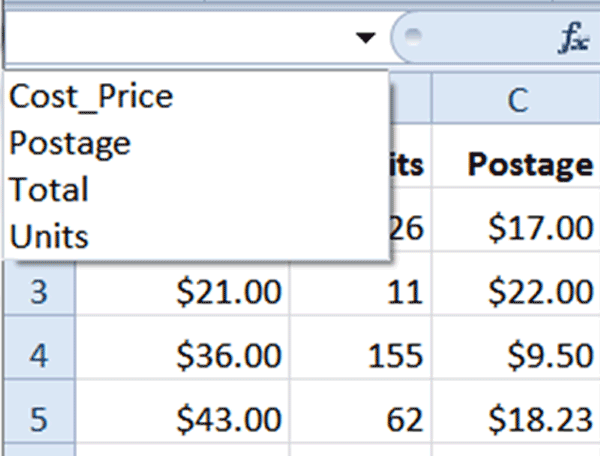
Selecting one of the names in the Names Box will select the relevant range in the worksheet.
To use a Named Range in a formula:
1. Create the formula as you normally would, by inserting an equal sign and the name of the formula, for example, SUM.
2. Instead of using cell references, for example, =Sum(A1,A2), use the cell range’s name that you have created.
3. Excel will prompt you with the names of Named Ranges when you start typing. Click on the name in the list or type it manually to insert it into a formula.
To delete Named Ranges:
1. Select the worksheet by pressing Ctrl+A on your keyboard.
2. Click on the Formulas tab on the Ribbon.
3. In the Defined Names group click on the Name Manager button. This will launch the Name Manager dialogue box.
4. In the Name Manager dialogue box click on the Named Range in the list you wish to delete then click on the Delete button, confirm the deletion and close the dialogue box.
* Transposing Rows and Columns
Imagine you need your data to be rotated so that your column labels become row labels switching the view of your data around. Many people achieve this by using cut and paste to recreate the desired format, but the Transposing function will achieve this much quicker.
Study the screenshot of a data set below:
To transpose the data in the example above so that data is arranged in rows:
1. Select the data set you wish to Transpose.
2. Click on the Copy button or use the copy shortcut key combination: Ctrl+C on your keyboard.
3. Position your cursor in the first cell of the area where you wish to transpose the data set to (you need to select a different area of the worksheet or a new worksheet).
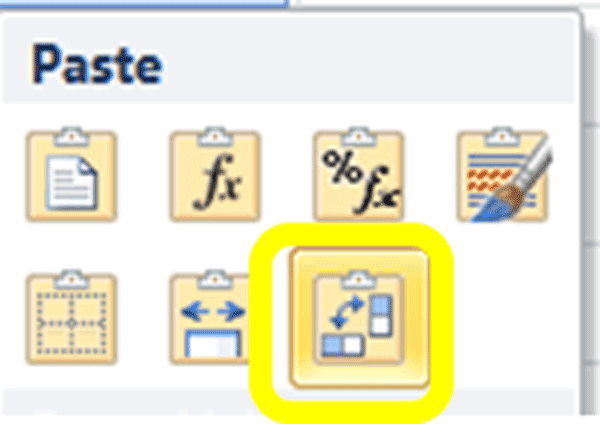
4. Click on the dropdown arrow below the Paste button in the Clipboard group and select the Transpose function (circled in yellow in the screenshot below) to transpose the data:
5. The pasted data will be transposed.
* Inserting Comments
Comments allow you to add notes to your own data or to a worksheet that you are reviewing. Comments are positioned external to cells and therefore do not affect the format or layout of your worksheet. They are easy to insert and remove, making them the ideal way of communicating thoughts about specific data sets in Excel.
To insert a comment:
1. Select the cell to which the comment applies.
2. Click on the Review tab on the Ribbon.
3. In the Comments group, click on the New Comment button.
4. A comment box will open in your worksheet attached to the cell you selected. The comment box will contain the name of the worksheet author and space to type your comment. You can delete the name and insert your own name.
5. Type into the comment box and once you are done, click back into the worksheet.
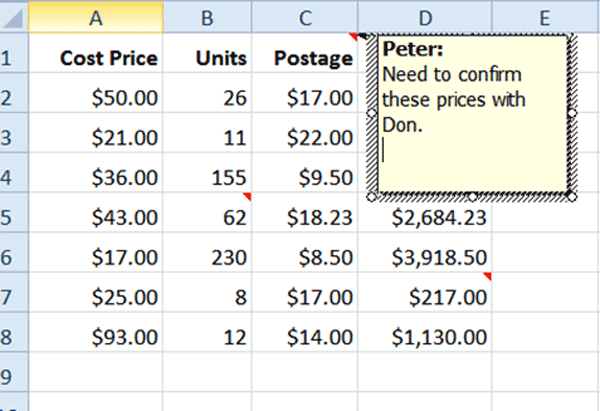
6. Comments are embedded into a worksheet and become visible when you hover over or select a cell that contains a comment. You can also see that a cell contains a comment by looking out for a tiny red triangle in the top right-hand corner of a cell.
To edit an existing comment:
1. Select the cell that contains the comment you wish to edit.
2. Click on the Review tab on the Ribbon.
3. In the Comments group, click on the Edit Comment button.
4. Make changes to the comment as required.
To delete comments:
1. Select the cell that contains the comment you wish to delete.
2. Click on the Review tab on the Ribbon.
3. In the Comments group, click on the Delete button.
To delete all comments in a worksheet, select the whole worksheet by pressing Ctrl+A on your keyboard before clicking on the Delete button in the Comments group.
A quick way to insert a comment is to right-click a cell and select Insert Comment from the menu list. You can also use the shortcut: Shift+F2 to insert a comment to a selected cell.