
www.TestsTestsTests.com

Autofill Excel
Using Autofill in Excel Tutorial
Free Online Microsoft Excel Tutorial
Excel 2010 – Entering Data
* What is Autofill?
* Autofill Day and Month Series
* Autofill Number Sequences – How to autofill numbers in Excel
* Autofill Custom Lists
The Autofill function is a great tool that allows you to quickly create date or month series, numbered lists and sequences and even customized sets of data, saving you from having to manually type them out. Imagine you need to create a roster where everyone’s name reappears in sequence reflecting when they are on duty or you want to quickly create a work/month/week planner.
Test your Excel skills with the corresponding FREE Online Multiple Choice
Excel Using Autofill Test
Autofill also works brilliantly to create a numbered list or series of numbers.
Let’s examine how to do this.
* What is Autofill?
We briefly touched on Autofill and how to use it in the COPY AND PASTE tutorial where it was used simply to quickly replicate data to a cell or cells adjacent to the data you wish to copy. However, Autofill is far more powerful than just a copy and paste tool!To experiment with the Autofill function, it is important to understand two elements inherent to it: the Fill handle and Auto Fill Options.
1. To experiment with these, open a blank Excel spreadsheet and insert some data into a cell.
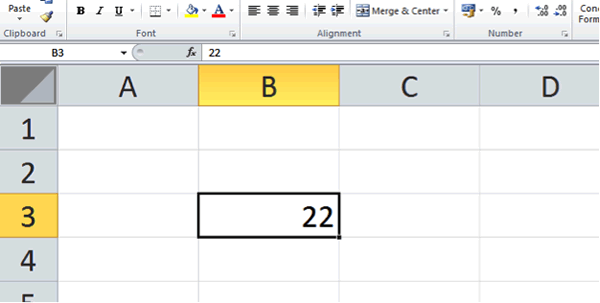
2. Select the cell containing the data and have a close look at the selection border that surrounds it. You will note it is ‘broken’ by a tiny little box in the bottom right-hand corner (circled in blue in the image below).
3. Hover your mouse cursor over this corner and when your cursor changes into a crosshair, push and hold down your left mouse button whilst dragging upwards, downwards, left or right. This will allow you to copy the contents of the selected cell into the adjacent cell(s).
4. The Auto Fill Options icon appears after you have copied cells. To display the options, you need to click on the icon that appears in the bottom right-hand corner of the last cell you filled. Study the example below:
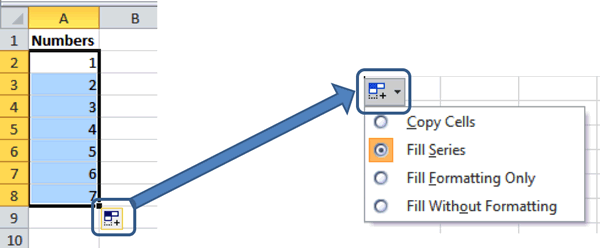
5. The list of options that appears will vary depending on what type of data the cell you are copying contains. The options in the image above are the standard options for auto filling numbers.
– If you select the first option, ‘Copy Cells’, the cells you auto filled will become copies of the cell you selected to fill down.
– ‘Fill Series’ creates a data sequence – in this example the numbers 1-7.
– If you select ‘Fill Formatting Only’, only the formatting contained in that cell will be copied down, but not the value of the actual cell.
– ‘Fill Without Formatting’ will copy only the value contained in that cell, but leave the formatting.
– Go ahead and experiment with the available options!
* Autofill for Day and Month Series
Have you ever needed to quickly create a day/week/month planner? Want to be able to create a roster or appointment book? Need a timetable for all the studying you are planning to do this semester? Easy as pie using the Autofill function!Let’s explore how to do this:
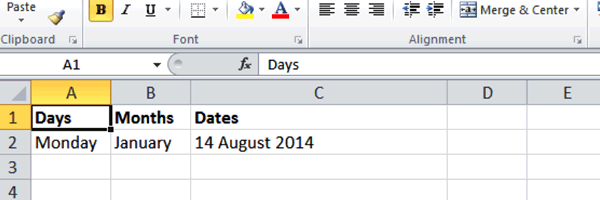
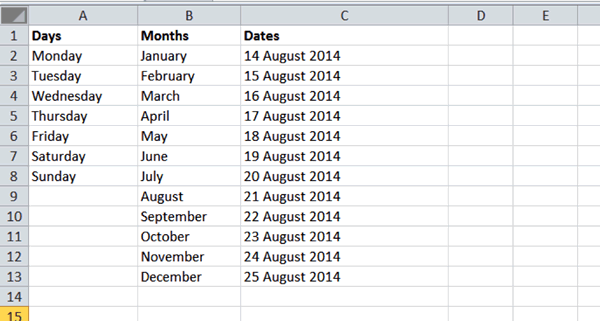
1. Open a new spreadsheet and recreate the data as shown in the image below:
2. Next, select the first cell in the Days column containing the word ‘Monday’ (A2 in the example above) and drag the Fill handle down until you get to Sunday. Did you note the grey information box that appeared to the right of the cells whilst you were dragging the Fill handle informing you of which day you are at?
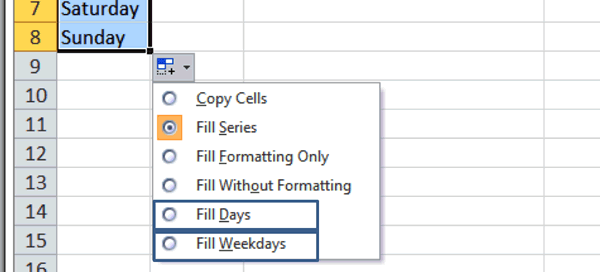
3. After you have completed the Days fill. Click on the Auto Fill Options box and study the available options. You will note there are two additional options that are unique to this type of content, namely: ‘Fill Days’ and ‘Fill Weekdays’. ‘Fill Days’ will create a sequence of all the days of the week, however, should you wish to exclude weekends and only have weekdays in your series, select the ‘Fill Weekdays’ option.
4. The month Autofill function works in exactly the same way as the days Autofill function. Use the Fill handle to fill the Month series, by selecting the cell containing January (B2 in the example below) and auto filling the cells below it until you get to December.
5. Finally, Autofill the Dates column by selecting the first date (C2 in the example below) and using the Fill handle to fill the cells below.
The results of your different Autofill sequences should look something like this:
TIP: Experiment with what happens if the first cell you select starts on a Friday or if the month you select to use the fill handle on is not January.
* Autofill Number Sequences – How to autofill numbers in Excel
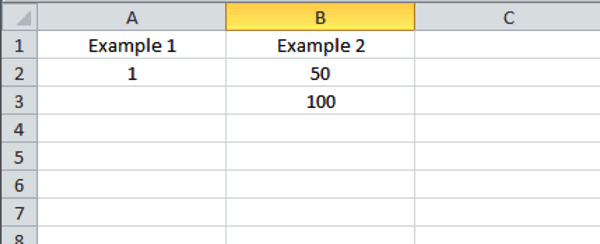
There may be many reasons to want to create a sequence of numbers, for example, to number a list of items in Excel or to automatically create a list of numbers that increment by a set value. This is, or will be, one of those functions that you wish someone had told you about before you spent all afternoon manually numbering a list in Excel…1. Open a blank spreadsheet and enter the data as pictured below:
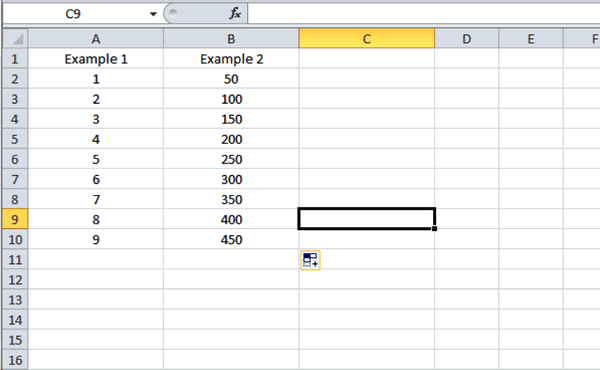
2. Select the 1 under the heading Example 1 (A2 in the example above) and Autofill up to cell A10. This should create a list of 1s. Select the option on the Auto Fill Option icon (that appears in the right-hand corner of the last cell that was filled). Pick the option that says: ‘Fill Series’. Your list of 1s will change into a numbered list.
3. In the second example, we want to create a customized list where we Autofill a series with numbers that increment by steps of 50. To do this, select the first two numbers in the series, in this example 50 and 100 (B2:B3 in the example above) and then Autofill down to cell B10.
Your results should look like this:
You can also create customized increments in your series using Autofill and set number value at which you want the Autofill function to stop. You do this by using the Fill Options located on the Ribbon:
1. Type the number 100 in a blank cell, press enter to accept the data entry and then select the cell.
2. On the Ribbon, click on the Home tab. Locate the Editing group (on the far right of the ribbon) and select the down pointing arrow next to the Fill button (all circled in blue in the image below).

3. From the dropdown list select ‘Series’. This will launch a dialogue box with a number of Autofill options as pictured below:
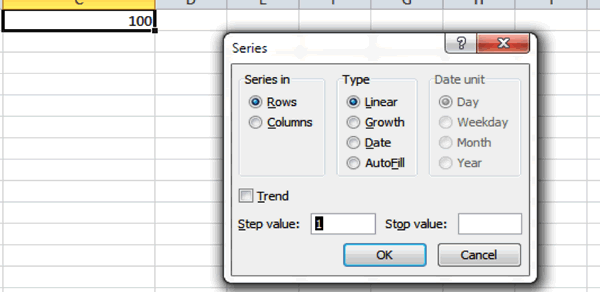
4. In the box for Step value, insert the value you wish to increment your number by in each successive fill, in other words each cell in the sequence. For example, say you want a list of numbers between 100 and 150 with increments of 1.5. Type 1.5 in the Step value box and 150 in the Stop value box. We want our numbers to go downwards in a column, so select the button next to Column under the series heading.
Your completed box should look like this (take note of the areas circled in blue):
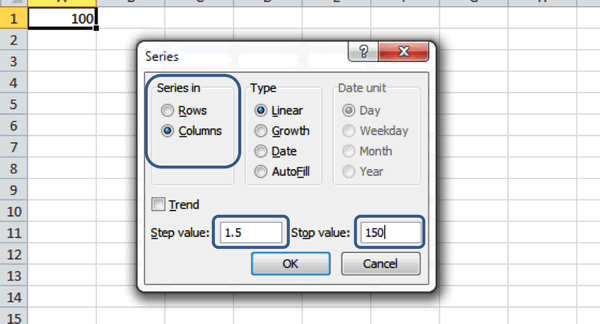
5. Press OK. And like magic, Excel will automatically have filled your sequence downwards.
– This is a really useful tool if you wish to automatically create a list of values with specific increments.
– Experiment with the other options in the Series options box. You never know, one of them may just file your tax returns for you!
* Autofill Custom Lists
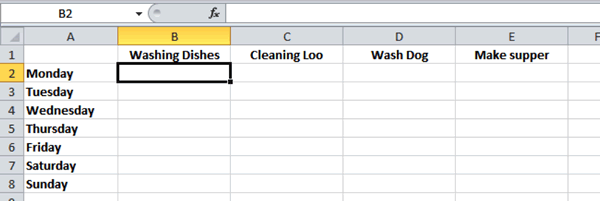
Another really useful Autofill option is to customize your own series. This will allow you to type the first item (word, letter or number) in a series and then use the Fill handle to Autofill the data. For example, if you share a house with family/ students/ other persons and want to draw up a housecleaning roster where duties are rotated, this tool will assist you in creating a list of names to repeat and allow you to evenly distribute names in the roster (that is if you want the roster to be fair…).
1. Start by entering the following sample data into an Excel sheet (remember to use Autofill for the days of the week!):
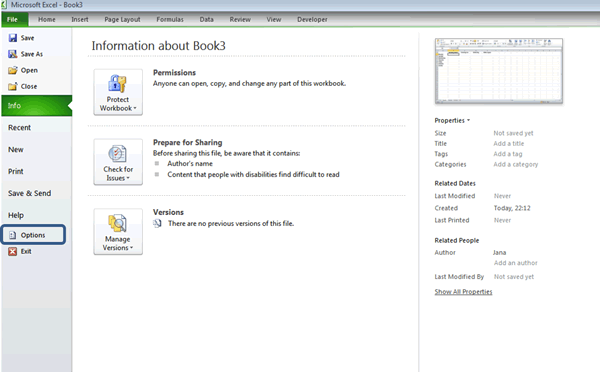
1. Next, click on the File tab on the Ribbon. It is the green tab on the top left-hand side of the screen. This will open what Microsoft calls the ‘backstage’ screen.
2. Locate and click on the Options button which you will find in the list of items on the left of the screen (circled in blue in the image below):
3. This will launch the Excel Options dialogue box. Next select Advanced Options from the left-hand tabs and scroll down in the main section of the options dialogue box until you see the General section (circled in blue in the image below):
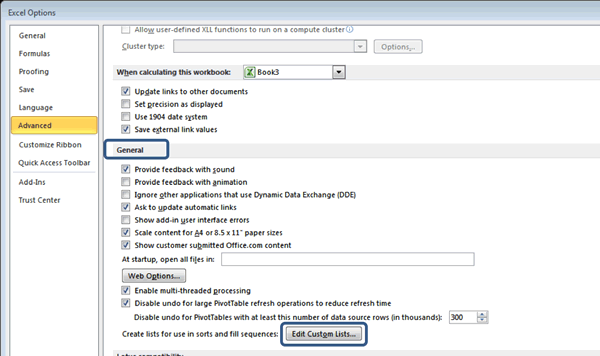
4. In the General section, click on the Edit Custom Lists button (circled in blue in the image above).
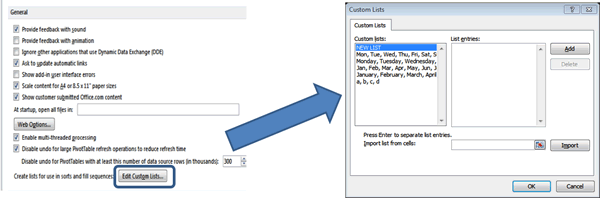
5. This will open the Custom List dialogue box (pictured above).
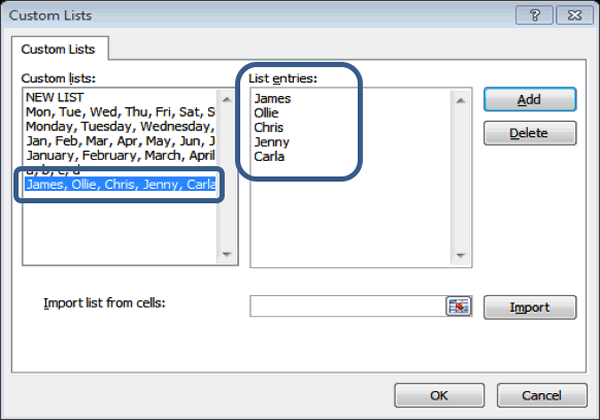
6. In the box underneath the heading “List entries:” type the following names: James, Ollie, Chris, Jenny, Carla and press Add.
Your result should look like this:
7. Press OK to close the dialogue box and OK again to close the Excel Options dialogue box.
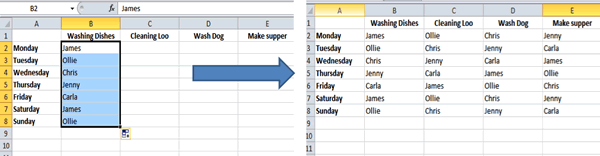
8. Back in the spreadsheet, type the first name in the list we created, James, into cell B2.
9. Use the Fill handle to fill the column and then again to fill each individual row. Your results should look like this:
You can create custom lists for a variety of useful repeatable items and sequences – for example a shopping list, stock inventory or any other list of items that you use repeatedly.
Woohoo! Now that you have done the tutorial:
Test your Excel skills with the corresponding FREE Online Multiple Choice
Excel Using Autofill Test
TRY THE NEXT TUTORIAL:
Formatting Text in Excel Tutorial
TRY THE NEXT TEST:
Formatting Text in Excel Test