
www.TestsTestsTests.com

How to Add Excel Borders & Shading to Cells Tutorial – Formatting Excel Spreadsheets
Excel 2016 Tutorial
Data Entry & Formatting in Excel 2016
Free Online Microsoft Excel Lessons
* Excel Cells – How to add borders in Excel 2016
* Deleting Borders from cells in Excel
* Applying Colored Shading to Cells
* Deleting Colored Shading from Cells in Excel 2016
* Applying Built-In Formats – Save your new styles in Excel 2016
|
Worksheets are used to display data in row and column format, usually with headings and/or rows containing total values of calculations. |
 |
* Excel Cells – How to add borders in Excel 2016
Use borders to make your data not only look nice but easier to read too! They are easy to apply and remove if you follow the steps in this tutorial.
First, let’s have a look at how data looks with and without borders.
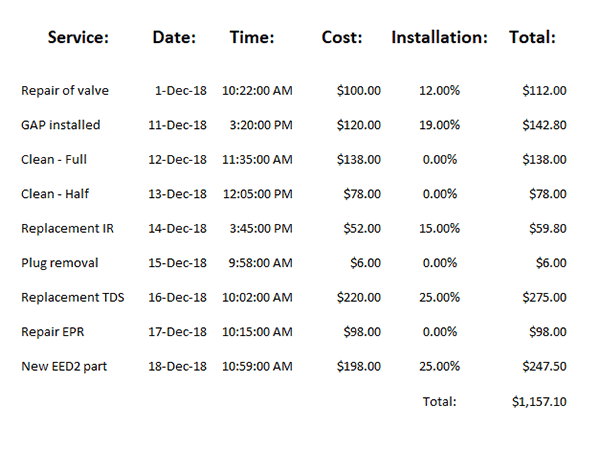
Without Borders:
With borders applied:

The data set in the above two examples is small, imagine you had a large worksheet with multiple rows and columns of data – the borders may make it much easier to read a printed copy of the data.
IMPORTANT: Excel worksheets have gridlines enabled by default. These gridlines resemble border lines, but they won’t print. Their purpose is to assist you in entering data into cells, rows and columns.
To apply borders to cells in your worksheet:
1. Select all the cells you want to format with borders – to do this hold down your left mouse button and drag the selection shading through all the cells to select.
2. Under the Home tab on the Ribbon, in the Font group, click on the dropdown arrow next to the Border button and select one of the options listed (see screenshot below):
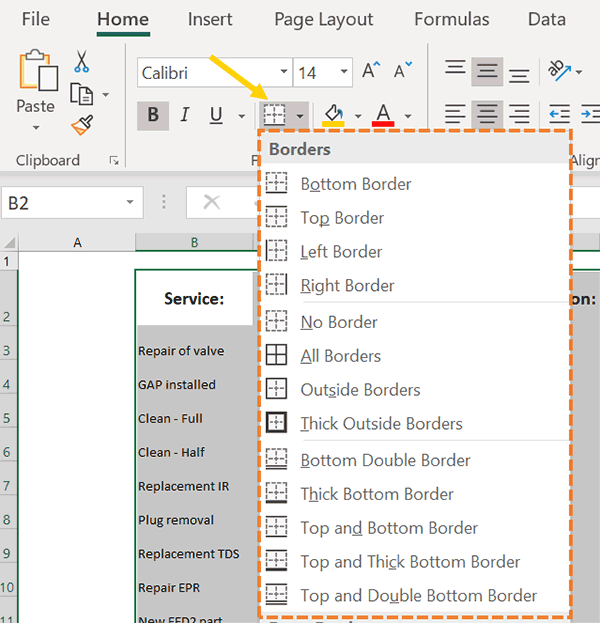
The selected border will instantly be applied to the selected cells.
You can also draw custom borders:
1. Open the Borders menu list and select Draw Border from the list.
2. Your mouse cursor will change into a small pencil. Use the pencil to draw borders around cells/rows or columns.
If you change your mind about which border to apply, select the data again and select another border option from the borders list.
To select and change the color of borders:
1. Select the cells you wish to apply the border to.
2. From the Borders menu list select Line Color option and then pick a color.
3. Either apply the new border color to the borders using the Draw Border pencil tool OR select the borders to apply the new color to from the Borders list.
You can set all of the above options in the Format Cells dialog box:
1. Select the cells you wish to apply borders to.
2. Right click and select Format Cells and then click on the Border tab.
3. In the Format Cells dialog box select a line style, color and use the border box to set set where each line should appear. Press OK to apply the border formatting.
* Deleting Borders from cells in Excel
To remove all borders, select the cells and then in the Borders menu list select the No Border option. This will instantly delete all the borders in the selected cells.
To remove some borders, but not others: Select the cells and then in the Borders menu list select the No Border option.
You can also use the Erase Border tool to delete borders: The Erase Border tool is available from the Borders menu list. Once selected your mouse cursor will change into a tiny purple eraser. Click the eraser on borders in your worksheet to instantly delete them.
TIP: You can remove all formatting, including borders, by using the Clear button in the Editing group under the Home tab. Caution: it will remove ALL formatting and may not always be suitable.
* Applying Colored Shading to Cells
Study the screenshot below:
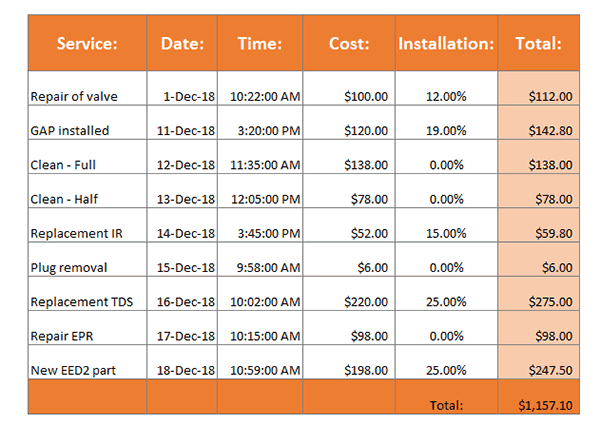
Applying color shading to cells as in the above example, highlights important data and makes your worksheet look nice. Color shading is also known as Fill Color in Microsoft Excel.
It is easy to apply shading to a worksheet – follow these steps:
1. Select the cells, rows or columns to which you want to apply shading.
2. Under the Home tab on the Ribbon, in the Font group, click the dropdown arrow next to the Fill Color button.
3. Click on a color to apply it to the cells.
TIP: You can apply as many different colors to the same worksheet as you want. If you have corporate colors, you can select it from the More Colors option using either standard, RGB or HSL color palettes.
You can set all of the above options in the Format Cells dialog box:
1. Select the cells you wish to apply shading to.
2. Right click and select Format Cells and then click on the Fill tab.
3. In the Format Cells dialog box select fill color, fill effects and pattern colors and styles. Press OK to apply selection.
* Deleting Colored Shading from Cells in Excel 2016
To remove colored shading applied to cells, follow these steps:
1. Select the cells to remove the shading from
2. Under the Home tab on the Ribbon, in the Font group click the dropdown arrow next the the Fill Colors button.
3. Select No Fill to remove shading from the selected cells.
TIP: To remove all shading applied to a worksheet, click on the Select All button which you’ll find at the intersection of the column and row labels in the top left-hand corner of the Excel window. You can also use the shortcut key combination Ctrl + A to select the entire worksheet. Then select No Fill to remove all shading.
* Applying Built-In Formats – Save your new styles in Excel 2016
Excel comes packed with a number of different built-in cell styles which include border and shading options. You can also save border and shading styles you create to the built-in Cell Styles gallery.
To apply cell styles:
1. Select the cells you wish to apply the formatting to.
2. Under the Home tab on the Ribbon in the Styles group, click on the Cell Styles button.
3. From the Cell Styles gallery select one of the styles to apply to your cells (see screenshot below)

TIP: If you hover your mouse cursor over each style, you will have an instant preview of what the style will look like when applied to your cells.
You can also save any border and shading styles you create to make it easy to access at a later stage.
To save your custom border and shading formats to the Cell Styles gallery:
1. Format cells with the border and shading options you want.
2. Select the formatted cells.
3. Go to the Cell Styles gallery and click on the New Style option below the gallery items.
4. In the Style box, give your style a name and press OK to save it.
Now if you go back into the Style Gallery, your new style will appear at the top, ready for you to apply it as you need it!
Woohoo! Now that you have done the tutorial:
Test your Excel skills with the corresponding FREE Online Multiple Choice
Formatting Excel Worksheets
~ How to Add Excel Borders & Shading to Cells in Excel 2016
* TRY ANOTHER TUTORIAL: What’s new in Excel 2016 Test
* TRY ANOTHER TEST: What’s new in Excel 2016 Tutorial