
www.TestsTestsTests.com

The File Tab & Backstage View Excel Tutorial
Excel 2016 Tutorial
Learn Excel Basics Lesson
Free Online Microsoft Excel Tutorial
* The areas of the Backstage View – Excel 2016
* How to Open Excel Workbooks in Excel 2016
* Create New Workbooks
* Save Workbooks and Recover Unsaved Workbooks
* Excel to PDF – Create PDF copies of Worksheets to Share in Excel 2016
|
The File button in Excel provides access to workbook saving, retrieving, information, security settings and a multitude of other options, which are not readily available in the normal workbook view. Aptly named the Backstage View, this is where you will find all the tools you need to create and manage Excel workbooks like an expert! |
 |
* The areas of the Backstage View – Excel 2016
Similar to the behind the scenes activity of a stage play, the Backstage view in Excel contain all the tools needed to create, manage and share an Excel workbook.
To access the wonderful world of the Excel 2016 Backstage view:
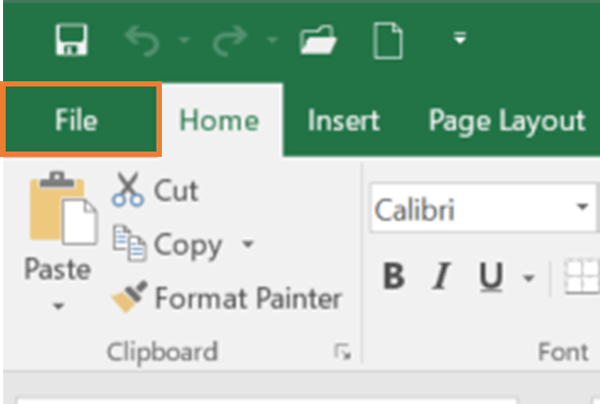
1. In an open Excel workbook, click on the File tab:
2. This will launch the Backstage view that opens on the Info page by default.
Depending on which tab you click on in the Backstage view, you will be presented with different options. These options, as numbered in the screenshot below, are as follows:
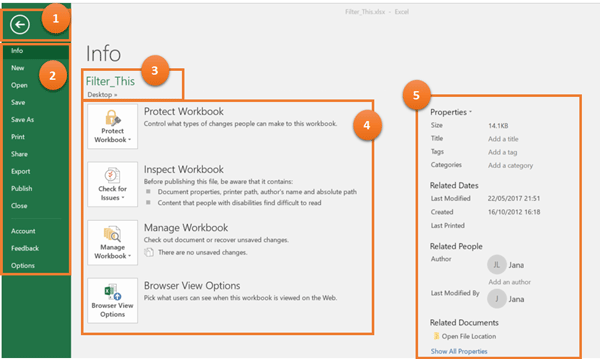
1. The Back button – this will take you back to your worksheet and exit the Backstage view.
2. Backstage view tabs – these are all the different option areas for the Backstage view. Click on these to navigate to different options.
3. This is the name of your workbook. If the worksheet has no name yet, this will be Book1, Book2, etc.
4. These are security and workbook sharing options, you can use these to, for example, password protect a workbook.
5. The properties area provide you with useful information such as when the workbook was created and by whom.
* How to Open Excel Workbooks in Excel 2016
To get started in Excel 2016, you may want to open a workbook that you created earlier or one that has been shared with you by another MS Office user. At first glance it may appear that there is not much to opening a workbook, you double click the workbook icon in a folder or email attachment, and it opens, right? There are a couple of workbook opening tricks you may not be aware of, for example, you can quickly open workbooks that you used recently without having to spend time finding them.To open an existing workbook, click on the File tab to launch the Backstage view.
1. In the Backstage view tabs list, click on Open. This will launch the Open section of the Backstage view, as shown in the screenshot below:
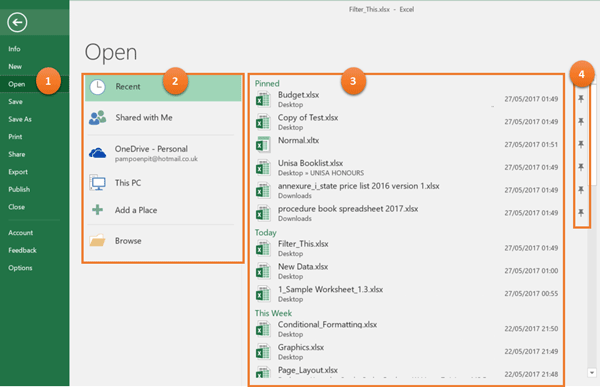
2. Worksheet location – select where the workbook you are looking for is saved. With Microsoft Office 365 you can browse for worksheets that you used recently, that were shared with you via a Microsoft Online OneDrive account, your own cloud-based OneDrive account, documents hosted on a corporate SharePoint Server or on your traditional computer hard drive.
Locate the workbook in your preferred location and click to open.
3. Recent and Pinned are options that make it easy to find workbooks you used recently or ones you repeatedly need to access quickly. The Recent section displays workbooks in date order of when they were accessed, with Pinned workbooks always displayed at the top of the list.
4. A Pinned workbook is one that you use frequently. In the area numbered 4 in the screenshot above, you will note pins which appear on the right-hand side of each worksheet. By clicking to the right of each worksheet in your Recent area, you can pin and unpin workbooks. Once unpinned, the workbook will move down the Recent list and once pinned, it will move to the top of the list.
TIP: The keyboard shortcut combination, Ctrl+O will quickly navigate to the Open section of the Backstage view. Hold down the control key on your keyboard and press O (the letter not the number) whilst you are in your regular worksheet view.
* Create New Workbooks
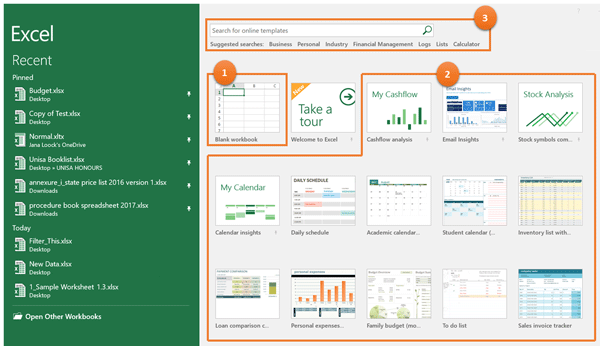
Creating a new workbook can be a lot of fun! Firstly, decide what you would like to achieve with your workbook, for example, do you need an invoice, contact list, financial statement or a personal budget. Before you start building that workbook, searching Excel 2016’s template gallery for existing templates, can save you a lot of time and work.
When you launch Microsoft Excel 2016, it automatically opens the Recent and New screens. The New section, gives you the option of creating a blank workbook (see 1 in the screenshot below) or to select a template from the suggested gallery (see 2 in the screenshot below).
Use the Search for online templates box (3 in the screenshot below) to search for templates. You could, for example, type budget and Excel will present a gallery of options that match this search criteria. To open a workbook from the gallery, click on the workbook image.
You can also open a New workbook from within an existing workbook:
1. Click on the File tab to launch the Backstage view.
2. In the Backstage view, click on New. This will open the New section from where you can select a blank workbook or search for and use Excel templates.
TIP: The keyboard shortcut combination, Ctrl+N will quickly navigate to the New section of the Backstage view. Hold down the control key on your keyboard and press N whilst you are in your regular worksheet view.
* Save Workbooks and Recover Unsaved Workbooks
Frequently saving workbooks is highly recommended. You can save a workbook to your local hard drive, your cloud-based OneDrive account or a corporate SharePoint space. You can also instruct Excel to save a workbook automatically at set intervals and recover unsaved workbooks.
To save a workbook:
1. In the workbook view, click on the File tab to launch the Backstage view.
2. In the Backstage view, click on the Save button in the Backstage option list.
3. Depending on where you wish to save the workbook, select a Recent folder, your OneDrive account or your PC hard drive by navigating to a folder to save the workbook in.
It is recommended that you create folders and save workbooks in such a way that you are able to find them again. Should you forget where you saved your workbook, remember you can always use the Recent option to access it.
TIP: The keyboard shortcut combination, Ctrl+S will save your workbook. Hold down the control key on your keyboard and press S whilst you are in your regular worksheet view.
- If your workbook has not been saved with a name yet, you will be prompted to follow the steps detailed at 1 – 3 in the section above.
- If the workbook has already been saved, pressing Ctrl+S regularly whilst working on the workbook will ensure your work is saved and no data lost.
To prevent any work from being lost, set the automatic save option in Excel:
1. Whilst in the regular workbook view, click on the File tab to launch the Backstage view.
2. In the Backstage tab options list, click on Options (outlined in orange in the screenshot below) to launch the Excel 2016 Options dialog box:

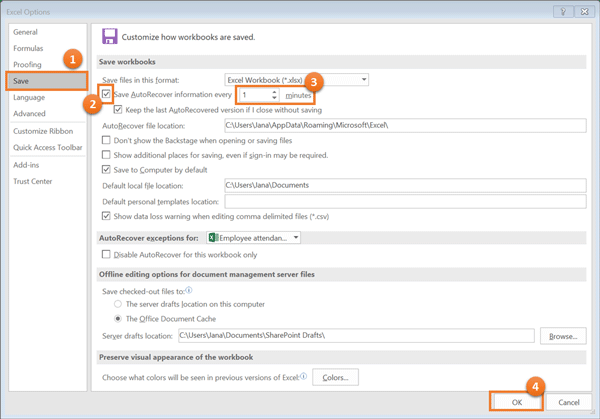
In the Options dialog box (see screenshot below), take the following steps to ensure Excel saves your workbook automatically:
1. Click on Save.
2. Ensure the Save AutoRecover information ever x minutes, box is ticked.
3. Set the AutoRecover minutes to a value that suits your requirement. Setting it to save every 1 minute will save your workbook automatically ever 1 minute.
4. Press OK to save your settings.
The automatic save function works in the background, and you won’t have any indication Excel is saving the workbook, unless it is a very large workbook, in which case you may briefly spot a progress bar at the bottom of your Excel workbook.
To recover a workbook that was erroneously closed before saving:
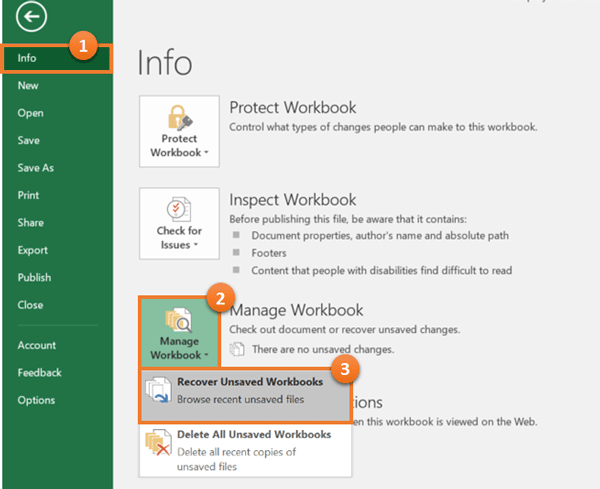
1. In the regular workbook view, launch the Info section of the Backstage view by clicking on the File tab.
2. In the Info section of the Backstage view, click on the Manage Workbook button.
3. Next, click Recover Unsaved Workbooks. This will open a file browser dialog box from where you can select and open auto recovered workbooks.
When you open an unsaved workbook, Excel will prompt you to save the recovered file before continuing. Click on the Save As button to save the auto recovered workbook.
* Excel to PDF – Create PDF copies of Worksheets to Share in Excel 2016
PDF, or Portable Document Format, is a file type commonly used to share documents, including worksheets. A PDF document is not easily editable, which makes it very useful in the context of an Excel worksheet. Say, for example, you wish to distribute copies of your company’s balance sheets with shareholders, but not all of them use Excel or even know how to use the program, you can share the worksheet as a PDF, which is easy for everyone to open. A PDF document can either be opened in a browser, such as Google Chrome, or in Adobe PDF.
To save a workbook as a PDF document for sharing, launch the Backstage view from an existing workbook:
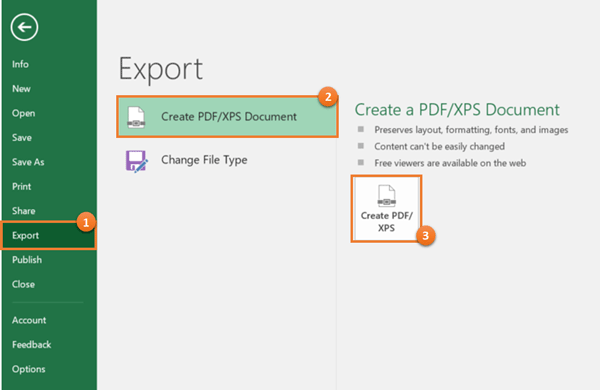
1. In the Backstage view options list, click on Export.
2. In the Export view, click on Create PDF/XPS Document.
3. Then click on the Create PDF/XPS button.
This will launch the Publish as PDF or XPS dialog box:
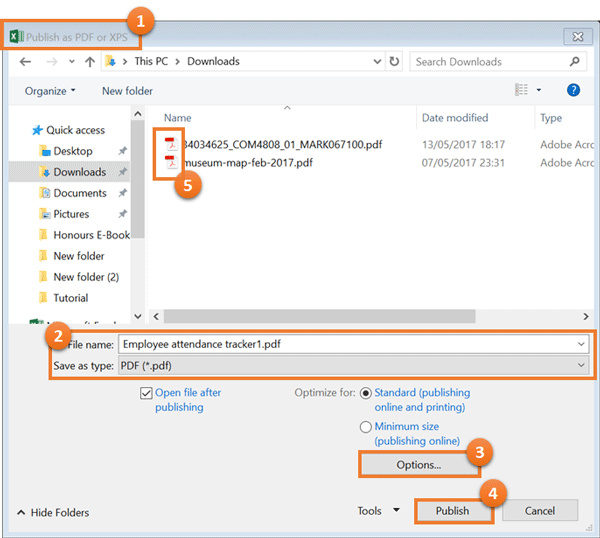
1. In the Publish as PDF or XPS dialog box you will have a number of options to help you save your Excel workbook as a PDF document. s
2. Give your PDF document a name or use the name of the workbook.
3. If you wish to save the entire workbook to PDF and not just the selected worksheet, click on Options to set this.
4. Click on Publish to create the PDF document.
5. PDF documents have a red Adobe Acrobat icon. To open an Adobe document, use your general Windows folder browser instead of opening it within Excel. If you open a PDF document from within Excel, Microsoft will try to convert the PDF back to an Excel worksheet.
Now you have done the tutorial:
Test your Excel skills with the corresponding FREE Online Multiple Choice
The File Tab and Backstage View – 2016 Excel Basics Test
* TRY THE NEXT TEST: Making Excel View Types Work for You Tutorial
* TRY THE NEXT TUTORIAL: Making Excel View Types Work for You Test