
www.TestsTestsTests.com


Using the File Tab: The Backstage View Tutorial
MS Office 2010
Free PowerPoint Online Tutorial
* The Backstage Area in PowerPoint
* How to Save a Presentation in PowerPoint
* Recent Places in PowerPoint
* How to Print PowerPoint Slides / Presentations
An overview of the common tasks that can be completed using the File Tab aka The Backstage View including the list of recent documents, using pushpins to keep documents at the top of the list, print and print preview, and save and save as.

* The Backstage Area in PowerPoint
The Backstage in PowerPoint 2010 contains all the “behind the scenes” functions that are absolutely essential to creating a successful slideshow. You will find functions to save your presentation into multiple format types, templates, Options, Security and information settings and the Help dialogue in the Backstage area.
To access the Backstage View, press the bright orange File Tab (circled in yellow in the screenshot below):
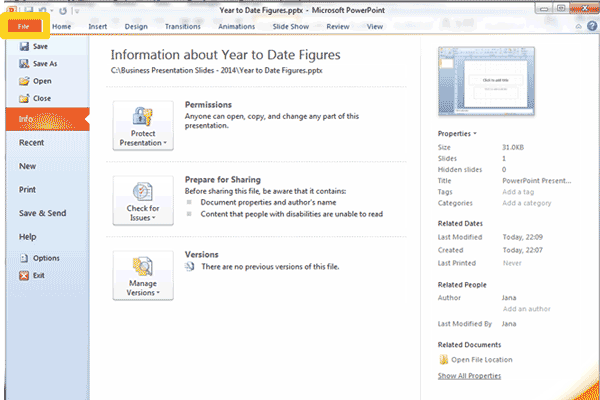
Study the screenshot of the Backstage View above. You will note there are three distinct panels:
1. The first panel on the left-hand side contains tabs that open further areas of the Backstage View. This panel will be the same for all the areas of the Backstage View. To ascertain which area is currently displayed, take note of which Tab is highlighted in bright orange. In the screen shot above, the selected area is the Info area, which also represents the default view.
2. The center panel will vary depending on which tab you have selected in the first panel. This panel usually offers further options and settings to select from.
3. The third panel varies from being a preview panel to offering further options to select.
Experiment with accessing the Backstage View and selecting each tab individually, taking note of the area of the Backstage each tab opens.
To exit the Backstage View and continue working on your presentation, simply click on any of the tabs at the top of the screen, for example, Home, Insert, Design or Transitions.
* How to Save a Presentation in PowerPoint
Barely a generation ago saving a presentation would have meant placing the notes of your talk in a safe place and remembering where you have filed them. Today, saving could mean to save a copy of your presentation as is, save it as PDF document that can be viewed on most PCs, save it as a video for playback on most traditional devices, saving it as a previous version of PowerPoint and many more options. You can even “package” a PowerPoint presentation to enable it to be played back even if the viewer does not have PowerPoint installed on their machine.
You can save copies of the same presentation into multiple formats depending on what it will be used for:
1. Click on the File Tab to launch the Backstage View and then click on the Save Tab at the top of the left-hand panel. This will launch the Save dialogue box.
2. Give your presentation a name in the File Name box and click Save to save it in a file or location where you will access it from later.
3. A PowerPoint 2010 presentation is saved with the file extension .pptx.
To save your presentation into a different format, it is recommended to first save your presentation as a .pptx file by following the instructions above, and then save it into a different format.
1. In the Backstage View click the Save As Tab. This is located directly below the Save Tab.
2. Click on the dropdown arrow next to the Save As Type box and make a selection from the available formats listed.
The following are some really useful formats to keep in mind:
*PDF (Portable Document Format) – save your slides in this format if you wish to send it to someone where you don’t want the formatting to unexpectedly change on the other person’s device. They will not be able to edit your slides in this format and slides will display as a document not a presentation.
*PowerPoint Template – save your slides in this format if you wish to use your presentation as a template. Opening a presentation saved as a template will automatically open a new copy based on the template and prompt you to save it with a new name. You can avoid accidently overwriting an existing presentation that is used as a template for new presentations, by using this format.
*PowerPoint 1997-2003 – although Microsoft officially discontinued support for Office 2003 in 2014, many people still continue using this version. You can save a presentation into earlier versions of PowerPoint by selecting this option. This format enables people using earlier versions to edit and view your presentation. You may be prompted to remove certain elements that are not compatible with earlier versions and which could change the way your presentation looks, so use with caution.
*PowerPoint Show – saving your presentation into this format is great for sharing your presentation where you want your presentation to launch immediately when opening the file from Windows. Opening the file from PowerPoint will allow you to edit it as usual.
*Windows Media Video – save your presentation as a video. This is great for creating multimedia content, for example training videos, entertainment sets or photo albums that play automatically. You can embed audio and video and the presentation will play automatically as a video. You will be able to share it as it will play on any device that supports WMV (Windows Media Videos).
*Image Formats (including GIF, JPEG and PNG) – use these formats if you have created a graphic in PowerPoint that you wish to be able to insert into other programs or webpages or to simply save your creation for reuse. You will be prompted to save either all slides in your presentation as images or only the selected slide(s).
The above are only a few of the many useful options and is by no means an exhaustive list. Experiment with saving the same presentation into the different available formats taking note of the uses and benefits of each file type.
Further saving options can be accessed in the Backstage View by clicking on the Save & Send Tab. Examine the screenshot of the Save & Send area below:
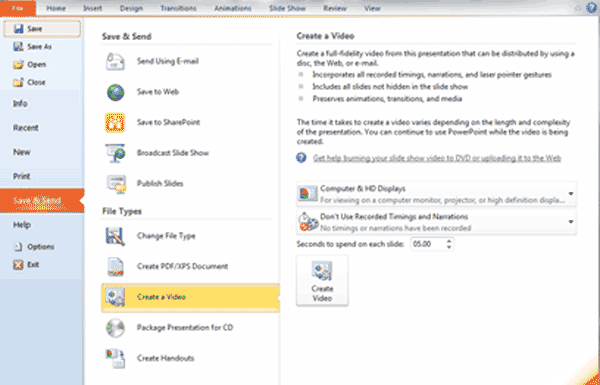
You will note this area contains many of the same saving functions as the Save As dropdown list, but with more options and explanations as to the format. Useful functions in this area, depending on your requirements, would be:
1. Attaching your slides to an email in a variety of formats.
2. Creating a video using your slides and selecting from different video quality types.
3. You can access the Create Handouts function, which allows you to select a layout for printing your slides and notes either for personal use or to hand out to your audience.
USEFUL HINT: A quick way of saving your slides is using the shortcut combination Ctrl+s. You can quickly launch the Save As dialogue box by pressing F12 on your keyboard.

* Recent Places in PowerPoint
If you are a frequent traveler or even if you have only been a few places, you will no doubt have some sort of paper trail of where you have been. You may have hundreds of photos and videos on social media or receipts, tickets and other memorabilia of your trip. When you look at any of these items, it will bring back memories and you may even vividly imagine being back there again!
Recent Places in PowerPoint may not be quite as exotic or relaxing as travelling or holiday memories, but it could serve as a life-saver and stress reducer nonetheless by providing you with a direct link to presentations and folders you had recently accessed. Have you ever closed a presentation after saving it only to try and find it a little bit later not knowing where you saved it? Are there presentations or folders that you use repeatedly? Then Recent Places is the place to be (excuse the pun!).
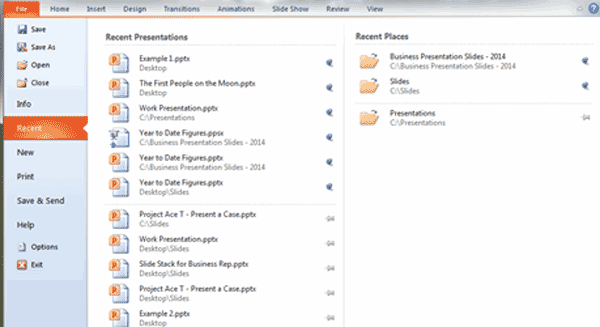
Study the screenshot of the Recent Places Area below:

The middle panel contains Recent Presentations. Any presentation that you open or save will appear on this list automatically. To reopen a presentation from this list, simply click on it once.
In the last panel (on the right-hand side) is the Recent Places area. The folders in this list represent folders you had recently access and opened presentations from. To open a folder from this list to view its contents, click on it once.
Items are automatically added to the Recent Places list depending on which folders or presentations you open. The list, however, is not static and items will move off the list after a while as they are replaced with more recently accessed presentations and/or folders. Should you have presentations that you frequently work on or use as a template for other slides, or if you have a specific folder or set of folders you refer to on a regular basis, it may be worth your while to instruct PowerPoint to keep these in the Recent Places lists indefinitely.
1. To prevent a presentation or folder in the Recent Places list from moving off the list, you need to ‘pin it’ to the list.
2. If you study the area next to each presentation name or each folder name in the Recent Places list, you will observe a grey pushpin icon.
3. Clicking on the pushpin will move the presentation or folder to the top of the list and the pushpin icon will change to a blue ‘used’ pushpin (see screenshot below).
4. If you wish to remove an item from being pinned to the Recent Places list, click the pushpin again.
To clear the list, you can either remove a single item or multiple items at the same time. Right-click on an item you wish to remove from the list and select “Remove from list”. You can also remove all items that are not pinned by selecting “Clear unpinned Presentations” to clean up your Recent Places area.
* How to Print PowerPoint Slides / Presentations
You may want to print the slides in your presentation in order to review their content, pass them on to someone else to review or simply to file away as a record of a presentation.To access the Print Area and related options, press the File Tab to access the Backstage Area and then select the Print Tab in the left-hand panel.
The Print Area opens with an option pane (middle) and a preview pane (last column to the right). Study the screenshot of the Print Area below to identify these areas:
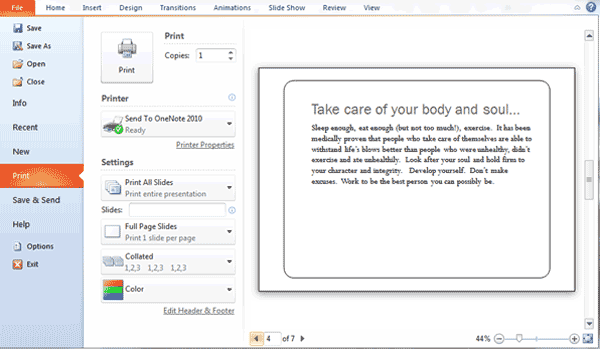
Use the Print Options area in the middle pane to select how many copies you wish to print and which slides to print. A useful option to note is the Full Page Slides button. If you click on this it will give you options to select to print multiple slides per page in order to save paper or for convenience.
The far right pane contains a preview of what each slide will look like when printed. Use the navigation button located at the bottom left-hand corner of the slide preview to navigate through all the slides in your presentation to preview them. You can also change the zoom of the print preview panel by using the Zoom Slider located on the bottom right-hand corner of the slide preview area.
When you are ready to print, simply press the large Print icon located at the top left-hand corner of the middle panel.
USEFUL HINT: Using the shortcut combination Ctrl+p whilst in your presentation, will take you to the Print Area directly.
Woohoo! Now that you have done the tutorial:
Test your PowerPoint skills with the corresponding FREE Online Multiple Choice
PowerPoint The Backstage View: Using the File Tab Test
TRY THE NEXT TUTORIAL: Powerpoint Views Tutorial
TRY THE NEXT TEST: Powerpoint Views Test