www.TestsTestsTests.com
The PowerPoint Screen Tutorial
MS Office 2010
Free Microsoft PowerPoint Training Online
* The Ribbon and Tabs in PowerPoint
* The Quick Access Toolbar in PowerPoint
* Slides and Outline Tabs in PowerPoint
* Slide Notes Area in PowerPoint
*
The Status Bar in PowerPoint
Starting out in PowerPoint it is important to identify and understand all the things you see on the screen. This includes the Ribbon, Tabs, the Quick Access Toolbar, Slides and Outline Tabs, the Slide Pane, the Note Pane and the Status Bar.
Test your PowerPoint skills with the corresponding FREE Online Multiple Choice
PowerPoint Screen Test
* The Ribbon and Tabs in PowerPoint
PowerPoint has a very logical user interface. It will possibly take you half an hour to familiarize yourself with its layout, but believe me, you will be grateful you did! Attempting to put your first slideshow together without knowing where to find essential functions is a sure recipe for frustration.
The Ribbon and tabs are arguably the most important part of the interface to familiarize yourself with. The Ribbon (circled in yellow in the screenshot below) is the area at the top of the interface that contains groups of functions that you will use to create and beautify your presentation.
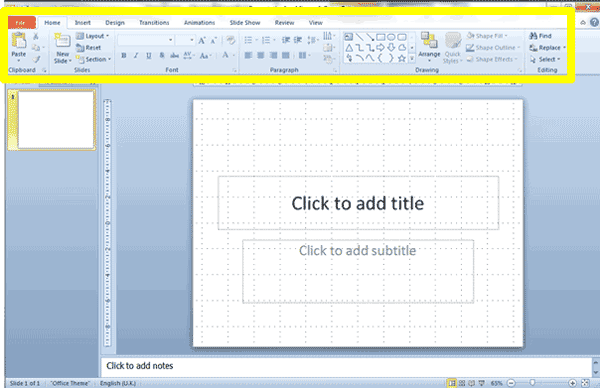
If you study the Ribbon carefully, you will note a series of headings along the top part. If you click on any of these “headings” they open up a different section of the Ribbon. These are called Tabs and each tab opens a section of the Ribbon that relates to the name of the selected tab. Depending on your version of PowerPoint, the tabs are (in order from left to right): Home, Insert, Design, Transitions, Animations, Slide Show, Review and View.
Study the image below and then in your own copy of PowerPoint, identify each tab by clicking on them and noting the area of the Ribbon they open.
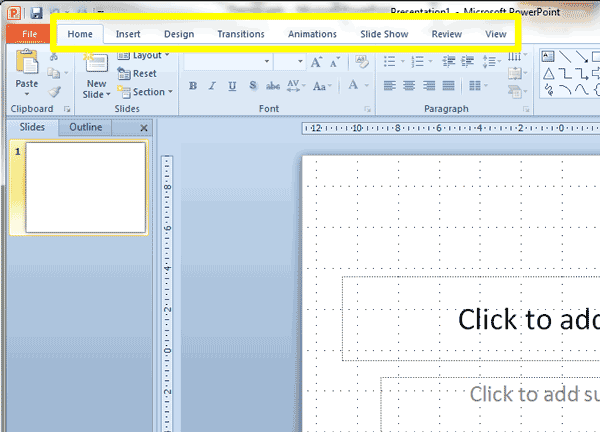
The creators of the PowerPoint Ribbon made an effort to place the tabs in the order they believe most people are likely to create presentations:
1. The Home Tab contains all the basic font, formatting, drawing and alignment buttons that are essential for creating a slide.
2. The Insert Tab allows you to add more sophisticated elements to your slides, for example tables, smart art, photos, videos and audio.
3. The Design Tab provides functions that allow you to change the look and feel of your slides by using themes and page orientation.
4. The Transitions Tab will come in useful after you have created the content of your slides and completed the design. Using the Transition Tab you can animate the transition of one slide into another by having them fly in, appear, fade and a multitude of other options.

5. After you have set transitions for your slides, the next tab, Animations, allows you to focus on adding animation to individual elements on your slides. For example having bullets appear during your presentation when you click your mouse or having bullets fade out so only the most important points are emphasized.
6. The Slide Show Tab is for adding the final settings to your presentation, previewing your slides from the beginning to ascertain how they will display to your audience and other settings that relate to the set-up of a presentation.
7. The Review Tab should never be missed! Here you will find the spelling and grammar checker and other functions relating to proofreading a presentation.
8. The View Tab in PowerPoint is exceptionally powerful. Specific views allow you to perform certain actions, for example the Slide Master allows you to create templates and universal slide layout and formatting. Other essential functions such as the Slide Sorter, Notes Page and Notes Master are worth experimenting with.
If you study the section of the Ribbon under each Tab you select, you will note that the buttons are sorted into named groups. For example, under the Home Tab you will note the Clipboard, Slides, Font, Paragraph, Drawing and Editing groups. Some groups have a little diagonal arrow in the right-hand bottom corner (circled in yellow in the screenshot below). This is called a dialogue box launcher.
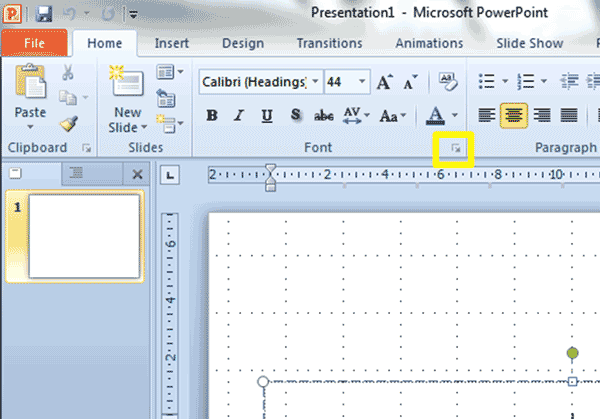
If you click the dialogue box launcher it will launch a dialogue box with options relating to the group in which it is situated.
Additional tabs called Contextual Tabs appear only when specific content is selected. For example, if you select a Textbox you will have tabs appear on the right-hand side of your current tabs that contain options relating to a Textbox. If you click away from the Textbox or unselect it, the Contextual Tabs will disappear again. There are Contextual Tabs for just about every kind of element you can insert into PowerPoint including tables, graphics, charts, shapes, audio and video.
The Ribbon takes up a lot of real estate on the screen. You can hide part of the Ribbon so that only the tabs display by right-clicking on the Ribbon and selecting “Minimize the Ribbon” from the list. To redisplay the full Ribbon, right-click in the tabs area and click “Minimize the Ribbon” again.

* The Quick Access Toolbar in PowerPoint
The Quick Access Toolbar or QAT for short, is the baby sister of the Ribbon. By default it usually contains Save, Undo and Redo buttons but you can modify it to contain any functions you frequently use that would save you time having to search for on the Ribbon.
The Quick Access Toolbar is located on the top left-hand side of the PowerPoint screen (circled in yellow in the screenshot below):
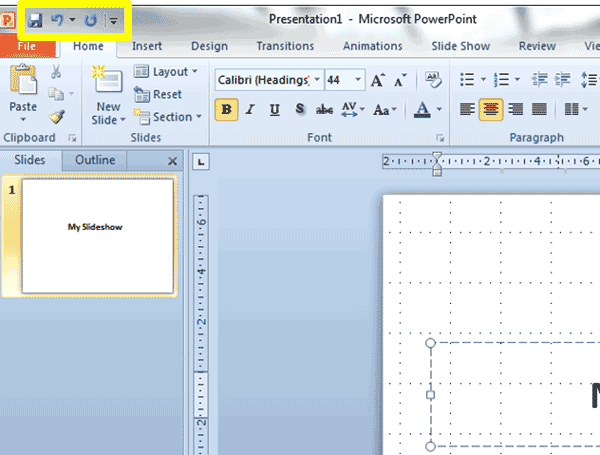
To add more buttons to the Quick Access Toolbar, press the down pointing arrow to the right of the last button on the QAT. To add or remove any of the buttons, simply click to add and click again to remove. A tick mark next to an option denotes a function that is already on the QAT.
You can customize the QAT further by either right-clicking any button on the Ribbon and selecting “Add to Quick Access Toolbar” or selecting “More Commands” from the dropdown list launched from the QAT mentioned above. This will launch the Customize the Quick Access Toolbar dialogue area. From here you can select any function that exists within PowerPoint to add to the QAT.
Finally, you can display the QAT above or below the Ribbon. The default (as in the screenshot above) is above the Ribbon. To display the QAT below the Ribbon, press the down pointing arrow to the right of the last function on the QAT and select “Show Below the Ribbon” from the dropdown list.

* Slides and Outline Tabs in PowerPoint
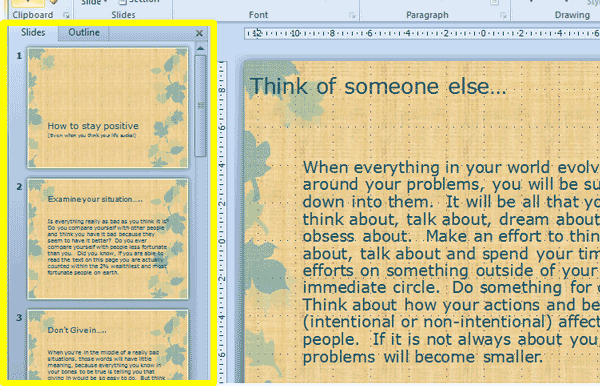
The Slides and Outline areas located to the left of the Slide Panel gives you a bird’s eye view of your presentation. The Slides Area, which displays by default, contains thumbnails of each slide in your presentation. It allows you to navigate to specific slides, rearrange the order of slides, duplicate slides you wish to recreate, delete unnecessary slides, change the slide layout and a multitude of other essential functions.
Open an existing PowerPoint presentation and experiment with using the Slides Area (circled in yellow in the screenshot below). Click on different thumbnails to have the selected slide displayed in the Slide Pane. Drag slides up or down to reorder them and right-click on any slide thumbnail to investigate available options.
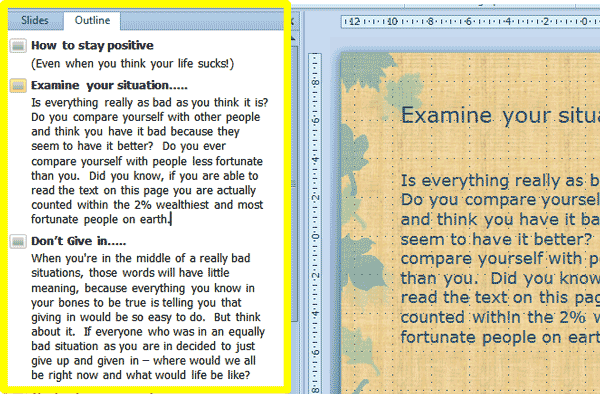
The Outline Area shares real estate with the Slides Area. You will note the Outline Tab to the right of the Slides Tab which allows you to switch between the two views.
The Outline Area (circled in yellow in the screenshot below) is great for viewing the text contained in your slides. You can use it to proofread, edit and add text to your slides. The bold headings represent slide headings followed by either a text area or a bulleted list. The Outline Area is a very powerful function that is worth exploring, so look out for our tutorial on this topic.
To hide the Slides and Outline Area, click the close icon located at the top right-hand corner of the pane. To redisplay the pane hover your mouse over the left-hand edge of the PowerPoint screen (in the area where the Slides and Outline Area usually displays) until your mouse icon changes into a double cross. Click and drag to the right to redisplay the Slides and Outline Area. You can also resize it by dragging it to the right or left to make it wider or narrower.
* Slide Notes Area in PowerPoint
Most of us have been there. You are standing in front of a room of your peers or a larger audience. You are looking at a slide, a graph or a photograph you have included in your slides, projected on a large screen behind you for all to see and for the life of you, you cannot remember why you have included it or what you wanted to say about it. Faced with the expectant stares of your audience and sweat streaming down your brow threatening to drown you, you quickly click past the slide or make some weak statement about it.
If only you had used Slide Notes! The Slide Notes Area (circled in yellow in the screenshot below) located at the bottom of each slide in the main Slide Pane, allow you to add unlimited notes to each slide in your presentation.
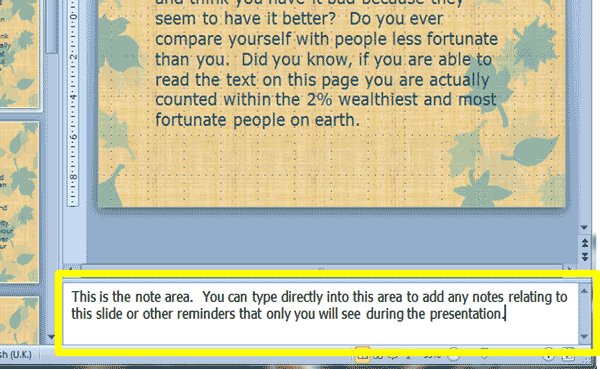
You can either print these to use during the presentation or view them on your screen. The main presentation will run on the projected screen and your audience will not see your notes.
To hide the Notes Area if you are not using it, hover your mouse icon over the top border of the box. When your cursor changes into a ‘double arrow’ click and drag the Notes Area down to hide it. To redisplay the Notes Area, you perform exactly the same action except you drag it back upwards into position.
* The Status Bar in PowerPoint
Located at the bottom of the PowerPoint screen, the Status Bar is often overlooked or ignored. Providing information on the slide on which you are currently working, how many slides the presentation contains, what language is set and which theme is applied, it is overlooked at your own peril. Besides offering you useful background information about your presentation, it also contains useful shortcuts to, for example, change the language of your presentation, set your slide zoom and change the view type.
Below is a screenshot of a Status Bar (circled in yellow) but it may display different information on your PowerPoint screen depending on your default settings:
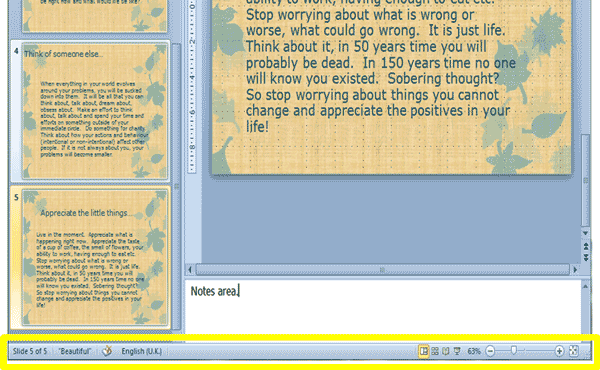
You can modify the Status bar by right-clicking anywhere on it and selecting or deselecting items from the list that appears.
Woohoo! Now that you have done the tutorial:
Test your PowerPoint skills with the corresponding FREE Online Multiple Choice
PowerPoint Screen Test
TRY THE NEXT TUTORIAL: Using the File Tab in PowerPoint Tutorial
TRY THE NEXT TEST: Using the File Tab in PowerPoint Test


