
www.TestsTestsTests.com

Data Forms Excel Tutorial
Excel 2010 Training –
Working with Data
Free Online Microsoft Excel Tutorial
* What are Data Forms?
*
How to Enable Data Forms
* Using Data Forms to Find Entries
* Using Data Forms to Create Entries
* Using Data Forms to Edit or Delete Entries
When you have to do a lot of data entry, it may be easier and more efficient to do it in a Data Form rather than on the actual worksheet. Data Forms allow you to find data, view entries, add and delete data to a worksheet with a user-friendly form.
Test your Excel skills with the corresponding FREE Online Multiple Choice
Data Forms Excel Test
* What are Data Forms?
The Data Form feature in Excel provides you with a different way to add, delete, navigate and search entries on a worksheet. It is especially useful if you have a worksheet that contains multiple columns where it is not always convenient to scroll all the way to the right or left to view data. It also provides a quick and easy way to do data entry as the form eliminates the problem of having to move through a physical worksheet and ensures more consistency in data entry.
Study the screenshot of part of a Data Form below:
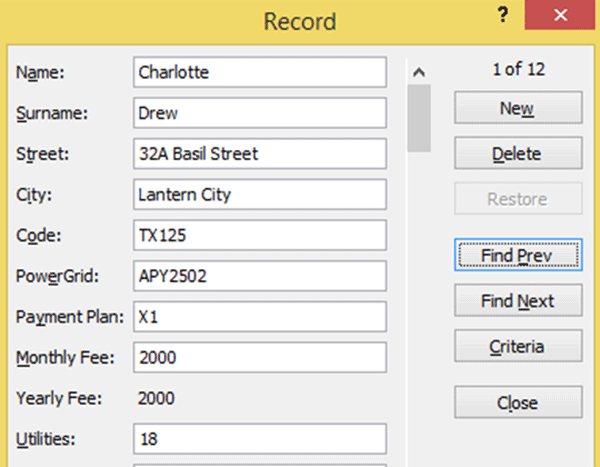
1. The form name, Record, is the name of the worksheet containing the data on which you are using the Data Form.
2. The form fields, for example, Name, Surname, Street and Payment Plan are the column headings on the worksheet.
Below is a screenshot of the worksheet on which the Data Form (pictured above) has been enabled:

You will note the column headings match the fields on the Data Form and that the first row in the screenshot above, reflecting details for Charlotte Drew, is also the first record displayed on the Data Form screenshot.
A Data Form therefore displays the exact same data as contained on the worksheet only in a form format.
If you create a new entry using the Data Form, it will insert the data in the correct columns in your worksheet as a new row.
If you edit any of the entries in the Data Form, the same entry will be edited on your worksheet and vice versa.
* How to Enable Data Forms
When you started this tutorial you might have tried to find the Data Form button on the Excel Ribbon without success. The reason for this is that the Data Form button is not on the Ribbon by default and needs to be added.
The easiest option is to add the Data Forms button to the Quick Access Toolbar, which is displayed by default at the top left-hand corner of every Excel Worksheet.
To add the Data Form button to the Quick Access Toolbar:
1. Click the dropdown arrow to the right of the Quick Access Toolbar (circled in yellow in the screenshot below):

2. Select the More Commands option from the Customize the Quick Access Toolbar menu. This will launch the Excel Options dialogue box (see screenshot below):

3. In the Excel Options – Customize the Quick Access Toolbar dialogue box under the heading Choose commands from, pick Commands not in the Ribbon from the dropdown list (highlighted blue in the screenshot below):

4. In the box below the Commands Not in the Ribbon box, scroll down until you see Form. The list is organized alphabetically to help you find functions easily.
5. Click on Form to select it. Next click on the Add button located towards the middle of the Excel Options dialogue box. This will add the Form option to the Customize Quick Access Toolbar list (see circled in yellow in the screenshot below):

6. Press OK to accept the changes you made to the Quick Access Toolbar.
Back in your usual worksheet view, you will note the Form icon has been added to the Quick Access Toolbar as a button.
To launch the Data Form:
1. Position your cursor in any cell within your data range.
2. Click on the Form button on the Quick Access Toolbar to launch the Data Form for the worksheet.
To close the Form:
1. Click on the X in the red box in the top right-hand corner of the Form; OR
2. Click the Close button in the Form.
* Using Data Forms to Find Entries
A Data Form is an exceptionally useful tool, not only to navigate between entries on a worksheet, but also to find specific entries.
To use a Data Form to navigate between entries on a worksheet:
1. Launch the Data Form.
2. Click on the Find Next and Find Previous buttons to move between entries.
To use a Data Form to find a specific entry:
1. Launch the Data Form.
2. Click on the Criteria button.
3. In the blank Form, type the value you wish to look for in the relevant field box. For example, if we were looking for an entry where the Name field is Charlotte, we would complete the Form criteria as follows (see screenshot below):

4. Click on the Find Prev or Find Next buttons to navigate through all entries that contain Charlotte in the Name field.
To clear criteria and display all entries again:
1. In the Data Form, click on the Criteria button.
2. Next, click on the Clear button.
3. Finally, click on the Form button to return to the normal Data Form.
Alternatively, if you wish to keep the criteria but still navigate through all entries, use the Enter or Arrow keys to move between data entries. To view only data that match the criteria you set, continue using the Find Prev or Find Next buttons.
* Using Data Forms to Create Entries
The most common use for Data Forms is to create new entries. When you have a worksheet that runs across multiple columns and rows it is not usually convenient to have to scroll all the way across the worksheet to enter data. Not only is it difficult to keep track of all the data you have created for a specific entry, it can also be hard to keep track of the column headings or clues for what data to enter into a specific column.
To use a Data Form to add a new data entry to a worksheet:
1. Launch the Data Form.
2. In the Data Form, click on the New button.
3. Use the form fields to add the data for the new entry. Remember that the form fields match up to the column headings on the worksheet.
4. Press the Enter key to accept the entry. It will automatically be added to the first empty row below the last data entry on the worksheet.
TIP: You don’t have to complete all the fields on the Data Form for it to add the data to the worksheet. For example, if you wanted to add all the names and surnames first and then add other data, you can add as much or as little data at a time as you wish.
* Using Data Forms to Edit and Delete Entries
A Data Form can make editing and even deleting multiple entries a breeze. No need to scroll backwards and forwards through a worksheet to delete or edit data. The Form provides you with a platform to quickly view and edit specific data entries.
Imagine you wish to edit the data contained in the fields of some of the entries on your worksheet. Instead of scrolling through the worksheet, you can use a Data Form to apply these edits efficiently.
To use a Data Form to edit entries:
1. Launch the Data Form.
2. In the Data Form, use the Tab key to navigate between fields and edit their contents.
3. Press the Enter or Arrow keys to navigate to the next entry. You can also use the Find Prev and Find Next buttons or the scrollbar to the right of the fields on the Data Form, to move between different data entries on the worksheet.
To use a Data Form to delete entries:
1. Launch the Data Form.
2. In the Data Form, use the Enter or Arrow keys to navigate between entries.
3. When you come across an entry you wish to remove, click on the Delete button. This will remove the entry and all the data associated with it. If you close the Data Form you will note the entry, as well as the row that contained the entry, has been deleted from the worksheet.
Data Forms are useful tools for quick and easy data entry. They do not in themselves provide extra functionality, but instead simply adds efficiency and comfort to managing data. Remember to take the Data Form quiz to test yourself on this topic.
Now you have done the tutorial…
Test your Excel skills with the corresponding FREE Online Multiple Choice
Data Forms Excel Test