www.TestsTestsTests.com
Using Macros Excel Tutorial
Excel 2010 Training –
Macros
Free Online Microsoft Excel Tutorial
* Running a Macro
*
Recording a Macro
* Assign a Macro to a Button
* Save a Macro-Enabled Workbook
* Delete a Macro
Macros let you perform the same steps over and over again with the click of a button. How to create and edit macros is easy and makes you an Excel pro.
Test your Excel skills with the corresponding FREE Online Multiple Choice
Using Macros Test
* Running a Macro
A macro, in the context of computer science, is short for macroinstruction which is a set of instructions combined into a single action that can be repeatedly executed. Macros may seem very intimidating at first glance, but by working through this tutorial and practicing in Microsoft Excel, you will be a pro in no time.
To understand what a macro is, imagine you use your smartphone to record your ‘To Do’ list for the day. You could use the audio recorder or the To Do List function and depending on your phone make, it may look like this:

Saving the above To Do List on your phone and using it every time you have a similar event (in the above case a party) will save you from having to recreate a To Do List every time or even to manually remember the actions to carry out. Similarly, a macro in Excel is just a list of recorded actions that are saved and can then be used to repeat a specified set of instructions.
You can record macros for just about any set of actions that can be carried out in Excel.
In our example, we will run a macro that has been created to save an Excel worksheet in PDF format.
To run a macro that is already created within a workbook:
1. Click on the Developer tab on the Ribbon. (If the Developer tab is not visible on your Ribbon, you will have to enable it).
To enable the Developer tab, click on File – Options. In the Excel Options dialog box, select Customize the Ribbon. In the right-hand panel, underneath the heading Customize the Ribbon, tick the box for Developer and press OK.)
2. In the Code group, click on the Macros button (circled in yellow in the screenshot below):

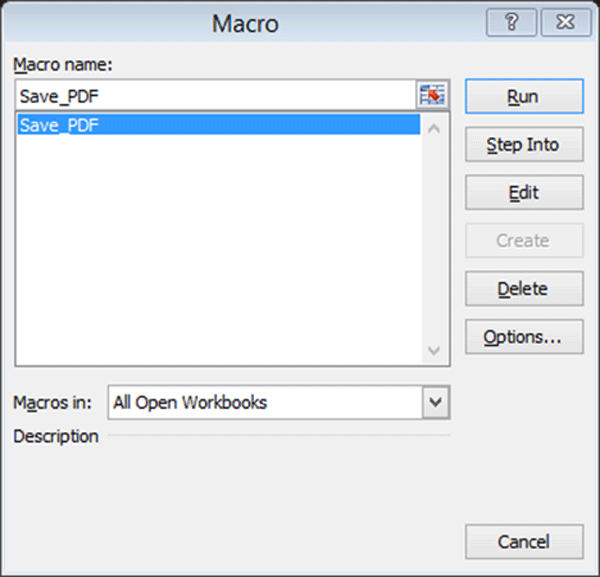
3. This will launch the Macro dialog box listing all the macros that are available in the open workbook. In the screenshot example below, there is one macro named: Save_PDF.

4. To run this macro, select it in the list by clicking on it. Next click on the Run button to execute the macro.
When clicking the macro pictured in the screenshot above, the worksheet will automatically be saved as a PDF to a specified folder on your PC. It replaces having to carry out the manual actions of saving a worksheet as a PDF into a specified folder. This is one example of a macro. Macros can be used for formatting, formulas, functions, saving worksheets, creating worksheets and just about any other set of actions you perform in Excel.
* Recording a Macro
Before you record a macro some planning is usually required. See it as writing a script for an actor detailing what you wish him/her to do and say onstage.
If we want a macro that saves a worksheet as a PDF onto our desktop, we could detail the ‘script’ for the macro actor as follows:
- * Select the current active worksheet
- * Go to File – Save As
- * Use the worksheet name as the File Name
- * Select .PDF as the Save as File Type
- * Select the Desktop folder to save the file to
- * Click OK and complete the action
To record this macro:
1. Open the worksheet/ workbook you wish the macro to be active on.
2. Click on the Developer tab on the Ribbon.
3. In the Code group, click on Record Macro. This will launch the Record Macro dialog box:

4. Give your macro a name in the Macro Name box (circled in yellow in the screenshot below). Ensure the name is easy to understand and tied to the functionality of the macro. In the example below, the macro is named Save_PDF to indicate what will happen if the macro is executed.

5. Assign a shortcut key to the macro. Be careful to not use shortcut keys that you frequently use for other functions.
6. Select where you wish to store the macro. If you only wish to run the macro on the current workbook, select: This Workbook.
7. In order to help other people using the worksheet or even to act as a reminder for yourself at a later stage, type a description for the macro in the Description box.
8. Take a deep breath before pressing the OK key. Once you press this, you will have to carry out the actions for the macro, as detailed in the script you created in the first step, without stopping.
9. After pressing OK, you will note the Record Macro button changes to Stop Recording. This indicates the macro is busy recording. Carry out all the actions you would normally carry out to perform a task (to save as a PDF) in our example.
10. Once you have completed the actions, press the Stop Recording button.
If your macro was successful, you will now be able to run it by following the instructions listed in the section above, Running a Macro.
* Assign a Macro to a Button
At this point, you are probably wondering what the purpose of creating multiple macros that you then have to find, select and run from the Developer tab – Code group, is. Well, there is one final action that brings it all together: you can assign a macro to a button and group on the Ribbon and even assign an icon. You could create a whole section of the Ribbon containing only the functions you created. Imagine showing your friends or colleagues these customized functions and watching them search in vain to find it on the Ribbon of their own copy of Excel…. definitely worth the effort!
To assign a macro to a button:
1. Open the worksheet containing the macro you wish to create a custom button for.
2. Click on the File tab to launch the Backstage view and then select Options to launch the Excel Options dialog box.
3. In the Excel Options dialog box, click on Customize the Ribbon.
4. In the right-hand side panel, click on New Tab (circled in yellow in the screenshot below):

5. Give the tab a logical name, for example, My Functions, by selecting the new tab you created and clicking on Rename at the bottom of the panel. You can also right-click the new tab you have created and select Rename from the menu list.
6. Under the tab you created a new group will automatically be added. Rename this new group by giving it a name that fits the type of macros you will be adding to it. As the macro we created is to save as a PDF, we could name the group Saving Functions.
7. Next, you need to add the macro you created to the Tab and Group. In the Choose Commands From box, select Macros (see screenshot below):

8. Scroll through the Macros list and select the macro you created. In our example this is the Save_PDF macro.
9. In the Tabs list on the right-hand side panel, ensure the group under the tab you created, is selected. In our example this is the My Function tab and the Saving Functions group.
10. Click on the Add button. The macro name will now appear in the selected group.
11. Finally you can customize the macro by creating a button icon for it. Select the Macro you created and click on Rename. You can then select an icon from the icon gallery to add to your Macro.

Click OK to accept all the changes. Depending on the name and icon you chose, the customized Ribbon with your macro will look something like this:
Take note of the tab name on the Ribbon (My Functions), the group name (Saving Functions) and the icon with the Macro name (Save_PDF).
Clicking the button you created for the Macro will now launch the macro as if it is a built-in function in Excel.
* Save a Macro-Enabled Workbook
Hopefully at this point in the tutorial, you are awed by the power of macros and cannot wait to get started. The final ingredient in the world of macros is the type of file that is capable of containing a macro and macro security settings that could prevent your macro from functioning.
To save a workbook that contains a macro:
1. Click on File and then select Save As.
2. Select where you wish to save the workbook and give it a file name.
3. From the list of Save as File Type, select Excel Macro-Enabled Workbook (.xlsm) or Excel Macro-Enabled Template (.xltm):

4. Press OK to save the workbook.
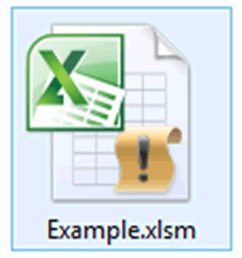
An Excel workbook that contains macros display as an icon with an exclamation mark:

When opening a worksheet that contains macros, Excel will by default display a Security Warning at the top of the worksheet and prompt you to enable macros. If the file you are opening is a workbook you created or originates from a safe source, it is okay to click on Enable Content and utilize the worksheet as usual.
* Delete a Macro
A worksheet or book that contains multiple obsolete macros can be a minefield of surprising events when the worksheet appears to execute actions at random without warning. It is good practice to keep a tight control over the number of macros and their functions in a worksheet.
To delete a macro that is no longer in use:
1. Open the worksheet that contains the macro.
2. Click on the Developer tab on the Ribbon.
3. In the Code group, click on the Macros button. This will open the Macros dialog box.
4. In the Macros dialog box, click on the macro you wish to delete and click the delete button.
Delete with caution. Once deleted, you cannot reinstate a macro and would have to recreate it.
QUICK TIP: To launch the Macros dialog box, use the shortcut combination: Alt+F8.
Now you have done the tutorial…
Test your Excel skills with the corresponding FREE Online Multiple Choice
Using Macros Test
* TRY THE NEXT TEST: Sort and Filter Data


