
www.TestsTestsTests.com

Using the Ribbon Tutorial
Free Online Microsoft Excel Tutorials
Excel Training 2010 – Getting Started
* How is the Ribbon organized?
* How are Tabs organized?
* What are Contextual Tabs?
* Identifying Groups on the Ribbon
* Show/ Hide the Ribbon
The Ribbon replaces the old Menu system. Learn how the tabs are organized into groups, how to open the group dialog box and how to hide the ribbon.Test your Excel skills with the corresponding FREE Online Multiple Choice
Excel Using the Ribbon Test
* How is the Ribbon Organized?
When you first opened Excel and saw the Ribbon, you may have thought it appears to be a chaotic collection of buttons, colors and words with no clear pattern or thought given to its lay-out. If you were used to the old menu system present in Excel prior to 2007, you may even be frustrated at the perceived lack of order compared to older versions of Excel.
However, the Ribbon is very carefully organized and understanding this order will assist you in finding just about any function, even if you have never used it before. It might make it easier for you to view the Ribbon as an organization where the Ribbon represents the office building, the tabs are the different departments and within each department, you have teams or groups with collective functions comprising individuals with different job roles.
1. The Ribbon is at the top of the Excel screen. The screenshot below displays the Ribbon with the Home tab selected:

The best way to learn about the Ribbon is to open your own version of Excel (2010 or later) and identify the parts of the Ribbon along with this tutorial.
2. You will note there are eight tabs at the top. These are the default tabs and are labelled: File, Home, Insert, Page Layout, Formulas, Data, Review and View:
Depending on your version of Excel, there may be further tabs, for example a Developer Tab or other customized tabs.
3. Each of these tabs open up a separate section of the Ribbon, similar to how tabs in a lever arch file will open up different sections of the same file.
4. Each section is divided into groups. For example, under the Home tab you will find the Clipboard, Font, Alignment, Number, Styles, Cells and Editing groups. You can identify a group by the name at the bottom of each group. For example, in the screenshot below we can identify two groups namely, Number and Styles:
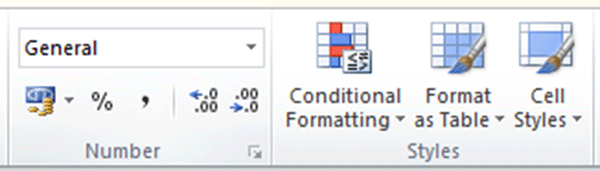
5. Each group contains a collection of functions that are visible either as words or icons/buttons. These functions relate directly to the group to which they are assigned. If you study the screenshot above, you will note, for example, that the Styles group contain functions that relate to formatting and styles.
6. If you move your mouse cursor over a button/icon, Excel will provide you with a screen tip containing more information about the function. In the screenshot below the cursor is moved over the Sort Z to A button which is located in the Sort & Filter group under the Data tab on the Ribbon and a screen tip explaining what the function is appear:
* How are Tabs Organized?
The tabs, as mentioned earlier, may be considered the departments of the organization and each tab contains multiple teams or groups with individual functions. When the designers of Excel decided on the order in which the tabs should appear on the Ribbon, their idea was to place the tabs in the order in which a user may logically need to use the functions when creating a worksheet.
Open a new worksheet and study the order in which the tabs appear:
1. The first tab, the FILE tab, opens up a different part of Excel where you can access an area known as the Backstage. Here you will find options for just about any function that is not in the visible part of a worksheet. For example, options to set worksheet properties and options, change print settings, set privacy and saving options, to name but a few. There is a whole tutorial and quiz dedicated to examining this section of the Ribbon and it is highly recommended you familiarize yourself with the great time timesaving options inside the Backstage area.
2. The second tab, and also the tab which opens by default on a worksheet, is the HOME tab. The Home tab contains all the essential functions for creating a worksheet and ensuring it looks professional and neat. Here you will find options to use copy and paste, change font, set numbering formats, apply styles, access cell options and use editing tools such as Find and Replace and AutoSum:

3. The third tab is the INSERT tab. After you have formatted your worksheet using functions found under the Home tab, the next step may possibly be to insert elements such as tables, clipart, charts, headers and footers and symbols into the sheet:

4. The third tab is the PAGE LAYOUT tab. You may be surprised to discover that page layout is just as relevant in an Excel worksheet as it is in a traditional document. Here you will find options to apply pre-designed themes, set paper size and layout, set printing parameters and scale a worksheet to fit onto the number of pages you need it to:

5. After Page Layout, we get to the tab that contains the real brain behind Excel, i.e. the FORMULAS tab. Here you will find an entire library of functions and formulas for just about anything you may wish to do with numbers or text in a worksheet. Add-on options to formulas, such as the Defined Names and Formula Auditing groups, help you build powerful functions:

6. Equally as powerful and functionally rich as the Formulas tab, is the DATA tab. Worksheets often contain reams of information that need to be entered consistently, analyzed and organized. Here you will find functions to create databases, link to external data such as webpages, sort and filter, data tools, outline and analysis:

7. Before saving and sharing a worksheet, running a spellcheck is essential. You find tools to review and protect a worksheet under the REVIEW tab:

8. Finally, but not to be overlooked, is the VIEW tab. Similar to other Microsoft Office applications, the View tab provides options to change how a worksheet is displayed on your screen. Additionally, each of the Workbook Views come with different options or areas of the worksheet that can only be edited in that specific view. You will also find options to control the window view, such as zoom and opening more than one instance of the same worksheet, on this section of the Ribbon.

* What are Contextual Tabs?
Have you ever worked in a Microsoft Office application (2007 and later), cheerfully changing formatting or other options, only to find a short while later, these options seem to have vanished without a trace. The tabs responsible for this much experienced mystery are called the CONTEXTUAL tabs.
Contextual tabs appear only in the context of specific types of content and the content has to be selected or your cursor positioned within the content, for these tabs to appear. There are contextual tabs for just about every element you can insert into a worksheet, for example, charts, pivot tables, images, headers and footers, shapes and many more.
You can identify the contextual tabs in that they will appear or disappear as soon as you move away from the element and they are also usually brightly shaded. They appear in addition to the default tabs discussed in the tutorial above.
Study the screenshot below. Can you identify the contextual tabs in this worksheet?
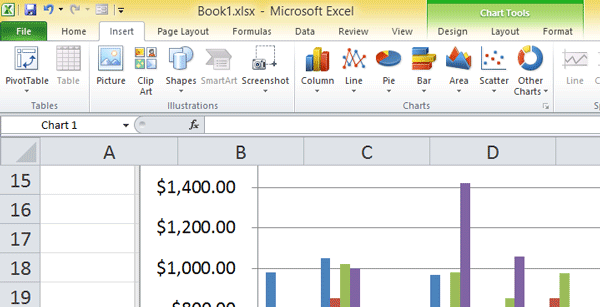
If you said: Chart Tools with three sub-tabs namely, Design, Layout and Format, you are spot-on. The chart object in the main worksheet is currently selected, but if the user clicked away from the chart, the contextual tabs will disappear.
Contextual tabs, which appear when an element that you wish to edit is selected, should be the first place you look for options and settings relating to the selected element.
* Identifying Groups on the Ribbon
As you worked your way through the different tabs and functions associated with each in the section above, you may have noticed how functions associated with each tab are grouped together. Each group has a name that best describes the functions contained in that specific group.
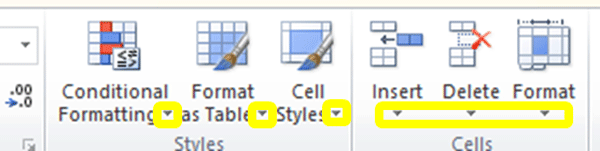
Some items in a group represent a single function, for example, the Copy button in the Clipboard group (under the Home Tab). Some items in a group provide you with more options to choose from, for example the Conditional Formatting button in the Styles group.
You are usually able to tell if more options are associated with a single function by looking out for a tiny down-pointing arrow either below or to the right of the function’s button (see circled in yellow in screenshot below):
Groups are separated by a vertical borderline to the right of each group. The name of the group, which appears centered at the bottom of the group, tells you more about the type of functions you will find in that group.
Real estate on the Ribbon is tight, and there are only that many icons/buttons that can fit into a group. If the options you are looking for do not appear in the group, you can access more options if the group has a dialog box launcher. All groups do not have this option and it is quite small so need some careful detective work to find.
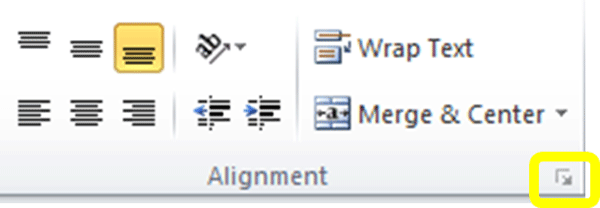
The screenshot below is of the Alignment group. The dialog box launcher is circled in yellow. When you click the dialog box launcher, the Format Cells dialog box appears with more detailed options on setting cell alignment:
Open a worksheet and see how many dialog box launchers you can find on the Ribbon. Click a few and examine the additional options they offer.
* Show/Hide the Ribbon
Although the Ribbon is hidden by default in Excel 2013 and 2016, only displaying the tabs at the top of the screen, you can still show/hide the body of the Ribbon. In Excel 2010 the Ribbon is still displayed by default.
To hide the Ribbon if it is getting in the way of your creativity:
1. Click on the minimizer symbol at the top right-hand corner of the worksheet (circled in yellow in the screenshot below):
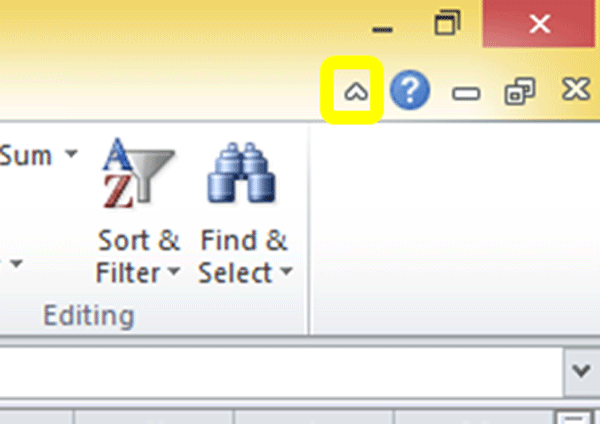
2. To redisplay the Ribbon, click on the same icon again.
A second method to hide the Ribbon is:
1. Right-click anywhere on the Ribbon.
2. Select Minimize the Ribbon from the menu list.
Surprisingly, right-clicking the tab area at the top of the Ribbon when it is hidden (or minimized) will not give you an option to redisplay the Ribbon!
QUICK TIP:
For all the shortcut groupies out there, you can hide and display the Ribbon by holding down the Control key on your keyboard and pressing the F1 key.
- CTRL+F1 to show or hide the Ribbon.
Woohoo! Now that you have done the tutorial:
Test your Excel skills with the corresponding FREE Online Multiple Choice
Excel Using the Ribbon Test
TRY THE NEXT TUTORIAL:
Customizing the Quick Access Toolbar in Excel Tutorial
TRY THE NEXT TEST:
Customizing the Quick Access Toolbar in Excel Test